
Introduction
Removing tire marks from a sealed surface without dulling the sealer means using cleaners and pads that lift the mark without damaging the seal. Start with a light cleaner labeled for concrete sealers and test in an inconspicuous spot first. Work in small areas and use gentle motions to avoid abrasive wear.
Choose non-aggressive pads such as soft sponge, microfiber, or non-woven alternatives, and avoid harsh scrubbing or very aggressive tools. Always check the product label, manufacturer instructions, and local rules for allowed cleaners and pad textures, and rinse thoroughly after treatment to minimize residue and protect the sealer. If in doubt, consult the cleaner’s guidance and perform a small test before proceeding widely.
Key takeaways
- Understand tire marks form and how sealers trap residue under gloss.
- Choose cleaners and pads by sealer type, avoiding agitation that dulls finish.
- Test patch in inconspicuous area before full treatment to gauge impact.
- Use light passes with compatible pads; pressure should stay steady.
- Wear eye protection, gloves, and mask when dust or fumes are possible.
- Document findings and results to refine future cleaning without harming sealer.
Table of Contents
- Introduction
- Key takeaways
- Why Tire Marks Form and How Sealers Can Get Dulled
- Sealer Types and Their Relative Vulnerability
- Cleaner Types: What to Use and What to Avoid
- Pad Choices and Abrasiveness Explained
- Matching Cleaner Chemistry to Pad Type and Sealer
- Test Patch Protocol and Visual Checkpoints
- Machine Technique, Manual Methods, and Ergonomics
- Tools, Materials Checklist and PPE
- Conclusion
- FAQ
Why Tire Marks Form and How Sealers Can Get Dulled
Tire marks come from different sources, including rubber transfer, surface scuffs, and embedded grime. Each type behaves differently on concrete and sealers. Abrasion from traffic and cleaning actions can dull gloss when paired with aggressive chemistry.
Understanding the distinction helps you choose the right approach. The goal is to remove the mark without stripping or hazing the sealer’s finish. Check labels and manufacturer guidance if you are unsure about compatibility.
Types of tire marks to identify
Tire marks on your sealed surfaces aren’t all created equal. Knowing the type helps you choose the right cleaner and method.
Rubber transfer: These are surface-level, like a sticker that’s stuck then peeled off. They’re easy to remove with the right cleaner.
Surface scuffs: These are light scratches in the sealer film, not deep enough to reach the substrate. A gentle cleaner and pad should do the trick.
Embedded grime: This is when rubber has gotten into tiny pores or cracks in the sealer. It’s harder to remove but still possible with the right approach.
How sealers lose gloss
A sealer’s gloss is like a mirror – it reflects light to give that shiny look. Here’s how tire marks can dull it:
Mechanical abrasion: This is when something scrapes the surface, changing its texture. Think of it like sandpaper on glass – it roughs up the smooth surface, scattering light instead of reflecting it.
Tire marks can cause this if they’re deep or you scrub too hard with an abrasive pad.
Chemical attack: Some cleaners have strong chemicals that can break down the sealer film. This alters the surface, making it less reflective and dulling the gloss.
Even mild cleaners can do this if left on too long or used too frequently.
Sealer Types and Their Relative Vulnerability
Sealer families break into film-forming and penetrating. Film-formers lay a visible film on the surface and can be more sensitive to abrasion, chemical cleaners, and UV exposure. Penetrating sealers soak in and leave less surface film, but they vary in how they react to moisture and weather.
Knowing this helps you pick gentler approaches for fragile surfaces and avoid harsh cleaners or scrubbing. When in doubt, check the label or datasheet for recommendations and test a small area first.
Film-forming sealers (acrylics, urethanes, etc.)
These sealers sit on top of your surface. They can be abraded or softened by harsh cleaners and pads.
Gentle is key here. Use mild cleaners and soft pads to avoid dulling the sealer.
Think of it like a fresh paint job. You wouldn’t use steel wool on that, would ya?
Epoxy and high-build coatings
These are tough cookies but they can still show dulling if you’re too rough.
Avoid aggressive abrasion or strong solvents. They can leave your sealer looking lackluster.
Imagine sandblasting a shiny new car. Not pretty, huh?
Penetrating and impregnating sealers
These sealers soak into the surface. They’re less likely to dull but can discolor.
Watch out for transferable rubber or reactive cleaners. They can leave stains.
It’s like a dark shirt on a sunny day. It’ll show every little mark.
Cleaner Types: What to Use and What to Avoid
Common cleaner chemistries include pH-neutral detergents, mild alkaline cleaners, solvent-based rubber removers, and specialty rubber cleaners. Each has a role, but they differ in risk to the sealer and in how well they tackle rubber residue. Choose a cleaner with clear guidance for use on sealed concrete and follow it closely.
Avoid cleaners that are known to chew into sealers or leave residues that can cloud gloss. Always confirm compatibility with your sealer by checking the label or manufacturer instructions. If you cannot confirm, test in a small inconspicuous area first.
Safer, sealer-friendly cleaners
When it comes to removing tire marks without dulling your sealer, you’ve got to play it safe. Stick with cleaners that won’t damage or strip your sealant.
The safest bets are pH-neutral detergents. They’re mild and won’t harm most sealers. Mildly alkaline cleaners can also work, but avoid anything too strong.
Specialty rubber cleaners formulated for coated surfaces are another good choice. They’re designed to tackle tire marks without hurting your sealer. Always check the product label before you buy.
Risky cleaners and when to avoid them
Some cleaners might seem like they’d do the trick, but they can actually damage your sealer. Here’s what to steer clear of:
- Strong acids: These can eat away at your sealer, dulling its gloss and even damaging it.
- Highly aggressive solvents: They’re designed to dissolve tough stuff, but they can also strip or damage your sealer.
- Cleaners not meant for coated surfaces: If it’s not designed for sealed floors, it could still harm your sealer.
- Harsh scrubbing with these cleaners: Even if you’re using a safer cleaner, too much elbow grease can dull your sealer.
Before you use any cleaner, especially the riskier ones, test it on a small, hidden area first. And always consult your sealer manufacturer’s guidelines if you’re unsure.
Pad Choices and Abrasiveness Explained
Pad materials range from microfiber and nylon to natural fibers. Each material has a different level of aggressiveness, from gentle to heavy-duty. Match the pad to the type of mark and the sensitivity of the sealer you are protecting.
Non-abrasive pads are typically used for delicate work, while more aggressive pads target embedded grime. Guard against overworking the surface by sticking to lighter passes and probing with tests. Verify pad suitability with product guidance if available.
Non-abrasive and finishing pads
When it comes to removing light tire marks without dulling your sealer, you want a pad that’s gentle yet effective. That’s where white or soft microfiber/polishing pads come in.
These pads are made for light-duty cleaning and polishing. They’re perfect for sensitive sealers like urethanes and acrylics. The key is to use them with the right cleaner, as mentioned earlier.
Remember: Just because they’re soft doesn’t mean they can’t get the job done. Test a small area first to ensure they remove the marks without damaging your sealer’s gloss.
Medium-duty scrubbing pads
For light scuffs and more stubborn tire marks, you might need something with a bit more bite. That’s where medium-density nylon or blend pads come in.
These pads are great for tougher jobs without being too aggressive. They’re perfect for use on epoxy coatings and high-build sealers that can handle a bit more scrubbing.
Caution: Always test these pads on a small, hidden area first. While they’re not as harsh as heavy-duty pads, they can still potentially dull sensitive sealers if used incorrectly.
Heavy-duty pads and abrasive discs
For really tough tire marks or resilient substrates where sealer replacement is acceptable, you might need to bring out the heavy hitters – heavy-duty pads and abrasive discs.
These are designed for serious scrubbing power. They’re great for concrete, stone, and other hard surfaces. But remember, with great power comes great responsibility. These can easily dull or even remove film-forming sealers like urethanes and acrylics if not used carefully.
Use these sparingly: Only use them when absolutely necessary and always test on a small area first. It’s better to spend more time with lighter pads than risk damaging your sealer.
Matching Cleaner Chemistry to Pad Type and Sealer
Pair a gentle cleaner with a soft pad first, then evaluate the result before considering escalation. If marks persist, consult manufacturer instructions for both cleaner and sealer to guide the next step. The goal is to balance effectiveness with preservation of the sealer’s appearance.
Always follow the recommended sequence and review any cautions on product data sheets or labels. When in doubt, test and document the outcome in a small area before proceeding widely. Respect local rules and safety notes during testing.
Escalation steps if initial cleaning fails
If your first attempt at removing tire marks doesn’t work, don’t worry. There’s a safe way to escalate your approach.
First, test patch an area with the next level of cleaner and pad. This helps you see if it’s too harsh before you tackle the whole job.
If that doesn’t work, try increasing dwell time or agitation. Let the cleaner sit longer on the surface or use a bit more elbow grease.
Finally, if needed, step up to a more aggressive pad, but keep an eye on your sealer. If it starts looking dull or feels soft, stop and consult a pro.
When to stop and consult a pro
Knowing when to call it quits is just as important as knowing how to clean. Here’s when to throw in the towel and pick up the phone.
If you start seeing visual dulling on your sealer, stop immediately. You don’t want to damage it further.
Also, if the coating starts feeling soft or gummy, that’s a sign you’re doing too much. Back off and call in a pro.
Lastly, if you’ve escalated your cleaning efforts but the tire marks still won’t budge, it’s time to consult a professional. They have tools and knowledge you might not have access to.
Test Patch Protocol and Visual Checkpoints
Use a small test patch to verify cleaner and pad compatibility with your sealer. Apply the cleaner and pad to a discreet area and observe the outcome. Look for improvements without new dulling, hazing, or uneven patches.
Visual cues of success include balanced gloss and even texture; cues of failure include new dull spots or color changes. If outcomes are not acceptable, stop and reassess with alternative cleaners or pads. Keep notes of what you tested and the results.
Step-by-Step Test Patch Workflow
Before you start cleaning your entire surface, follow this test patch workflow to ensure the cleaner and pad won’t damage your sealer.
- Choose a small, hidden area: Select an out-of-sight spot for your test patch.
- Start with the mildest cleaner: Begin with the least aggressive cleaner from your safer options list.
- Use the least abrasive pad: Pair it with a non-abrasive or finishing pad to minimize risk.
- Document before and after: Take clear photos of the area before and after cleaning to track progress.
- Apply cleaner and scrub gently: Follow the cleaner’s instructions, applying it evenly and scrubbing lightly with your chosen pad.
- Rinse thoroughly: Remove all cleaner residue with clean water. Any leftover cleaner can damage the sealer over time.
- Let it dry completely: Allow the area to dry for at least 24 hours before assessing results. This gives the sealer time to recover.
- Inspect the test patch: Check if the tire marks are gone, and there’s no loss of gloss or texture change.
Quick rule: If your test patch passes, you’re good to go. If not, escalate your cleaning efforts as outlined earlier in this guide.
Visual and Tactile Checkpoints
After completing your test patch or full cleaning job, use these visual and tactile checkpoints to ensure you’ve achieved the desired results without damaging the sealer.
- Check for remaining marks: Look closely at the cleaned area. Tire marks should be completely gone. Any residue means you need to clean again or escalate your efforts.
- Inspect gloss level: Compare the cleaned area with an untouched section. There should be no loss of gloss, indicating the sealer is still intact.
- Feel for texture change: Run your fingers over the surface. It should feel smooth and even, with no rough patches or soft spots.
- Look for whitening: Check if there’s any white residue or discoloration. This could indicate the sealer has been damaged or removed.
- Test for softness: Gently press on the surface. It should feel firm and resilient, not spongy or soft.
Quick rule: If your cleaned area passes all these checkpoints, you’ve successfully removed tire marks without dulling the sealer. If not, re-evaluate your cleaning process and consider consulting a professional.
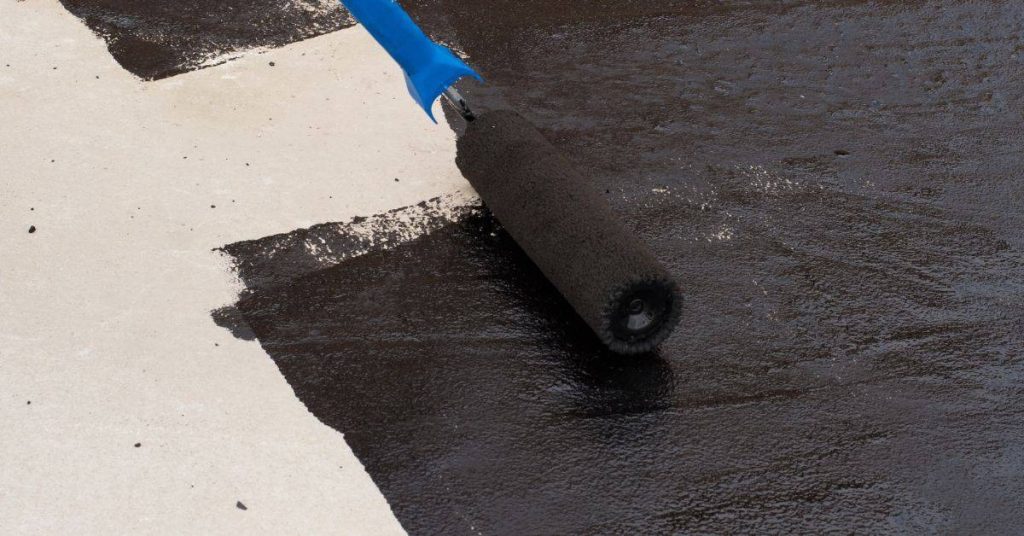
Machine Technique, Manual Methods, and Ergonomics
Hand scrubbing works well for light marks and delicate sealers, reducing the risk of overworking a surface. A single-disc or orbital machine can cover more area when used with a soft pad and gentle cleaner. Use short passes and light pressure, focusing on the mark rather than the whole surface.
Rinse frequently to avoid residue buildup and check for changes in gloss as you go. Ergonomics matter on DIY jobs, so plan your workflow to minimize Repetitive strain and maintain control. Follow manufacturer guidance for any equipment used.
Hand methods for delicate sealers
For sensitive sealers, manual cleaning is your best bet. Grab a soft microfiber pad or a gentle-bristled brush.
Dampen the pad or brush with your chosen cleaner. Gently blot the tire marks, using just enough pressure to lift the stain without damaging the sealer.
Never scrub. Scrubbing can dull the sealer’s gloss and even scratch it.
Work in small sections, rinse with clean water, then dry thoroughly. Patience is key here.
Machine methods for tougher marks
When manual cleaning won’t cut it, bring in the big guns – but gently. Use a low-agitation machine like an orbital or single-disc polisher.
Attach a medium-duty scrubbing pad or an appropriate abrasive disc. Start with light pressure and short passes over the marks. Think of it as tickling the stain off, not sanding it away.
Never hold the machine in one spot. This can overheat the sealer and cause damage.
Check your progress frequently. If the mark is lifting easily, great! If not, you might need to escalate your cleaning efforts, but remember – always start gentle and work your way up.
Tools, Materials Checklist and PPE
Keep a practical list of cleaners, pads, applicators, rinsing gear, and disposal or reuse options. Include protective gear such as gloves and eye protection to handle cleaners safely. Organize items so you can access them without reorienting the work area.
Choose disposables and reusable items based on the task and cleaning regimen. Verify that each item is compatible with your sealer and environment by checking product labels and instructions. Maintain a clear workspace and follow safety guidelines throughout the job.
Essential PPE and Safety Steps
Before you start, make sure to follow this checklist for your own protection.
- Gloves: Wear chemical-resistant gloves to protect your hands from harsh cleaners.
- Eye Protection: Use safety glasses or goggles to shield your eyes from splashes and debris.
- Respirator: If using strong chemicals, wear a respirator with a particulate filter to avoid inhaling fumes.
- Ventilation: Ensure the area is well-ventilated. Use fans if necessary.
- Clothing: Wear old clothes that you don’t mind getting dirty or stained.
- Skin Exposure: Avoid contact with skin. If contact occurs, rinse immediately with water.
- Cleaner Storage: Keep cleaners in their original containers and store them according to the manufacturer’s instructions.
- Disposal: Do not mix different types of cleaners together. Dispose of each cleaner separately as instructed on its label.
Quick rule: Always follow safety guidelines listed on product labels.
Environmental Handling and Disposal
Properly contain and dispose of spent cleaning solutions to protect the environment.
- Containment: Use trays or drop cloths to catch any runoff. Dispose of these materials responsibly.
- Label Instructions: Follow disposal instructions on product labels. Some cleaners may need special handling.
- Local Regulations: Check local regulations for proper disposal methods in your area.
- Avoid Dumping: Never dump cleaning solutions down drains or onto the ground.
- Recycle Containers: If possible, recycle empty cleaner containers according to local recycling guidelines.
- Waste Collection: Use designated waste collection services for hazardous materials if required in your area.
Quick rule: Always prioritize safety and environmental responsibility when disposing of cleaning solutions.
Conclusion
Submit? No—final note: pick the cleaner and pad carefully, test small first, and work gradually to protect the sealer’s shine and your safety.Sorry; that stray tag is not allowed. Let’s deliver clean HTML only.
The core idea is simple: protect the sealer while you lift tire marks by matching cleaner chemistry to your pad and sealer, test patch before any full-area work, and keep the work controlled and safe so you don’t dull the gloss or cause damage you can’t undo.
To move from theory to action: test a small patch in an inconspicuous corner, confirm the cleaner and pad combo doesn’t dull or etch the sealer, then use a light, controlled pass with the machine or perform a careful manual scrub. choose a mild pad and the gentlest effective cleaner, follow the test results, cover only the area with marks, and rinse and re-check frequently. Keep your body position steady, gloves on, eye protection in place, and take breaks to avoid fatigue.
Common mistakes to avoid: using an aggressive cleaner or hard pad on a delicate sealer, skipping the test patch and applying products broadly, and rushing the process which invites streaks or patchy dulling. Safety rules: work in a well-ventilated area, wear PPE, and stop immediately if you see unusual discoloration, hasty rubbing, or heat buildup. If you’re unsure about the sealer type or the cleaner, or if the marks are stubborn after a couple of patches, call a pro rather than guessing and risking a costly mistake.
FAQ
Can I use a regular household cleaner to lift tire marks without dulling the sealer?
Start with the mildest cleaner on the label. Always test on a small patch first and follow the manufacturer’s instructions. If in doubt, check the label for pH range and recommended surfaces.
What kind of pads won’t dull the sealer while removing tire marks?
Choose pads that are non-aggressive or only moderately abrasive. Foam or microfiber pads are usually safer on sealed surfaces. Avoid pads with hard abrasive surfaces or metal components.
How should I run the machine to protect the sealer during cleaning?
Use light to medium contact and steady, overlapping passes. Keep a comfortable pace and let the pad do the work; don’t press hard. If the pad wears quickly or you see the sealer dull, stop and reassess.
What if the tire marks won’t come out after a few passes?
Don’t oversaturate or keep grinding the same spot. Try a milder cleaner or a less aggressive pad, then test again. If it still won’t lift, check product instructions or local guidance before proceeding with further remedies.