
Introduction
Cracks at stucco corners are stress-related failures at the joints where surfaces meet. They form when the wall moves or settles and the outer layer can’t flex enough. Addressing them starts with understanding where the stress concentrates and how the mesh supports the patch.
Repair technique should reinforce corners with proper mesh at joints and follow with a compatible coat. Check local rules and product instructions for mesh size, embedment, and waterproofing steps. Keep the area dry during work and match textures to minimize future movement.
Key takeaways
- Recognize corner stress points indicate substrate movement; verify with moisture and attachment checks.
- Use proper mesh/lath placement; install around corners with continuous reinforcement to reduce cracking.
- Prepare substrate: clean, dry, and sound; patch defects before stucco application.
- Apply crack repair workflow: assess, isolate, embed mesh, recoat, cure, then monitor.
- Prevent recurrence by detailing mesh around corners and using control joints where needed.
- Safety: follow PPE, scaffold rules, and manufacturer guidelines; stop work if cracking worsens.
Table of Contents
- Introduction
- Key takeaways
- Why Stucco Cracks at Corners: Root Causes
- Types of Corner Cracks and What Each Pattern Indicates
- Mesh, Lath, and Corner Reinforcement: Selection and Correct Placement
- Preparing Substrate and Corner Details Before Applying Stucco
- Repair Workflow to Fix Cracks and Prevent Recurrence
- Preventive Installation Practices to Minimize Recurrence
- Tools, Materials Checklist, and Material Specs Explained
- Maintenance, Visual Checkpoints, and When to Call a Professional
- Conclusion
- FAQ
Why Stucco Cracks at Corners: Root Causes
Corner areas experience concentration of movement and load because the surrounding materials work at different rates. The combination of rigidity, detailing, and substrate interaction makes cracks more likely where walls meet corners.
Diagnostics should separate installer error, thermal and hygric movement, and structural causes. When checking specs, verify labels, product data sheets, and manufacturer instructions to confirm intended performance.
Stress Concentration and Movement at Corners
External corners in stucco construction are natural stress risers due to their geometry. The meeting of two planes creates a point where forces can concentrate, leading to increased pressure on the material.
The differential movement between these planes also contributes to stress buildup. Stucco is rigid and cannot accommodate this movement without cracking.
Lack of flexible relief at corners exacerbates this issue. Corner beads or expansion joints are designed to absorb some of this movement, but if they are not installed or are insufficient, cracks can form.
High stress at external corners can lead to cracking. A visual inspection for signs of stress, such as hairline cracks or bulging, is a quick check. For a more thorough assessment, inspect corner geometry and ensure flexible relief is present.
Substrate, Framing, and Attachment Problems
Issues with the substrate, framing, or attachment can cause cracks at corners. Poorly installed or inadequate sheathing can lead to gaps or voids that allow movement and stress concentration.
Framing deflection or improper spacing can also create stress risers at corners. Inadequate fastening or missing weather-resistive layers can further exacerbate these problems.
Visible signs of problems, such as nail pops, gaps, or missing layers, indicate that there may be underlying issues with the substrate, framing, or attachment. A professional check involves examining sheathing for gaps, voids, or delamination; checking framing for deflection or improper spacing; and verifying proper fastening and weather-resistive layers.
If problems are found, repair or replace affected materials and ensure proper installation techniques are followed to prevent recurring cracks.
Environmental and Installation Factors
Temperature swings, moisture cycles, poor curing, and incorrect mixes or application techniques can lead to recurring cracks in stucco corners. Extreme weather conditions can cause the material to expand and contract, creating stress that leads to cracking.
Improper curing allows moisture to remain trapped in the stucco, leading to discoloration and potential cracking. Incorrect mix ratios or application techniques can also result in weak spots that crack under stress.
A quick check involves looking for signs of improper curing, such as incomplete drying or discoloration; checking for inconsistent application or mix issues. A professional inspection reviews weather history and the construction timeline to identify potential environmental impacts and ensures proper application and mix consistency.
If environmental factors or installation issues are suspected, investigate further to determine the specific cause and extent of the problem, allowing for targeted repairs and prevention strategies.
Types of Corner Cracks and What Each Pattern Indicates
Crack patterns help identify underlying issues such as movement, moisture, or poor detailing. Hairline, vertical, diagonal, stepped, and corner splits each suggest different stresses or failures at the corner zone.
Use the pattern to guide repair urgency and method. Different patterns point to different remedies, so match technique to the observed crack type and context.
Stucco Crack Types
Cracks in stucco corners vary by width and depth, each indicating a different cause:
- Hairline cracks, typically less than 1/8 inch (3 mm) wide and not penetrating through the stucco thickness, usually result from surface shrinkage due to curing or minor settlement. Monitor these for progression but urgent repair may not be necessary.
- Wider cracks or those that penetrate through the stucco thickness suggest deeper failure, potentially indicating structural issues. Urgent repair is needed to prevent further damage and potential structural problems.
Timing and pattern diagnostics (early vs delayed cracking)
The timing of crack appearance after installation provides valuable insights into their causes. This helps prioritize repairs and identify underlying issues.
Cracks appearing within a few weeks to a few months post-installation are often due to curing shrinkage, settlement, or initial load-induced movement. While these should be monitored, urgent repair might not be necessary immediately.
Delayed cracking, occurring more than a year after installation, may indicate underlying issues such as structural movement, moisture intrusion, or environmental factors. Prompt investigation and repair are crucial to prevent further damage.
Mesh, Lath, and Corner Reinforcement: Selection and Correct Placement
Reinforcement options vary in material and geometry, and selecting the right combination helps control corner stress. The goal is to maintain crack resistance without introducing incompatible movement.
Prioritize material compatibility and follow manufacturer instructions. Check product labels and data sheets to confirm suitable mesh, lath, and corner beads for the stucco system.
Mesh and Lath Types — Pros and Cons
The choice between fiberglass mesh, galvanized metal lath, and paper-faced beads significantly impacts the durability of your stucco finish.
Pros
- Fiberglass Mesh: Flexible, resistant to cracking, and lightweight.
- Galvanized Metal Lath: Rigid, provides excellent support, and fire-resistant.
- Paper-Faced Beads: Offer flexibility, easy installation, and a smooth finish.
Cons
- Fiberglass Mesh: Can be more expensive and may not provide the same level of support as metal lath.
- Galvanized Metal Lath: Heavier, more difficult to install, and can corrode if not properly maintained.
- Paper-Faced Beads: Less durable than other options and may not be suitable for all applications.
Choose the appropriate mesh or lath based on your specific needs. For flexibility and resistance to cracking, consider fiberglass mesh or paper-faced beads. If you need rigid support and fire resistance, evaluate galvanized metal lath. Always review manufacturer’s instructions for specific product use cases and ensure material compatibility with substrate, paint, and other finishes.
Corner Bead and Reinforcement Options
The choice between rigid and flexible corner beads is crucial to minimize cracking due to movement at corners. Review local building codes for specific requirements.
Rigid Corner Beads: Suitable when minimal movement is expected, providing a solid support structure for your stucco finish.
Flexible or Reinforced Corner Details: Ideal when significant movement is anticipated. These options accommodate expansion and contraction, reducing the likelihood of cracking at corners.
Assess your building’s movement potential to determine the most appropriate corner reinforcement option. Always follow manufacturer’s guidelines for installation and maintenance.
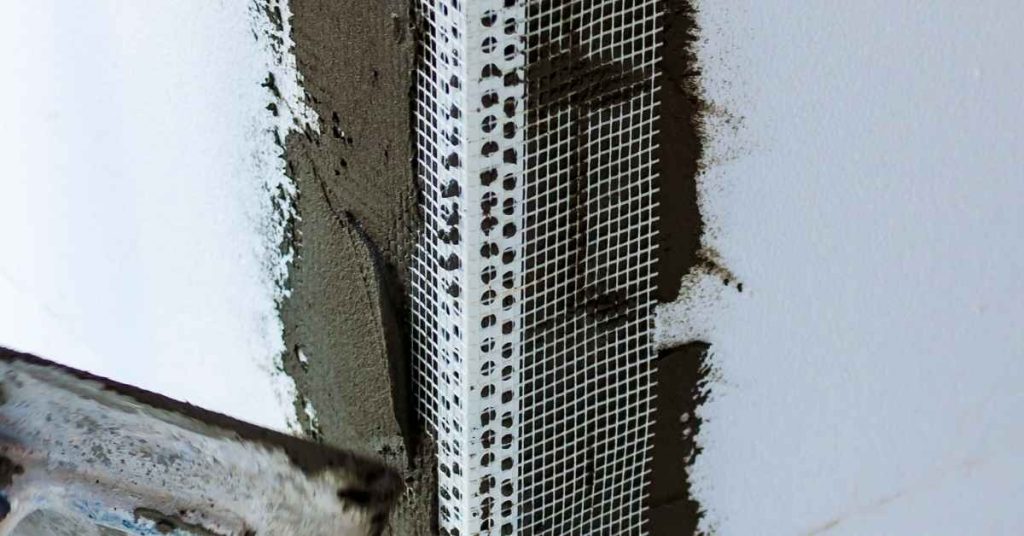
Correct Mesh Placement and Overlap at Corners
Proper mesh placement distributes stress evenly, preventing cracks. Always review manufacturer’s instructions for specific product application guidelines.
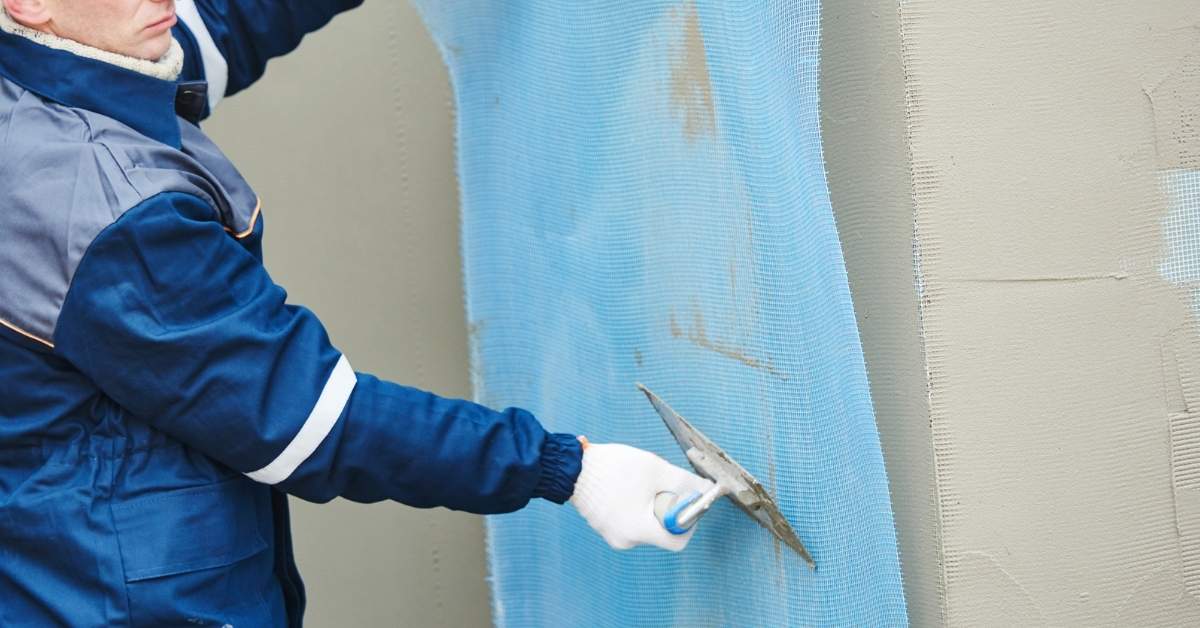
When embedding mesh in base coats, follow manufacturer’s recommendations for embedding depth to ensure adequate support. When lapping reinforcement through the corner, overlap mesh by at least 2 inches (5 cm) on each side of the corner, following product guidance.
Ensure your chosen mesh is compatible with your substrate and other materials used. Properly tying mesh into adjacent faces helps distribute stress evenly, further reducing the likelihood of cracking at corners.
Preparing Substrate and Corner Details Before Applying Stucco
Pre-application checks should include weather barrier placement, flashing, and proper termination of substrates. Ensure the corner details are clean, dry, and ready for coating, with no loose material.
Stress the correct sequencing and inspection points during prep. Verify that weather-resistive barriers and flashing meet the project requirements before application begins.
Sheathing, weather resistive barrier, and flashing details
The weather resistive barrier (WRB) and flashings at corners play a crucial role in preventing moisture-driven movement and decay that can lead to stucco cracking.
Ensure the WRB is continuous across corners. Inspect for gaps or tears and repair as necessary. Flashings should be securely attached behind corners to direct water away from the substrate.
Pro Tip: Verify WRB continuity and correct flashing installation behind corners before applying stucco. If issues are found, address them promptly to prevent future problems.
Lath fastening, attachment, and blocking at corners
A stable substrate is key for a successful stucco application. At corners, this stability comes from proper lath fastening, attachment, and blocking.
Inspect corner lath for proper overlap and secure attachment. The lath should be compatible with the substrate and securely fastened to it. If lath is loose or improperly attached, reattach or replace as necessary.
Common Mistake: Improper lath attachment at corners can lead to movement and cracking. Ensure lath is secure and compatible with the substrate before proceeding.
Planning control joints and isolation at corners
Control or movement joints and isolation details should be considered at corners to relieve stress and prevent cracking. Corners should not bear the brunt of building movement.
Confirm planned joint locations align with expected building movement patterns. Plan for control or movement joints and isolation details at strategic locations to relieve stress and accommodate natural building movement.
Pro Tip: Re-evaluate and adjust planned joint locations if they do not align with expected movement patterns. Proper planning can prevent future cracking issues at corners.
Repair Workflow to Fix Cracks and Prevent Recurrence
Start with diagnosis to identify whether a surface patch, patch over mesh, or full corner rebuild is needed. Choose a repair approach that aligns with the crack type and location.
End with quality checks to prevent reappearance. Establish a clear handoff between assessment, repair work, and follow up inspections to verify performance.
Diagnosing the root cause before repairing
Before attempting any repairs, it’s crucial to understand what caused the cracks in your stucco corners. This understanding will guide you towards the appropriate repair scope.
Inspect the crack pattern: Different patterns can indicate different causes. For example, horizontal cracks might suggest settlement issues, while diagonal cracks could point to structural movement.
Probe the substrate: Gently probe the cracked area with a screwdriver or similar tool to check for softness or hollowness, which may indicate moisture damage or other underlying problems.
Check flashings and control joints: Ensure that these elements are properly installed and functioning. Improperly installed or damaged flashings and control joints can lead to water intrusion and subsequent cracking.
Repairing Hairline and Moderate Stucco Cracks
Follow this sequence to effectively repair hairline and moderate cracks in your stucco corners.
- Thoroughly clean the cracked area using a wire brush or similar tool. This ensures proper adhesion of the patching material.
- If necessary, undercut the crack to create a V-shaped groove. This helps lock the repair material in place and prevents future cracking. Check if the crack is wider than 1/8 inch (3mm) before proceeding with undercutting.
- Embed reinforcement, such as fiberglass mesh or alkali-resistant tape, into the patching material. This adds strength and flexibility to the repair.
- Apply compatible patching materials, such as stucco repair mortar or elastomeric caulk, following the manufacturer’s instructions. Ensure the material is suitable for your specific stucco system by checking product labels or consulting with a professional.
- Finish and cure the repaired area according to the manufacturer’s recommendations. This may involve smoothing the surface, applying a sealant, and allowing the patch to dry and cure properly.
When to remove and reinstall corner reinforcement or full assemblies
In some cases, a partial patch may not be sufficient to address the root cause of the cracking. This section explains when it’s necessary to remove stucco and repair underlying issues.
Extensive, recurring, or structural cracks: If cracks are extensive, keep reappearing, or indicate structural problems (such as diagonal cracks), it’s likely that a partial patch will not solve the issue. In these cases, you should remove the stucco, repair any damaged lath, weather resistive barrier (WRB), and framing, then reinstall corner reinforcement.
However, if cracks are isolated and localized, a partial patch repair may be sufficient. Monitor the area for recurrence to ensure that the repair is holding up over time.
Preventive Installation Practices to Minimize Recurrence
Apply best practices for staging, curing, and coordinating trades to reduce corner cracking risk. Plan detailed sequences that respect material behavior during cure and temperature changes.
Highlight common installer mistakes to avoid, such as improper terminations or rushed work at corners. Use checklists to maintain consistency across crews.
Mixing, application technique, and curing control
Consistent mixing of stucco ensures even distribution of materials, reducing the risk of early cracking. Follow manufacturer guidelines for mix ratios to achieve the desired consistency.
Proper embedment of reinforcement mesh is crucial. Ensure the mesh is fully covered and embedded in the first layer of stucco (scratch coat) to provide adequate support and prevent cracking at corners.
Curing plays a vital role in minimizing shrinkage and early cracking. Follow recommended curing regimes, typically involving periodic misting or wetting of the stucco during the initial curing period, as specified by the manufacturer.
Regularly inspect the mix consistency, reinforcement placement, and curing schedule to ensure they meet standards and prevent common mistakes such as inconsistent mixing or insufficient embedment of reinforcement.
Sequencing with other trades and moisture management
Proper sequencing of trades is essential to prevent moisture intrusion and movement that can cause recurring cracks. Coordinate with window/door installers, roofers, and other relevant trades to ensure proper installation and integration of flashings, membranes, and transitions.
Correct installation of flashings at corners, windows, doors, and other openings is crucial for managing moisture intrusion. Inspect these areas visually to ensure they are properly installed and integrated with the stucco system.
Moisture management at roof/wall transitions is also critical. Ensure that proper membranes and flashings are in place to prevent water from entering and causing movement that may lead to recurring cracks.
Regularly inspect for signs of moisture intrusion or movement, and address any issues promptly by coordinating with the relevant trades. Proper sequencing, flashing, and moisture management will help prevent recurring cracks at stucco corners.
Tools, Materials Checklist, and Material Specs Explained
Transform typical utility lists into a practical DIY-friendly checklist. Focus on items you need to verify before starting, rather than fixed values.
Explain which material specifications to verify with manufacturers and codes. Emphasize checking compatibility and the accuracy of labels, data sheets, and installation guides.
Essential Tools for Corner Reinforcement and Repair
The right tools ensure a durable and effective corner detail in your stucco application.
- Tape Measure: Accurate measurement is crucial for proper mesh placement and overlap. Check it regularly to maintain accuracy.
- Utility Knife: For cutting mesh, paper, and other materials. Keep blades sharp for clean cuts.
- Stucco Mixer: A powerful mixer ensures a consistent mix. Regularly clean and maintain it to prevent clogging.
- Hawk and Trowel Set: For embedding mesh and applying stucco. Ensure trowels are the correct size for your application.
- Stucco Float: For finishing and smoothing the stucco surface. Check its condition before use to avoid damaging the finish.
- Power Drill (optional): For faster screw driving. Consider renting or borrowing instead of buying if it’s not a regular tool for you.
Materials to Verify and Standards to Check
The right materials, verified with local codes and manufacturer guidance, ensure durable corner details that meet regulations.
- Stucco Mesh: Verify type (expanded or woven) and size (16-24 gauge) for compatibility. Check manufacturer’s recommendations for overlap.
- Weather Resistive Barrier (WRB): Ensure it meets local codes and is compatible with your chosen stucco system. Check for proper flashing details at corners.
- Stucco Base Coat and Finish: Verify they are suitable for your climate and application method. Check manufacturer’s guidance on mixing ratios and application techniques.
- Corner Reinforcement: Ensure it is corrosion-resistant and meets local codes. Check manufacturer’s recommendations for attachment methods.
- Fasteners: Verify they are suitable for your substrate and meet local codes. Check manufacturer’s guidance on spacing and embedding depth.
Maintenance, Visual Checkpoints, and When to Call a Professional
Maintenance and visual checks help catch failing corners early. Use a simple monitoring checklist for homeowners and contractors to document changes and note signs that require a professional assessment.
Regular checks help prevent small issues from becoming larger repairs. For a quick cue, gently tap corners with a closed fist and listen for hollowness or detachment. If cracks widen beyond 1/8 inch or show signs of widening, contact a professional immediately, and a pro would inspect for hairline cracks, separation from walls, or crumbling texture.
Visual checkpoints and routine inspection tips
Regularly inspecting your stucco corners can help you catch potential issues early. Use this checklist to guide your inspections.
- Edge gaps: Check for any gaps between the corner bead and the wall. Gaps can allow water intrusion, leading to further damage if left unaddressed.
- Staining: Look for discoloration or stains on the stucco. These can indicate moisture issues that may require professional attention.
- Widening cracks: Monitor any existing cracks to ensure they are not growing in size. Widening cracks can signal underlying structural issues.
- Deflection signs: Gently push on the corners to check for any give or deflection. Excessive movement can indicate a problem with the lath or framing behind the stucco.
- Control joints: Ensure that control joints are intact and not cracking. Control joints help manage natural expansion and contraction of the stucco.
- Moisture meter check: Use a moisture meter to test the stucco for excess moisture. High readings can indicate water intrusion or improper curing.
- Flaking or peeling: Inspect for any flaking, peeling, or delamination of the stucco finish. These symptoms can signal underlying issues with the substrate or installation.
- Mold or mildew: Look for signs of mold or mildew growth on the stucco surface. The presence of mold can indicate a moisture problem that requires professional attention.
Quick rule: Perform monthly visual checks after installation or repair, and more frequently if you notice any issues or changes in your corners.
Red flags and when to seek structural or moisture experts
Certain signs indicate that professional help is needed to address stucco corner issues. Use this checklist to identify red flags.
- Repeating cracks: If cracks reappear after repair, it may indicate an underlying structural issue or improper repair technique. Consult a professional for assessment.
- Active water ingress: The presence of water behind the stucco can cause significant damage to the structure and should be addressed promptly by a building envelope specialist.
- Significant movement: Excessive movement or deflection in the corners can signal structural issues that require assessment by a structural engineer.
- Bulging or bowing: If corners appear to be bulging or bowing, it may indicate a serious underlying problem that requires professional attention.
- Musty odors: A persistent musty odor can indicate the presence of mold or mildew growth behind the stucco, which should be addressed by a professional.
- Wet insulation: If you notice wet insulation behind the stucco, it is a clear sign of water intrusion that requires immediate attention from a building envelope specialist.
Quick rule: Perform quarterly checks after installation or repair, and consult professionals immediately if you observe any red flags.
Conclusion
Ensuring crack resistance at stucco corners comes down to sound corner reinforcement, careful substrate prep, and disciplined maintenance. When you follow proper mesh placement, correct lath details, and a controlled repair workflow, you protect safety, durability, and the appearance of your home.
Begin with a simple, practical check: inspect for damaged or loose mesh and corner reinforcement, confirm the substrate is sound, verify the corner details before applying any stucco, and then follow a logical sequence for repairs and preventive work; work in a small area first, use the specified mixes and application order, and test movement after each step while keeping PPE on and the work area clean and dry. If any part of the inspection or repair feels uncertain, consult the manufacturer instructions or local rules before proceeding.
Common mistakes to avoid include rushing repairs without curing tests, skipping substrate or corner reinforcement checks, and applying new stucco over compromised work or improper flashing; always slow down to verify each layer adheres and cures correctly, and do not exceed recommended exposure or load at corners. Safety rules to follow include testing in a confined area first, keeping a clear work zone, using proper protective gear, and stopping if you see unusual cracking, loose material, or efflorescence that suggests moisture intrusion.
When the work exceeds your comfort level, or if you encounter persistent cracking after repair or signs of hidden damage, it makes sense to call a professional. A qualified pro can verify mesh and lath placement, confirm substrate readiness, and complete a durable, code-compliant repair plan; committing to professional help when needed protects safety, avoids costly mistakes, and supports a long-lasting finish. Stay deliberate, stay safe, and you’ll restore reliability and curb appeal with confidence.
FAQ
What are the best practices for mesh placement at stucco corners to prevent future cracks?
Position mesh to cover the corner with proper overlap into each wall plane, following the product label. Ensure the mesh lies flat without gaps or wrinkles and is embedded securely in the scratch and brown coats. Check manufacturer instructions for overlap requirements and any corner-specific reinforcement details.
How can I diagnose if a recurring crack is caused by corner stress or improper substrate prep?
Look for cracks that originate at the corner and run vertically or diagonally. Compare with other walls; if only the corners crack, substrate prep or reinforcement may be the issue. Review the substrate surface, cure history, and whether corner reinforcement was properly installed.
What steps should I take during repair to minimize recurrence at stucco corners?
Repair with the correct corner reinforcement and re-embed the mesh, ensuring proper adhesion to prepared surfaces. Restore the system in layers as specified by the product instructions and reinforce the corners with appropriate materials. Verify each layer is well bonded before applying subsequent coats.
Are there maintenance or inspection routines that help extend corner durability?
Conduct regular visual checks for new or widening cracks at corners and address promptly. Maintain proper drainage and wall detailing to reduce stress at corners. When in doubt, consult the product manufacturer guidance or a professional for assessment.