
Introduction
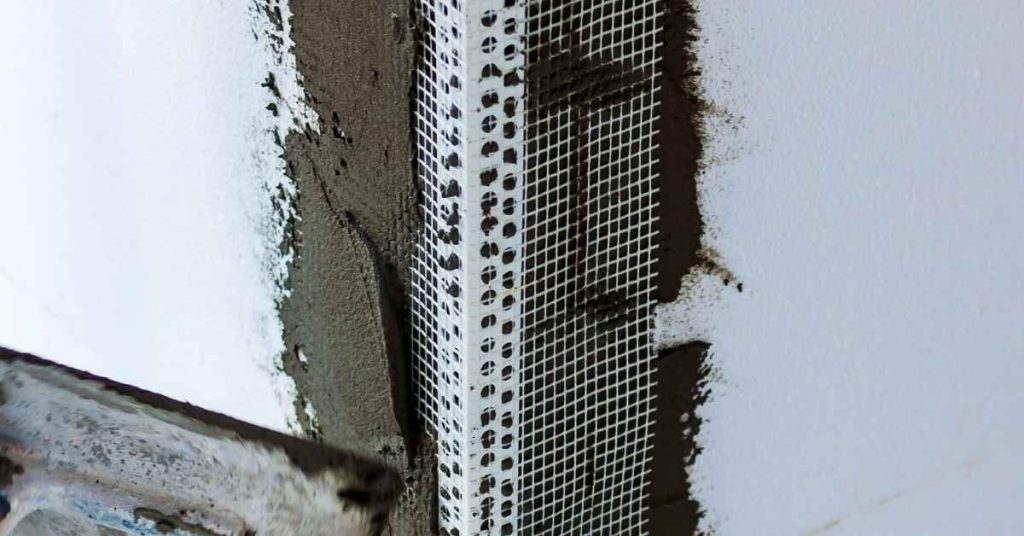
Proper mesh orientation and bead selection help prevent corner cracks around stucco windows. The way the mesh is aligned and the type of bead you use influence how the stucco moves at the casement and sill transitions. Choose options based on manufacturer guidance and local methods, then apply consistently.
Bead installation techniques matter, especially how you embed the bead and seal joints to allow for movement. Use the right caulk bead style to bridge gaps and keep water out, and follow clean, even application along the window edges. If you run into issues, recheck mesh orientation, bead fit, and the surface preparation before proceeding.
Key takeaways
- Proper mesh orientation around window headers prevents misalignment and crack propagation.
- Use compatible caulk beads to seal corners and allow movement without cracking.
- Install window beads by securing edges first and embedding mesh smoothly.
- Inspect for splash, moisture, or movement that signals hidden cracks needing repair.
- Plan maintenance with proactive inspections and timely repair to extend stucco life.
- Safety: wear eye protection, handle beads and lath with care at height.
Table of Contents
- Introduction
- Key takeaways
- Why Corner Cracks Form at Stucco Windows — Causes and Diagnostics
- Mesh Orientation: Principles and Best Practices
- Bead Types for Stucco Windows: Comparison and Selection
- Tools and Materials Checklist
- Step-by-Step Preventive Application Around Window Corners
- Repairing Existing Corner Cracks: Assessment to Fix
- Common Mistakes, Safety, and Quality Checkpoints
- Cost, Planning, and Maintenance for Long-Term Durability
- Conclusion
- FAQ
Why Corner Cracks Form at Stucco Windows — Causes and Diagnostics
Corner cracks around stucco windows come from a handful of common failure modes. Substrate movement from framing shrinkage or settlement often shows up as diagonal or stair-step cracks. Moisture intrusion and improper flashing can create patterns that track along the crack lines.
Diagnostic signatures help you tell the cause: movement tends to radiate from the sill or misalign with the reveal, while moisture-related cracks often pair with staining, efflorescence, or softness near the sill. Start with a practical inspection checklist: verify rough opening dimensions, check flashing and drainage, evaluate lath orientation and corner bead install, and note any prior patches that recurred. Look for roof leaks, gutter overflow, interior condensation, and exterior staining that follow cracks. Use moisture meters at crack lines and consider dye tests for water intrusion. Document with photos and scale, and note the season when cracks appear. Triage by pattern, flag installation errors, and plan repairs with mesh orientation and bead type in mind before moving ahead.
Thermal and structural movement
Cracks at stucco window corners can be caused by buildings moving around. This happens due to changes in temperature, the house settling, or framing shifting.
When it’s hot, materials expand. When it’s cold, they shrink. If your house isn’t expanding and contracting evenly, you’ll see cracks. Check if one side of the window is bulging while the other is flat – that’s a sign of uneven expansion.
As buildings age, they settle. This is normal, but too much settlement can cause cracks. Check for signs of settlement like sloping floors or doors sticking in their frames.
Framing movement can also cause cracks. If the window frame isn’t securely attached to the structure, it can shift and pull at the stucco, causing cracks. Make sure your framing is solid and properly anchored.
Water intrusion and bonding failure
Corners are where most water intrusion happens at stucco windows. Here’s why:
Poor flashing lets water seep in behind the stucco. Check if your window corners have proper, continuous metal or membrane flashing.
Wet substrate causes problems too. If you’re applying stucco over damp surfaces, it won’t stick right and can crack later. Before you start, check base compaction and ensure everything’s dry.
Adhesion loss is another culprit. Stucco needs a solid bond to the substrate. If it peels off, corners will crack. To test for this, gently tap the stucco at the corner with a hammer. If it sounds hollow or feels loose, you’ve got an adhesion problem.
Installation and material defects
The right materials and proper installation are key to preventing cracks at stucco window corners. Here’s what you need:
- Lath: Fiberglass or galvanized steel lath provides a strong base for your stucco. Look for 24- or 36-inch wide rolls, and ensure it’s rated for exterior use. Cheaper, narrower lath can warp and cause cracks.
- Stucco Base Coat: This goes on first. Choose a Type N or Type S mortar (check the bag). Type N is cheaper but less durable; Type S costs more but lasts longer. Avoid cheap, low-quality mixes that can crumble and crack.
- Stucco Finish Coat: This goes on top of the base coat. Again, choose Type N or Type S mortar. For a smooth finish, use stucco with fine aggregate. Cheaper, coarse aggregates can cause cracking and poor appearance.
- Window Lintel Bead: This keeps the stucco from falling out of the window opening. Choose one that’s compatible with your stucco mix (check manufacturer instructions). Cheap beads can break or rust, causing cracks and water intrusion.
- Expansion Joints: These prevent cracking due to movement. Use expansion joint tape or backer rod. Cheaper, inferior materials can fail, leading to cracking and water damage.
Pro tip: Always check product labels for compatibility with your specific project. Buy only what you need to avoid waste, and store materials properly to maintain quality (follow manufacturer instructions). When mixing, follow the 3:1 or 4:1 water-to-cement ratio for best results.
Mesh Orientation: Principles and Best Practices
Mesh orientation around windows should follow the opening so the wrap supports the jambs and continues onto the surrounding stucco. Align vertical and horizontal runs with the lath direction to maximize crack resistance. Ensure the mesh transitions smoothly across the opening without gaps.
Embed depth and overlap matter: embed enough to hold the mesh securely, with overlaps at seams and a wrap onto the bead or trim for continuous reinforcement. This setup helps control shrinkage cracks and transfers movement around openings. Always cross-check product instructions and local code requirements for mesh type and installation methods, and inspect for continuous mesh across corners, proper corner bead seating, and correct saddle detailing.
Horizontal vs. Vertical Orientation at Corners
The mesh’s orientation around window openings is crucial for controlling stress and preventing cracks. At corners, you have two options: running the mesh continuous across the opening or cutting/overlapping it.
Running the mesh continuous across the opening provides better crack resistance. It allows the mesh to move as a single unit, reducing stress concentrations at corners. This method is ideal for small windows or when using wider mesh sheets.
However, cutting/overlapping the mesh at corners can be necessary for larger openings or when using narrower mesh sheets. When overlapping, ensure the mesh runs vertically on the jambs and horizontally across the head to align with the lath or scratch coat direction. This helps distribute stress evenly.
Remember, always follow manufacturer guidelines and local codes for the best results.
Overlap, Lap Direction, and Anchoring Strategies
Proper overlapping of mesh sheets is vital to ensure continuity of reinforcement. The preferred lap direction is staggered, similar to shingling. This allows the mesh to overlap by at least 2 inches on each side of the seam.
When overlapping, make sure the mesh is embedded into the base coat deeply enough – typically around 3/4 inch. This ensures the mesh is well-anchored and can transfer loads effectively.
For added security, use anchoring techniques like embedding mesh ties or using mechanical fasteners. These help secure the mesh to the substrate, preventing it from pulling away under stress.
Always follow manufacturer recommendations for embedment depth, overlap width, and anchoring methods.
Mesh Interaction with Control Joints and Movement Joints
Control joints and movement joints are designed to manage stress and allow for natural expansion and contraction of the stucco. When installing mesh, it’s essential to consider these joints.
The mesh should not be continuous across control or movement joints. Instead, cut the mesh back about 1/2 inch from each side of the joint. This allows the joint to function correctly and prevents stress buildup that could cause cracking.
At movement joints, apply a flexible sealant before installing the mesh. The mesh should then be installed over the sealant, allowing it to move with the stucco. Always follow manufacturer guidelines for sealant application and mesh installation around joints.
Regularly inspect your work, ensuring no mesh is bridging control or movement joints. This will help maintain the integrity of your stucco system and prevent unwanted cracks.
Bead Types for Stucco Windows: Comparison and Selection
Bead types vary in how they perform at window corners. Metal beads, vinyl beads, paper-faced options, and flexible beads each have typical use cases around openings. Consider how each type interacts with your stucco system and movement demands.
Crack-control performance depends on movement accommodation and compatibility with the reinforcement. Look at installation nuances like substrate prep, alignment with rough openings, corner geometry, and securement methods. Check manufacturer recommendations and compatibility with your stucco system (cementitious or EIFS) before choosing. A practical flow helps: weigh cost, ease of installation, durability, and maintenance, then confirm with the stucco or masonry product maker.
Rigid corner beads (metal and PVC)
Rigid metal and PVC corner beads are ideal for straight, even window corners with minimal movement. They provide excellent support and help maintain sharp 90-degree angles.
Use them: when your rough openings are square and true, and you expect little to no movement from the structure or substrate.
Limitations: Rigid beads can’t accommodate much movement. If there’s significant thermal expansion, structural shifting, or an irregular substrate, they may crack or pop off.
Paper-faced and flexible beads
Paper-faced and flexible corner beads are great for coping with movement and irregular window jambs. The flexible nature allows them to bend and move with the substrate.
Use them: when you expect some movement, have an irregular opening, or want a bead that’s easy to cut and shape around complex corners.
Benefits: They’re forgiving on uneven surfaces, can accommodate minor shifts, and are often easier to install than rigid beads.
Integrated drainage and expansion-capable trims
Some corner bead trims incorporate drainage or expansion zones, helping to reduce water intrusion and movement-related failures. These features allow for better water management and increased flexibility.
Use them: in areas with high moisture content, significant thermal movement, or where you want added protection against water damage and cracking.
Benefits: They help prevent water buildup behind the stucco, reduce the risk of cracks from expansion and contraction, and can extend the lifespan of your stucco system.
Tools and Materials Checklist
This list covers what you need for prevention and repair around window corners, including when to choose mesh orientation versus bead types. Start with the basics and add specialty items as needed to match your system. Read product labels for specifics before buying.
Catalog the materials: mesh or lath, repair mortars or patch compounds, bonding agents, primers or sealers, caulk or sealants, and reinforcing fabrics if required. Compare bead options (vinyl, metal, fiberglass) and mesh orientation strategies for best crack control and flush look. Verify cementitious system specs, stucco thickness, moisture barriers, paint compatibility, and warranty terms per manufacturer guidance.
Materials to prepare (mesh, beads, coats, sealants)
Use this checklist before starting your concrete project. It helps ensure you have everything needed and avoids costly mistakes.
- Reinforcement mesh: Check size and type match your project’s requirements. Confirm it’s rust-resistant for longevity.
- Beads (expansion, control joints): Ensure they’re the correct size and type for your project. Verify they’re compatible with your concrete mix.
- Basecoat: Check label for compatibility with your chosen finish. Confirm it’s within its usable life span.
- Finish (smooth, exposed aggregate): Make sure it matches your desired look and is suitable for your climate.
- Sealant: Verify it’s designed for concrete and compatible with your finish. Check if it’s UV-resistant for outdoor use.
- Adhesion promoter (if needed): Confirm it’s suitable for your basecoat and substrate. Follow manufacturer’s guidelines for application.
- Curing compound: Ensure it’s compatible with your concrete mix and finish. Check if it provides the required protection against moisture loss.
- Release agent (if using forms): Verify it’s suitable for your form material and concrete mix. Confirm it won’t affect the finished surface.
Quick rule: Always check product labels and manufacturer instructions to confirm compatibility, application methods, and adhesion/cure times before starting any step.
Tools and PPE
Before you start mixing concrete, ensure you have all the necessary tools and personal protective equipment (PPE) to keep yourself safe and work efficiently.
- Trowels: Check you have trowels in various sizes (e.g., 6″, 12″, 18″) for finishing and smoothing the concrete. Ensure they are clean, straight, and not bent or damaged.
- Concrete Mixing Tools: Verify your mixing tools such as shovels, rakes, or a concrete mixer are in good condition to ensure efficient mixing.
- Drill with Masonry Bit: Confirm you have a drill and masonry bit for setting anchors into the cured concrete if required. Check the bit size matches your anchor’s diameter.
- Concrete Edger: Ensure you have a concrete edger to create clean, sharp edges around your pour.
- Gloves: Inspect your work gloves for any holes or tears. They should provide good grip and protect your hands from cuts and abrasions.
- Eye Protection: Check you have safety glasses or goggles with side shields to protect your eyes from debris and splashes.
- Respirator/Dust Mask: Ensure you have a respirator or dust mask rated for concrete dust (e.g., N95 or P100) to protect your lungs from harmful particles. Check the filter’s condition and replace if necessary.
- Steel-toed Boots: Verify your boots provide adequate protection, with no missing toes or soles that are worn through. They should also have good grip to prevent slips on wet surfaces.
Quick rule: Always wear all PPE before starting any task involving concrete to minimize risks and ensure a safe work environment.

Step-by-Step Preventive Application Around Window Corners
Lay out a clear progression from prep to finish to stop corner cracks before they start. Follow embedment and curing guidance from the manufacturer to keep the details sound. Use checkpoints to verify completion at each stage.
Prepare the surface, clean openings, control moisture, and ensure a crack-free backing before mesh or bead work. Outline mesh wrap around corners with the correct overlaps and embedment, then select and place beads to minimize stress. Plan curing windows, monitor humidity, and stage inspections after each step to catch issues early.
Step-by-Step Process
Follow these practical steps to prevent corner cracks around your window openings. This sequence starts with preparation, moves through the main work, and ends with final checks.
- Safety first: Put on PPE (personal protective equipment) including gloves, safety glasses, and a dust mask.
- Clean window opening: Remove any loose stucco or dust using a wire brush. Vacuum if needed.
- Check substrate moisture: Use a moisture meter to ensure the substrate is dry. If it’s above 15%, wait for it to dry out.
- Apply mesh and anchors: Cut and place mesh around corners, following your chosen orientation strategy. Embed lath/mesh anchors at each corner using the recommended setting compound.
- Install corner beads: Secure beads in place with adhesive or screws, ensuring they’re straight and not deformed. Allow them to set as per manufacturer’s instructions.
- Apply basecoat: Trowel on a thin layer of basecoat, embedding mesh and beads fully. Avoid air voids and fiber misalignment.
- Inspect work: Check for any missed spots or areas that need touch-up before moving to the next stage.
- Apply topcoat: Apply your final stucco coat, ensuring even coverage and proper trowel angles.
Surface Prep and Flashing Verification
Before applying lath or mesh, ensure your substrate is dry, flat, and properly flashed to prevent moisture issues. Here’s how:
First, check for moisture. Use a moisture meter to confirm the substrate isn’t damp (ideally below 15%). If it is, wait for it to dry out.
Next, inspect the surface. Ensure it’s flat and free of cracks or defects. Scrape off any loose material with a trowel.
Finally, verify flashing. Inspect window openings for proper flashing and drainage plane integrity. Look for gaps, tears, or missing pieces that could allow water intrusion.
Mesh Placement and Bead Installation Sequence
Install mesh, beads, and basecoat in the right order to ensure continuous reinforcement and well-bedded beads. Here’s how:
Start by placing mesh. Cut and position it around corners following your chosen orientation strategy. Ensure minimum overlap and proper seam treatment.
Next, install corner beads. Secure them in place with adhesive or screws, ensuring they’re straight and not deformed. Follow manufacturer’s instructions for embedment depth.
Finally, apply basecoat. Trowel on a thin layer, embedding mesh and beads fully. Use proper trowel angles to avoid air voids and fiber misalignment. Allow it to set as per manufacturer’s instructions before proceeding with topcoat application.
Final Coating, Sealants, and Curing Best Practices
Properly finish your work with these final steps to ensure a durable, long-lasting result:
First, apply topcoat. Trowel on your final stucco coat, ensuring even coverage and proper trowel angles. Allow it to set as per manufacturer’s instructions.
Next, seal bead corners. Apply a bead of sealant along the edges of corner beads to prevent water intrusion and cracking.
Finally, cure properly. Protect your work from rain and excessive heat during the curing period. Follow manufacturer’s guidelines for humidity and temperature conditions to ensure optimal cure.
Repairing Existing Corner Cracks: Assessment to Fix
Start by defining the scope and indicators of damage: differentiate hairline from wider cracks and note if the bead interface is active. Look for movement or warping around the window opening. Use a moisture meter or probe as part of the evaluation.
Classify repairs into spot patches, mesh reinforcement, bead repair or replacement, or bead and lath removal with replacement. Decide on partial repairs versus larger area work based on crack width, movement rate, water history, and system age. Choose materials and techniques that align with the crack path and surface plane, and plan for proper flashing and resealing to prevent recurrence.
When to patch vs replace bead or lath
Assessing the extent of damage is crucial before deciding whether to patch or replace beads and lath. Here are signs that’ll help you make the right call:
Patch when: Cracks are hairline, no movement or warping around the window, and there’s no active moisture intrusion or rot. A simple patch job should suffice.
Replace when: Cracks have widened over time, there’s noticeable movement or warping, or you find moisture intrusion, rot, or corrosion. These indicate a more serious issue that requires full bead and lath replacement for long-term performance.
Repair technique and visual checkpoints
Use this checklist when repairing existing corner cracks to ensure a reliable, long-lasting fix:
- Cut: Make sure cuts are clean and follow the crack path.
- Clean: Remove all loose stucco and debris. Ensure surfaces are dry before proceeding.
- Replace reinforcement/mesh: Align mesh with the crack path and surface plane for best results.
- Blend basecoat: Apply basecoat evenly, ensuring it’s thick enough to fill cracks but not so thick that it causes new cracks when drying.
- Apply finish coat: Ensure the finish coat is smooth and even. Check for any missed spots or thin areas.
- Check for proper adhesion: Gently pull on the repaired area to ensure good adhesion. If it feels weak, apply more basecoat and allow it to dry before finishing.
- Inspect corners: Ensure corners are well-defined and free of voids or thin spots.
- Check for proper curing: Allow the repair to cure according to manufacturer’s instructions. Check for any signs of premature drying, which can lead to cracking.
Quick rule: Always re-caulk and re-seal joints after repairs to prevent future water intrusion and cracking.
Common Mistakes, Safety, and Quality Checkpoints
Identify frequent errors to avoid: misaligned mesh, improper bead sizing for joints, and inadequate substrate prep around corners. These slip-ups lead to weak cracks and failed finishes. Review tool and material choices to ensure compatibility with the existing stucco and caulk products.
Safety comes first: wear PPE, ventilate, and follow mixing and curing instructions. Use a structured quality checklist from pre-application to final cure, including embedding, bead seating, sealant integration, and crack-width control. If signs of delamination or movement appear, retreatment may be necessary; always reference product datasheets for handling and timing.
Common application mistakes to avoid
Before you start, review this checklist to ensure a successful outcome.
- Mesh orientation: Check if mesh is aligned horizontally relative to the window frame. Vertical alignment can lead to cracking under stress.
- Bead size/type: Ensure beads match your stucco joint width and are compatible with existing materials. Incorrect beads may cause poor adhesion or cracking.
- Substrate prep: Verify corners are clean, dry, and free of debris. Inadequate preparation can result in delamination or premature cracking.
- Edge detailing: Check if corners have proper flashing and edge detailing to prevent water intrusion and cracking.
- Mesh embedment: Ensure mesh is fully embedded in the base coat. Insufficient embedment may cause mesh to rust or lose adhesion.
- Bead seating: Verify beads are properly seated and aligned with the corner. Poor seating can lead to cracking under load.
- Sealant integration: Check if sealant is integrated into the bead and corners. Skipping this step may result in water intrusion and cracking.
- Crack width control: Monitor crack width during curing. Hairline cracks can widen over time, leading to structural issues.
Quick rule: Regular inspection helps prevent costly repairs down the line.
Safety and curing precautions
Prioritize safety and proper curing for a durable, long-lasting finish.
- PPE: Wear gloves, goggles, and a respirator as needed. Exposure to wet cement can cause skin irritation or burns.
- Ventilation: Ensure the work area is well-ventilated to prevent dust inhalation.
- Dust control: Use damp rags or spray bottles to control dust during mixing and application.
- Mixing ratios: Follow manufacturer guidelines for mixing ratios. Incorrect ratios can lead to weak, crumbly stucco.
- Curing times: Allow sufficient curing time between coats and after final application. Premature washing or exposure to extreme temperatures can cause surface defects.
- Additives/bonding agents: Handle additives and bonding agents according to manufacturer guidelines. Improper handling may result in chemical burns or reactions.
- Weather limits: Avoid applying stucco in extreme heat, cold, or high humidity. Extreme weather can affect adhesion and curing.
- Protect during cure: Shield the surface from rain, direct sunlight, and freezing temperatures during the curing process.
Quick rule: Always consult product datasheets for chemical hazards and application windows.
Visual checkpoints and inspection checklist
Inspect your work at each stage to catch issues early and ensure a quality finish.
- Adhesion: Check for proper adhesion of the base coat to the substrate. Poor adhesion can lead to delamination or cracking.
- Bead alignment: Verify beads are properly aligned with the corner and level with the surface. Misaligned beads may cause cracking under load.
- Mesh coverage: Ensure mesh is fully covered by the base coat. Exposed mesh can rust or lose adhesion over time.
- Finish continuity: Check for a smooth, continuous finish free of voids, bubbles, or other defects. Inconsistencies may indicate underlying issues.
- Crack width: Monitor crack width during curing. Hairline cracks can widen and become structural issues over time.
- Delamination: Look for signs of delamination, such as peeling or flaking stucco. Delamination indicates poor adhesion or moisture intrusion.
- Movement under load: Gently press on the surface to check for movement or soft spots. Movement can indicate weak spots that may crack under stress.
Quick rule: Regular inspection helps ensure a quality finish and prevents costly repairs down the line.
Cost, Planning, and Maintenance for Long-Term Durability
Plan for upfront costs and long-term value by listing materials, labor, access equipment, and potential subcontractors. Compare this to expected recurring repairs from movement or moisture, noting that proper detailing can reduce future expenses. Check local rates to tailor your budget accurately.
Outline preventive details versus repair cycles and how mesh orientation and bead choice influence longevity. Include installation choices like flashing integration and moisture barrier compatibility, plus a maintenance schedule with visual checks and sealant refreshes. Verify regional pricing, lead times, and product availability, and use a simple planning worksheet to stay on track.
Cost comparison: prevention vs repair
Investing in proper reinforcement and beads upfront can seem expensive, but it’s often cheaper than repeated repairs. Here’s why:
Preventive detailing: Upfront costs include mesh ($0.50-$1.50/sq ft), beads ($0.20-$0.60/linear ft), sealants ($0.30-$0.80/sq ft), and labor (varies). But it prevents cracks, moisture intrusion, and frequent repainting.
Recurring repairs: Crack movement repair can cost $50-$200 per crack. Moisture intrusion may need mold remediation ($100-$3000), and repainting costs $1-$6/sq ft. These add up over time.
Proper detailing has a better ROI than frequent fixes. Plan contingencies for unexpected repairs, but prioritize prevention.
Long-term maintenance schedule and signs to monitor
A simple inspection cadence helps catch corner problems early:
Annual checks: Inspect corners for cracks, gaps, or displaced beads. Check sealants for integrity.
Post-storm inspections: Heavy rain, wind, or snow can dislodge beads or damage sealants. Inspect after severe weather.
Warning signs: Hairline cracks, moisture stains, or peeling paint indicate potential problems. Address these promptly to prevent major damage.
When to consult a professional
Some situations require a contractor or building-science professional:
Structural movement: If corners show signs of structural movement, like large cracks or displaced beads, engage an engineer or architect.
Widespread failure: If many corners are affected, it may indicate a systemic issue. Consult a professional to diagnose and address the root cause.
Hidden water damage: If you suspect moisture intrusion behind the stucco, hire a professional to inspect for mold or rot before making repairs.
Conclusion
Corner cracks at window edges matter because they affect safety, durability, and curb appeal. A solid, well-sealed first step saves you from costly leaks and bigger repairs later.
Check and follow this practical flow: inspect for crack size and movement, choose the right mesh orientation and bead type, verify the tools and materials you have match the job, prep and clean the area, apply in clean, dry conditions, work in small sections around the corners, and test the repair with a gentle touch after the mortar or sealant cures. If you are unsure about any step, start in a hidden area to confirm adhesion and cure before moving to visible spots.
Common mistakes to avoid are skipping surface cleaning, using the wrong bead or mesh orientation for the corner radius, and rushing the cure without proper temperature or moisture control. Safety rules are simple: wear eye protection and gloves, mask dust when mixing or sanding, and never force a joint that resists adhesion. If you see active water intrusion, large or rapidly expanding cracks, or you lack the proper tools, stop and reassess before continuing.
When to call a professional is clear: if cracks keep reopening after multiple repairs, if the frame or sheathing shows signs of rot, or you lack access to proper mixing ratios and curing conditions. A pro can confirm the diagnosis, optimize bead and mesh decisions, and prevent further damage. Stay steady, follow the steps, and you can keep the project on track with confidence.
FAQ
Proper mesh orientation for stucco windows
Mesh goes with the plane of the stucco, not across it. The mesh should wrap around corners and be continuous so it reinforces the crack paths rather than creating new ones. Always follow the mesh manufacturer’s guidance for wrap and overlap at window openings.
Types of caulk beads for preventing cracks
Choose a bead material that is compatible with stucco and the window frame. Use a continuous sealant bead around the perimeter and consider a backer rod if the joint is deep; check the product label for hairline cracks vs larger gaps and local installation guidance.
Application methods for window beads (bead installation techniques)
Install beads so they sit flush with the stucco surface and maintain a clean reveal around the window. Cut to fit, embed correctly, and key the bead into the patch with a trowel or knife; avoid gaps behind the bead that trap moisture.
Repair and maintenance tips for existing corner cracks
Assess crack width and movement first. Clean the area, then apply a compatible sealant or patch, and reinforce with mesh if the crack is active; recheck after weather events and re-seal as needed.