
Introduction
Cleaning and resealing polished plaster means removing soap scum and dull spots and applying a fresh protective coat. This is a hands-on DIY job that restores the surface without tearing it out. Expect a light scrubbing, careful rinse, and a new sealant layer following the manufacturer’s instructions.
Before you start, check the product labels for suitability on polished plaster and follow local rules. Test in an inconspicuous spot, use gentle cleaners, and avoid harsh scrubbers that could scratch the finish. Prepare the area, apply the sealant as directed, and allow adequate drying time before using the room.
Key takeaways
- Assess whether cleaning or resealing is appropriate for polished plaster surfaces.
- Protect adjacent areas with tape, drop cloths, and plastic sheeting during work.
- Test a hidden spot first to confirm finish compatibility; wear gloves.
- Use non-abrasive cleaners and soft cloths to avoid scratching polished surface.
- Rinse thoroughly after cleaning to remove soap residue that dulls sheen.
- Follow label instructions and use compatible sealers; apply in light, even coats.
Table of Contents
- Introduction
- Key takeaways
- When to Clean Versus When to Reseal
- Tools and Materials Checklist
- Safety, Surface Protection, and Prep Area Setup
- Removing Soap Scum and Surface Film Safely
- Tackling Dull Spots, Etching, and Mineral Build-up
- Addressing Mold, Efflorescence, and Stubborn Stains
- Choosing the Right Sealer or Refresh Coat
- Application Process for Resealing and Refresh Coats
- Conclusion
- FAQ
When to Clean Versus When to Reseal
Start with a careful visual check and a simple test. Look for dullness that erodes the shine, gouges, or loss of surface protection rather than just surface dirt. If there are visible signs of wear, check the finish for loss of sheen and a chalky feel to the surface.
Use basic inspection cues to decide whether cleaning is enough, or if spot repairs or a full refresh coat are needed. If the surface still beads water well and feels protected, cleaning may suffice. If protection is thinning or etched marks persist after cleaning, prepare for a reseal or partial refresh as needed.
Visual and tactile signs to watch for
First, look at your polished plaster. See any soap scum? It’s that white, filmy stuff on surfaces near faucets or showers.
Check for streaks too. They’re usually caused by water running down the wall and drying before it can be wiped off.
Dull patches are another sign. They might be due to dirt or residue not removed during cleaning, or they could indicate a spot where the sealer has worn off.
Feel your walls too. If water no longer beads up and rolls off, that’s a sure sign your sealer needs attention. Increased absorbency is another red flag.
Simple tests to assess finish condition
Grab a small cup of water. Drip a few drops onto your wall. If the water beads up and rolls off, your sealer’s still doing its job.
If it soaks in or leaves dark spots, that means your plaster’s absorbing too much moisture. Your sealer might be compromised.
Try a patch test with a mild cleaner. If the dirt wipes away easily, great! But if it’s hard to remove, or if the wall feels rougher after cleaning, that could mean it’s time for a refresh coat.
Always check your manufacturer’s guidelines too. They’ll give you specific thresholds for water absorption and sealer performance.
Tools and Materials Checklist
Gather a modest set of non-scratch tools for cleaning and minor repairs. Include soft brushes, non-abrasive pads, and a microfiber cloth for wipe-downs. Bring a labeled bottle or two for test patches and product comparison.
Keep a supply of compatible cleaners and a basic sealant option, and carry product labels for compatibility checks. Avoid harsh abrasives and aggressive cleaners that can damage polished plaster finishes. Always verify instructions from the manufacturer or label before use.
Cleaning supplies and implements
Before you start, gather these cleaning tools to keep your polished plaster looking its best. Use this checklist for regular maintenance or after noticing soap scum buildup.
- pH-neutral cleaner: Avoid harsh chemicals that can damage the finish.
- Soft sponges: Gentle enough not to scratch the surface.
- Microfiber cloths: Ideal for buffing and polishing after cleaning.
- Non-scratch pads: For stubborn spots, use these with light pressure.
- Gentle mechanical aid (optional): A soft-bristled brush or microfiber mop can help with larger areas.
- Rinsing equipment: A spray bottle filled with clean water for rinsing.
- Squeegee or towel: To remove excess water after rinsing.
- Avoid: Acidic cleaners, steel wool, or harsh abrasives that can damage the finish.
Quick rule: Always test cleaners on a small, hidden area first to ensure they won’t harm your plaster.
Repair and reseal materials
When it’s time to touch up or reseal your polished plaster, use this checklist to ensure you have the right tools and materials. This is crucial for maintaining the finish’s integrity.
- Filler/patching compound: Choose one specifically designed for polished plaster to match your existing finish.
- Sealer (breathable or film-forming): Ensure it’s compatible with your plaster type and existing sealer.
- Applicators: Brushes, rollers, or pads – depending on the sealer’s instructions.
- Protective tape: To mask off areas you don’t want to seal.
- Sandpaper (fine grit): For light sanding before sealing to remove any imperfections.
- Degreaser (optional): If your plaster has grease or oil stains, use a degreaser first.
- Product labels: Bring them along for compatibility checks and application instructions.
- Avoid: Using incompatible materials that can cause discoloration or damage to the finish.
Quick rule: Always follow manufacturer guidelines for application, drying times, and safety precautions.
Safety, Surface Protection, and Prep Area Setup
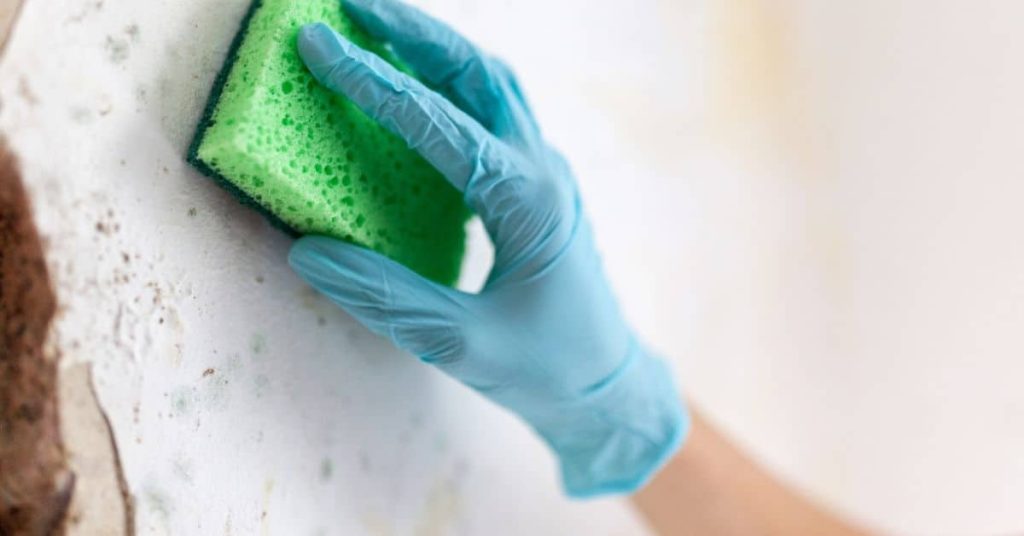
Wear appropriate PPE such as gloves and eye protection, and ensure ventilation is adequate. Keep doors or vents open and use temporary barriers if needed. Protect adjacent finishes with drop cloths or painter’s tape where practical.
Contain the work area to limit dust and splashes, especially around fixtures and hardware. Seal off floors or use sheets to prevent tracking cleaners into other rooms. Double check that all prep materials are clearly labeled and stored away from sensitive surfaces.
Personal protection and ventilation
Safety first, mate. Here’s what you need:
Gloves: Keep your hands clean and protected.
Eye Protection: Safety glasses or goggles to shield your peepers from splashes.
Masks: Depending on the products you’re using, you might need a dust mask or one that filters out fumes. Check those Safety Data Sheets for specifics.
And ventilation? Crack open some windows or use fans to keep air moving. Fresh air’s your friend here.
Protecting surrounding surfaces
Don’t want to mess up your nice finishes, do we?
Mask off any areas you don’t want touched. Use painter’s tape and paper or plastic sheets.
Be gentle with it, yeah? Don’t press too hard, especially on delicate surfaces like wood or metal.
And mind those glazed tiles. They’re slippery when wet, so keep ’em covered till you’re done.
Removing Soap Scum and Surface Film Safely
Begin with the mildest approach and test on a small area first. Use gentle agitation and a non-acidic cleaner to lift soap scum without scratching. Work in small sections to maintain control.
If residue persists, progress to a slightly more capable cleaner or a mechanical scrub with a soft pad, always testing in a hidden spot first. Avoid aggressive scrubbing that can dull the finish. Reassess the area after cleaning before deciding on a reseal.
Mild cleaning methods and process
Start with the gentlest method to remove soap scum from your polished plaster. Grab a pH-neutral cleaner, warm water, and soft cloths or microfibers.
Dampen the cloth in the solution, then gently wipe the surface in circular motions. Be sure not to scrub too hard – you don’t want to damage the finish.
Rinse thoroughly after each pass with clean water and a damp cloth. This helps remove any residue left behind by the cleaner.
Repeat this process until all soap scum is gone, then let the surface air dry completely.
Escalation to stronger cleaners or specialty products
If mild cleaning methods don’t cut it, it’s time to step up your game. Reach for specialized soap-scum removers or enzyme cleaners.
Before you start, test the cleaner in an inconspicuous spot. This helps ensure it won’t damage your finish. Follow the manufacturer’s instructions for dwell time and neutralization.
Apply the cleaner to the surface using a soft cloth or sponge. Let it sit as directed, then gently wipe off with a damp cloth.
Rinse thoroughly with clean water and let the surface air dry completely. Always remember: when in doubt, test first!

Tackling Dull Spots, Etching, and Mineral Build-up
Explain causes of dulling, such as wear or mineral buildup, and use conservative restoration methods. Start with mechanical lightening or polishing options designed for polished plaster. Keep pressure moderate and monitor the surface closely.
Reserve chemical treatments for limited areas and only after mechanical options have been tested. If etching or deep residue remains, document the area for possible weathering or refinishing steps and consult product guidance before proceeding.
Mechanical and restorative techniques
Polished plaster surfaces can dull over time due to wear, residue buildup, or mineral deposits. Before reaching for harsh chemicals, try these gentle mechanical methods to restore your finish.
Gentle Buffing: Use a soft, non-abrasive buffing pad attached to a random orbital sander or a handheld buffer. Work in small sections, applying light pressure and moving in circular motions.
Re-polishing with Soft Pads: For minor dull spots, use a soft polishing pad dampened with clean water. Gently rub the affected area until it regains its shine.
Remember, less is more when working on polished plaster. Overworking the surface can cause damage or remove the finish entirely. Always test these methods on a small, hidden area first.
Chemical treatments and poultices
Sometimes, mechanical techniques aren’t enough to tackle mineral deposits or etching. In these cases, carefully selected chemical treatments can help.
Poultices: Poultices draw out embedded stains by reacting with them. For mineral deposits, use a poultice made from a mixture of powdered cleaner and water. Apply it to the affected area, cover it with plastic wrap, and let it sit for 24-48 hours before removing.
Cleaners for Mineral Deposits: Choose cleaners specifically designed to remove mineral deposits. These usually contain acids like hydrochloric or muriatic acid. Always follow the manufacturer’s instructions and wear appropriate safety gear.
Patch Testing and Neutralizing Residues: Before applying any chemical treatment, perform a patch test in an inconspicuous area. After use, neutralize residues with a solution of baking soda and water to prevent further damage or staining.
Addressing Mold, Efflorescence, and Stubborn Stains
Differentiate between biological growth, salt bloom, and other stains by appearance and moisture behavior. Use appropriate pathways for each issue and avoid mixing cleaners that could react adversely. Start with the least aggressive option that is suitable for the issue.
Investigate moisture sources and fix underlying causes before sealing. Keep surfaces dry during treatment and follow up with a clean, dry test patch to confirm the issue is resolved. Do not seal until the area is confirmed clean and dry.
Diagnosis and causes
Before you start treating, understand what you’re dealing with. Mold, efflorescence, and other stains have different appearances and causes.
Mold appears as dark spots or patches, often with a musty smell. It grows where moisture is present, usually from leaks or condensation.
Efflorescence, on the other hand, looks like white salt deposits. It’s caused by water drawing salts to the surface and evaporating, leaving the salts behind. Common sources include groundwater, rainwater, or even humid air.
Other stains can be caused by minerals in water (hard water spots) or iron oxide from pipes (rust stains). Always investigate moisture sources before sealing.
Treatment protocols
Each issue requires a specific approach. Here’s how to tackle them:
Mold: Use a safe biocide cleaner, following the manufacturer’s instructions. Apply, let it sit, then scrub and rinse. Ensure the area is completely dry afterwards.
Efflorescence: You can use desalination products or poultices to draw out salts. Apply, let it sit, then remove and clean the surface. Again, ensure the area is dry.
For stubborn stains, you might need stain-specific cleaners. Always test in an inconspicuous area first. After cleaning, address any moisture issues to prevent recurrence.
Choosing the Right Sealer or Refresh Coat
Compare sealer categories such as breathable versus film forming, and waterborne versus solvent based. Note how each option interacts with polished plaster finishes and indoor conditions. Check that the chosen product is compatible with the plaster type you have on site.
Always review manufacturer data for adhesion, VOCs, and suitability. If you are unsure, verify guidance on product labels, data sheets, or the manufacturer’s instructions before proceeding. Avoid mixing products without confirmation.
Breathable versus Film-Forming Sealers
Sealers fall into two main categories: breathable and film-forming. Each has its place, depending on your plaster type and indoor environment.
Breathable sealers, like those based on natural waxes or oils, allow moisture to pass through while protecting the surface from dirt and grime. They’re ideal for historic or lime-based plasters that need to breathe.
Film-forming sealers, usually acrylic or polyurethane-based, create a barrier on top of the plaster. They offer excellent protection but can trap moisture, making them unsuitable for breathable plasters or humid environments.
Compatibility, Sheen, and Color-Change Considerations
Before applying any sealer or refresh coat, test it on a discreet area first. This helps you avoid costly mistakes.
Color shift can occur with some sealers, especially on dark or tinted plasters. A test patch will reveal if the sealer changes the color of your plaster.
Sheen change is another factor to consider. Some sealers can make the plaster appear glossier than intended. A test area will help you see the final look before committing to a full application.
Adhesion is also crucial. Ensure the sealer bonds well with your plaster by checking for any peeling or flaking in the test area.
Application Process for Resealing and Refresh Coats
Lay out a clear workflow: finish cleaning, complete drying, patch repairs if needed, then test patch a small area. Prepare a controlled environment to minimize dust and abrupt temperature changes during application. Follow the product instructions for surface prep and application specifics.
Apply in a steady, even manner and inspect as you go. Note that coat counts and cure times vary by product, so confirm with the label or instructions before starting. Plan for final inspection after the recommended drying period and rework any areas as required.
Surface prep and priming where needed
Before you start applying your sealer, ensure the surface is clean and dry. Any residues left behind can compromise the bond of your sealer.
Use a damp cloth to remove any dust or dirt. Let it dry completely. Moisture can cause issues with adhesion and may lead to peeling.
If you’re applying a new coat over an existing one, or if the surface is porous, you might need a primer or adhesion promoter. This ensures even coverage and better bonding. Follow manufacturer instructions for the best results.
Sealer application technique and quality control
Choose your applicator wisely. A lambswool roller or a soft brush works well for polished plaster. Start from one corner and work your way across the wall, maintaining a ‘wet edge’ to avoid lap marks.
Apply the sealer in thin, even coats. Thicker is not better – it can lead to drips and uneven drying. Follow product directions for the number of coats and curing time.
Before you seal the entire area, do a test patch. This lets you check for any issues with color change or compatibility. Inspect it after the recommended cure time. Touch up as needed before proceeding.
Conclusion
Keep it simple: clean thoroughly, protect surrounding surfaces, and seal only after you’re sure the surface is ready. This guards against damage, stops costly mistakes, and keeps the sheen durable.
Do this: start with a small test patch to confirm cleaning and etching rules suit your plaster, then clean soap scum and film, rinse and dry, check for dull spots or mineral build-up, address any mold or efflorescence, choose the right sealer or refresh coat, and apply it evenly in a well-ventilated area with proper PPE and clean tools. If you’re resealing, follow the product directions, apply in thin, even coats, let each coat dry fully, and protect the area during cure. Always test compatibility on a hidden spot and time your work for a dry period with steady humidity.
Common mistakes to avoid are rushing the prep, skipping a test patch, and overloading with sealer or finishing coats. Never skip safety gear or ventilation, never seal a damp surface, and never apply a coating over soap film without proper removal. If you’re unsure about moisture issues, mold, or etching deep into the plaster, pause and reassess before proceeding. When in doubt, bring in a professional rather than guessing, and remember that patience and precise steps save you time and money in the long run.
FAQ
Will soap-scum removal damage polished plaster?
Use a gentle cleaner and a soft cloth or sponge. Don’t scrub with abrasive pads. If in doubt, test on a hidden spot first and follow manufacturer instructions for the cleaner.
How do I test a small area before full reseal?
Choose a discreet patch and apply the cleaner, polish, and reseal product there first. Check for any color change, gloss shift, or residue. If it looks off, stop and consult the product label or a pro.
Can I reseal after cleaning in the same day?
Yes, but make sure the surface is completely dry and free of cleaner residue. Follow the sealer’s instructions about surface moisture and cure time. If unsure, wait until the next day or check the label.
What should I do about dull spots that come back after resealing?
Dull spots can mean contamination or wrong sealer for the finish. Re-clean the area with a compatible product, then reseal with the proper finish. If the problem repeats, verify the sealer type and application method.