
Introduction
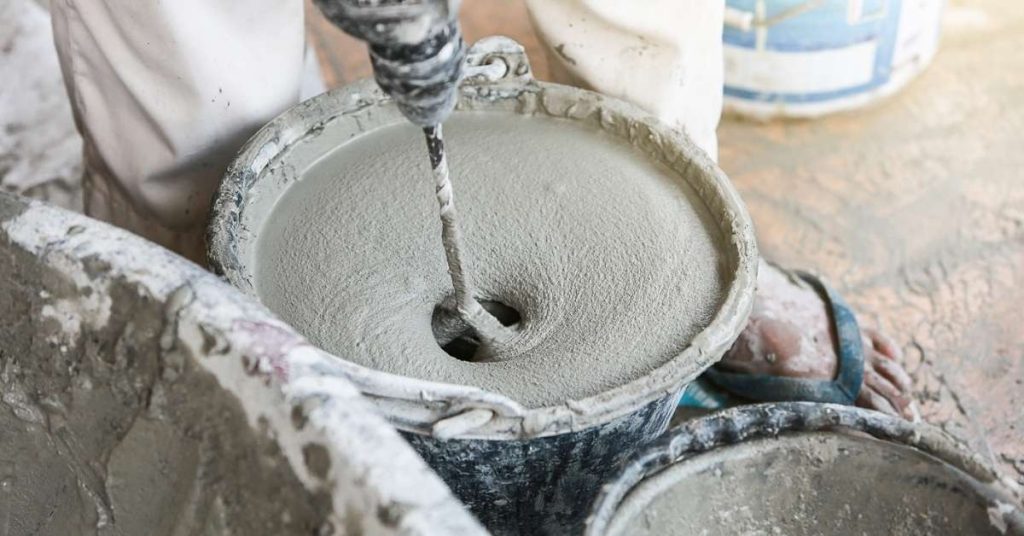
A mixing drill is a powered tool chosen for blending concrete, mortar, and plaster. It should deliver steady torque and control at the right speed to avoid overworking the motor. Using a too-large drill or running at excessive speed can burn the motor and degrade the mix.
Proper mixing helps achieve uniform texture and strength, while improper use can create air pockets and uneven setting. Regular drills without sufficient torque or proper paddles struggle with thick mixes, and may overheat. Choose a drill with adjustable speed, inspect the paddle and shaft compatibility, and check manufacturer guidance for load limits.
Key takeaways
- Proper mixing improves strength, consistency, and finish of concrete, mortar, plaster.
- Regular drills can’t replace dedicated mixers; differences in torque, RPM, and paddle design.
- Torque and speed balance critical for materials; excessive torque destroys paddles and motor.
- Never push a drill beyond rated duty; overheating can burn windings and motors.
- Corded vs cordless: cordless usually lighter, lower sustained torque; plan by project size.
- Use proper paddles and setup; mix in stages, avoid dry pockets and air entrainment.
Table of Contents
- Introduction
- Key takeaways
- Why Proper Mixing Matters for Concrete, Mortar, and Plaster
- Drill Vs Dedicated Mixers — Fundamental Differences
- Torque, Speed, and Power: What You Need for Different Materials
- Why ‘Bigger Is Better’ Can Burn Motors — Common Failure Modes
- Choosing the Right Mixing Drill: Corded Vs Cordless and Motor Options
- Paddles, Accessories, and Setup for Consistent Mixes
- Common Mistakes, Troubleshooting, and When to Stop Using a Drill
- Buying, Maintenance, Long-Term Costs, and Planning by Project Size
- Conclusion
- FAQ
Why Proper Mixing Matters for Concrete, Mortar, and Plaster
Mixing quality directly affects strength, workability, bonding, and finish. The mixer’s torque, speed, and paddle design influence how uniformly ingredients disperse and how the mix flows. Inconsistent batches can lead to weak joints and visible defects that require rework.
Achieving the correct water-to-cement ratio, aggregate loading, and additive compatibility hinges on consistent mixing. Look for signs of under- or over-mixing and understand their consequences. Practical checks include texture, air voids, and finish evenness across batches to confirm uniformity.
Bond Strength and Curing
Thorough mixing plays a crucial role in achieving optimal bond strength for concrete, mortar, and plaster. Adequate blending ensures complete hydration of cement particles, which is essential for developing final strength.
Insufficient mixing can hinder this process, leading to reduced bond strength and potential failures. To ensure proper curing, maintain consistent mix proportions and blend thoroughly.
Conduct a pull-off test on cured samples to assess bond strength. If results are insufficient, re-evaluate your mixing technique or consider using additives to enhance bonding. Always verify consistent mix proportions and thorough blending to guarantee complete hydration.
Workability and Finish
Proper mixing significantly impacts slump, flow, and surface finish quality for plaster and tile applications. Achieving the desired workability ensures easy application and a smooth, even finish.
Under-mixing or over-mixing can result in poor workability, leading to weak finishes, air voids, or uneven surfaces. Monitor slump tests and visual texture during mixing to maintain your desired workability.
If workability is too low (high slump), reduce water content or increase aggregate loading. Conversely, if workability is too high (low slump), increase water content or reduce aggregate loading. Inspect finished surfaces for evenness and air voids before application to ensure quality.
Waste, Cost, and On-Site Productivity
Poor mixing can lead to increased waste, slower crews, and higher repair costs. Inconsistent batches may result in rework, slowing down production and raising expenses.
Excessive waste or low productivity indicates issues with your mixing process. Compare production rates and waste generation with established benchmarks to identify problems early.
Monitor batch consistency, rework rates, and crew efficiency during mixing operations. If waste is excessive or productivity is low, investigate causes such as mixing quality or equipment issues, and implement improvements accordingly. Optimize mixing processes, train crews, and maintain equipment to minimize waste and improve on-site productivity.
Drill Vs Dedicated Mixers — Fundamental Differences
Handheld drills and dedicated mixers differ in core design, with motor placement, gear robustness, and protection against dust and slurry. This affects how they handle heavy mixes over time. Understanding these differences helps prevent underperforming results on site.
Duty cycle and load tolerance vary, influencing how long a tool can operate before overheating. Gear and torque characteristics show why higher no-load speed isn’t always better for viscous mixes. Use this to guide material compatibility and batch size decisions.
Mechanical and Gearbox Differences
The primary difference between drills and dedicated mixers lies in their mechanical design and gearboxes.
- Gearbox Type: Mixers use robust, high-torque gearboxes designed to handle heavy loads at low RPMs. Drills, on the other hand, have transmissions optimized for drilling tasks with lower torque at higher speeds.
- Torque Curve: Dedicated mixers offer higher starting torque to tackle viscous materials effectively. Drills may struggle with thick mixes due to their linear torque curve.
- Gear Ratio: Mixers often have lower gear ratios, providing more power for turning paddles or propellers. Drills typically have higher gear ratios for faster rotation but less torque.
- Seals and Protection: Dedicated mixers feature better dust, splash, and slurry protection to prevent damage from harsh environments. Drills may lack these protections, leading to reduced lifespan when used for mixing.
- Optional Tools: Consider renting or borrowing dedicated mixers for heavy-duty tasks instead of buying a drill with insufficient gearbox robustness.
Duty Cycle and Continuous Use
Drills are typically designed for intermittent use, while dedicated mixers are built to handle sustained mixing tasks.
Duty cycle refers to the maximum operating time before a tool needs to cool down to prevent overheating. Drills usually have lower duty cycles compared to mixers due to their design and intended use.
When selecting a tool for continuous mixing, consider the task’s demands and the tool’s duty cycle. Pushing a drill beyond its rated duty cycle can lead to motor burnout or reduced lifespan.
For long, uninterrupted mixing periods, choose a dedicated mixer designed for sustained use. Always allow tools to cool down as recommended by the manufacturer to prevent overheating.
When a Drill is Acceptable
A drill can be a practical choice for small-batch and light-media mixing tasks. However, it’s essential to understand the limitations of using a drill for mixing.
Drills are well-suited for occasional mixing or small quantities of lightweight materials, such as drywall compound or joint compound. They can also be useful for mixing small batches of mortar or thin-set concrete mixes.
When using a drill for mixing, monitor its performance and allow cooling breaks to prevent overheating. Keep in mind that drills may not provide the same level of consistency or efficiency as dedicated mixers when tackling heavy, continuous mixing tasks.
If you find yourself relying on a drill for heavy, continuous mixing, consider upgrading to a dedicated mixer to ensure optimal performance and tool lifespan.
Torque, Speed, and Power: What You Need for Different Materials
Torque and speed interact to determine mixing efficiency. Concrete often requires a different profile than mortar or plaster to avoid air entrainment and ensure dispersion. The goal is uniform consistency without introducing voids.
Viscosity and batch size drive the need for higher torque versus higher speed. Watch for signs of under- or over-mixing, such as lumpiness or heat buildup, and adjust parameters accordingly. This guides paddle design choices and the decision to use a dedicated unit for larger or tougher batches.
Torque vs Speed — What Each Controls
When mixing materials like concrete, mortar, or plaster, two key factors determine the efficiency of your drill: torque and speed.
Torque, measured in Newton meters (Nm), is what moves heavy loads. It’s crucial for mixing dense materials like concrete. Using too little torque can result in an under-mixed batch with lumps or separation.
Speed, measured in revolutions per minute (RPM), influences shear and dispersion. Low speed prevents splashing, while higher speeds help break up clumps and distribute dry ingredients evenly. Too high a speed can cause air entrainment, leading to weak mixes.
Safe Target Ranges and What to Check
Before mixing, ensure your drill or mixer is up to the task. Here’s a checklist to help you:
- Check manufacturer torque (Nm): Ensure it matches or exceeds the requirements for your heaviest mix.
- Verify RPM range: Make sure it covers the speeds needed for all materials you’ll be mixing.
- For heavy mortars: Prioritize higher torque at low RPMs to avoid motor strain.
- For thin plasters: Higher RPMs can be acceptable, but monitor motor temperature.
- Paddle size: Ensure it’s suitable for your bucket size and that your drill delivers the required torque.
- Duty cycle: Check if it supports continuous use for your mixing needs.
- Gearbox quality: A robust gearbox prevents premature wear and tear.
- Motor temperature: Monitor during use to prevent overheating.
Quick rule: Always consult manufacturer datasheets for specific torque, speed, and duty cycle recommendations.
Matching Paddle Size to Power and Batch Volume
The right paddle size ensures efficient mixing without straining your drill. Here’s how to choose:
Paddle diameter: Select a paddle wide enough to reach the sides of your bucket, but not so wide that it doesn’t fit. A larger diameter increases torque and mixing efficiency.
Shaft length: Ensure the shaft is long enough to reach the bottom of your bucket without hitting the base. A longer shaft improves mixing at the bottom of the batch.
Drill power: Check if your drill can deliver the required torque for the selected paddle size and batch volume. Using a paddle that’s too large or a drill that’s underpowered can lead to inefficient mixing or motor overheating.
Why ‘Bigger Is Better’ Can Burn Motors — Common Failure Modes
Overspecifying power or using oversized paddles on undersized drills can cause stalls and excessive current draw. This pushes a motor toward its thermal limit and triggers protective shutdowns or damage. Avoid forcing equipment beyond its designed load.
Common failure modes include motor stall, overheating, brush wear, arcing, and accelerated bearings or gear wear. Paddle diameter, quantity, and material contribute to torque needs and performance. Manage duty cycles and heat with proper breaks and airflow.
Overload, Stall Current, and Heat Buildup
Applying excessive load on a drill can cause it to draw excessive current, leading to overheating and potential damage. This is due to the motor working harder than its rated capacity.
Excessive heat: Can be felt through the casing of the drill during use. If the drill becomes unusually warm, reduce load or stop operation immediately to prevent overheating.
Stall current: Exceeding a drill’s rated torque can cause it to draw more current than it was designed for, leading to motor stall and potential damage to components such as windings and commutators. Always ensure the drill’s rated torque matches or exceeds the demands of the mix being prepared.
Wear on Brushes, Bearings, and Gears
Mixing stresses can accelerate wear on critical components, leading to reduced lifespan or failure. Regular maintenance is key to preventing this.
- Carbon brushes: Wear out over time due to friction with the commutator. Replace them as needed according to manufacturer’s guidelines to maintain optimal motor performance.
- Bearings: Support the motor’s shaft and reduce friction. Worn bearings can cause excessive noise, vibration, or even motor failure. Inspect and replace them regularly.
- Gears: Transmit power from the motor to the paddle. Heavy use or improper lubrication can lead to gear wear, causing reduced performance or damage. Lubricate gears regularly and inspect for wear.
Practical Signs of Imminent Failure
Recognizing early warning signs can prevent catastrophic failure and costly downtime. Familiarize yourself with your drill’s normal operation to better detect any deviations.
Smoking or burning smells: These are clear indicators that something is wrong. If you notice these, stop operation immediately and inspect the drill for potential electrical issues or overheating components.
Repeated trip-outs or slowed/stalled operation: These can indicate a problem with the motor, such as excessive wear on brushes or commutator damage. If your drill keeps tripping out or struggles to maintain speed under load, it’s time for an inspection.
Choosing the Right Mixing Drill: Corded Vs Cordless and Motor Options
Corded power versus cordless portability presents trade-offs in run-time, duty cycle, and long-term cost. Balance access to outlets with job-site mobility to match the project profile. This helps determine suitable equipment choices.
Brushed versus brushless motors, along with available RPM ranges, influence torque delivery for concrete, mortar, and plaster. Consider battery capacity and motor reliability when weighing larger sessions and durability needs on site.
Corded Drill Advantages and Limits
A corded drill offers steady power supply without battery downtime, making it ideal for continuous, heavy-duty tasks like mixing concrete, mortar, or plaster.
However, it requires access to a power outlet on-site. If access is guaranteed, then a corded drill is suitable.
Use extension cords if necessary, but manage them safely to prevent tripping hazards and ensure cable length is sufficient for the job.
Cordless Trends: Batteries and Brushless Tech
Cordless drills with brushless motors and high-capacity battery packs offer improved duty cycle, reduced maintenance, and portability.
For jobs requiring mobility and no access to outlets, a cordless drill with brushless motor is suitable. Verify runtime and recharge time to match job demands.
Invest in reputable brands for better performance and longevity of batteries.
Motor Type and Duty-Cycle Ratings to Check
Before purchasing, ensure the drill’s capabilities match your job requirements. Check motor type (brushed or brushless), duty cycle rating, and thermal protection features.
For heavy-duty mixing jobs, prioritize drills with brushless motors and high duty-cycle ratings to handle sustained workloads without overheating or frequent rest periods.
Do not rely solely on motor power; consider duty cycle and thermal protection for sustained performance.
Paddles, Accessories, and Setup for Consistent Mixes
Match paddle geometry to material to control shear, air entrainment, and texture. High-twist and low-triction designs behave differently with concrete, mortar, and plaster. Select according to the desired finish and mix characteristics.
Correct shaft length and paddle diameter prevent motor overload and cavitation. Ergonomic handles and vibration damping support steady mixing and reduce fatigue. Consider container shape, fill level, and interior finish to minimize splashing and air pockets.
Paddle types and matching to materials
The right paddle type significantly impacts mix quality and motor efficiency. Different materials require specific paddle geometries for optimal results.
- Plaster: Twin-blade paddles are ideal for thin plaster slurries, providing efficient mixing with minimal air entrainment. Incorrect paddle choice can lead to weak bond and cracking.
- Mortar: Spiral or helical paddles are best for mortar, ensuring desired consistency and shear. Using the wrong paddle may result in uneven texture and poor workability.
- Concrete: Helical paddles with high-twist design are suitable for concrete mixes, preventing segregation and ensuring uniform consistency. Incorrect paddle choice can cause staining and weak bond.
Safety and ergonomic accessories
Proper accessories enhance control, reduce fatigue, and prevent accidents during mixing. Inspect accessories before use to ensure they’re secure and functional.
Secondary handles: These improve control and stability when mixing large batches or heavy materials. They help distribute the weight evenly, reducing operator strain.
Splash guards: Essential for working with hazardous materials, splash guards protect against splatter and spills. They minimize contact with harmful substances, ensuring safety during operation.
Extension shafts: For mixing large batches or reaching deep containers, extension shafts maintain control and reduce operator strain. They allow for better maneuverability and easier access to hard-to-reach areas.
Tools and materials checklist for a mixing job
Preparation is key to efficient mixing. Review this checklist before starting to ensure all necessary items are present.
- Drill: A suitable drill with the required power and torque for the task at hand. Check the drill’s specifications to ensure it can handle the load.
- Paddle: The correct paddle type, as discussed earlier, matching the material being mixed.
- Mixing container: A sturdy, suitable bucket or container for the volume of mix required. Check the condition and size to ensure it’s appropriate for the job.
- Personal Protective Equipment (PPE): Gloves, safety glasses, and other protective gear necessary when working with hazardous materials or heavy equipment.
- Cleanup supplies: Buckets, sponges, brushes, and other tools needed for cleaning up after the mixing job is complete. Having these on hand makes post-job cleanup more efficient.
Common Mistakes, Troubleshooting, and When to Stop Using a Drill
Common mistakes include overloading, running at high torque or speed, and using inappropriate paddles. These actions can damage motors or yield poor mixes. Recognize these patterns early to avoid problems.
Quick troubleshooting covers stalled motors, overheating, uneven texture, paddle wobble, and odors. On-site fixes include adjusting load, pausing, and verifying fit. Know when to switch to a dedicated mixer and how to upgrade safely.
Typical user errors to avoid
Avoid these common mistakes when using mixing drills with concrete, mortar, and plaster to prevent motor damage and ensure consistent mixes.
- Using oversized paddles: Incorrect paddle size can cause excessive strain on the drill. Use paddles that match your material and bucket volume.
- Starting at high speed: Starting at high speed can cause material to splash out of the bucket or result in an uneven mix. Begin mixing at low speed, gradually increasing as the mix thickens.
- Overfilling buckets: Overfilling buckets leaves no space for material expansion during mixing, leading to spills and poor mixes. Leave some space at the top of the bucket.
- Ignoring duty-cycle limits: Pushing your drill beyond its rated duty cycle can cause it to overheat and fail. Respect the manufacturer’s guidelines to prevent motor burnout.
Regularly inspect and maintain your equipment to avoid these common mistakes and ensure consistent results.
Troubleshooting performance issues
If you’re experiencing performance issues while mixing, prompt diagnosis can help prevent further damage and ensure consistent results. Here are some steps to diagnose common problems:
Overheating: If your drill feels hot or the motor starts making unusual noises, pause mixing immediately and allow it to cool before resuming. Reduce load if necessary.
Low torque: If your drill is struggling to mix material, check that the paddle is secure and appropriate for the material. Reduce speed if the motor is straining.
Vibration or uneven mixes: Inspect for visible damage, check paddle fit, and verify motor condition. Regularly clean and maintain your equipment to prevent performance issues.
Signs you need a dedicated mixer
If you’re frequently mixing large volumes or struggling with consistency, it might be time to upgrade from your drill to a dedicated portable concrete/mortar mixer. Here are some signs to look out for:
Frequent mixing of large batches: If you find yourself constantly pushing your drill’s limits, upgrading to a dedicated mixer can improve efficiency and results.
Struggling with mix consistency: If you’re having trouble achieving consistent mixes, consider upgrading paddles or length, and ensure they match your material type and batch size. A dedicated mixer may also provide better consistency.
Regularly review your equipment needs as project requirements change to ensure you have the right tools for the job.
Buying, Maintenance, Long-Term Costs, and Planning by Project Size
Mixing Drill Purchase Considerations
When purchasing a mixing drill, balance the initial purchase price against long-term costs and maintenance needs. Match equipment size to project scale, from small repairs to professional workloads, to ensure suitable vessel capacity and prevent overspending on excessive or underpowered tools.
Evaluate productivity gains and minimize downtime by choosing gear that offers consistent mixing results across various job sizes. Implement a routine maintenance plan covering heat management, seals, brushes, and proper cleaning to extend motor life. Include storage and seasonal work considerations for optimal tool care. For infrequent, small projects, electric hand mixers or drill-attached paddles may be cost-effective. However, frequent use and larger batches necessitate dedicated grout/mortar mixers with higher torque and capacity to avoid reduced lifespan and increased downtime from inadequate maintenance.
Maintenance tasks and extending tool life
Maintaining your mixing drill ensures consistent performance and prolongs its lifespan. Regular care includes cleaning, checking brushes (if applicable), cooling intervals, and inspecting gears and cords.
- Cleaning: After each use, remove any residue with a wire brush or cloth to prevent buildup and ensure optimal performance.
- Brush inspection (corded drills): Check carbon brushes regularly for wear. Replace them when they’re shorter than 1/4 inch to maintain motor efficiency.
- Cooling intervals: Allow the drill to cool down after prolonged use to prevent overheating and damage to internal components.
- Gear inspection (corded drills): Inspect commutator and armature for signs of wear or damage. Clean with a suitable solvent if necessary.
- Cord inspection: Check the power cord for fraying, cracks, or other damage that could pose a safety hazard. Replace if damaged.
Choosing equipment by project scale
The size and frequency of your mixing projects should dictate the type of tool you use to ensure optimal productivity and cost-effectiveness.
- Occasional small-scale jobs: A robust drill with attachable paddles may suffice. These tools are versatile and can handle occasional mixing tasks efficiently.
- Recurring medium-to-large volume work: Invest in a dedicated mixer for increased efficiency and durability. These tools are designed to handle frequent, high-volume mixing jobs.
- Large-scale concrete pours: Consider renting or purchasing a heavy-duty, high-torque mixer specifically designed for large concrete batches. These tools can significantly reduce mixing time and labor costs.
- Drywall repair and small mortar mixes: A compact, dedicated grout/mortar mixer may be ideal. These tools are designed to handle small to medium-sized batches efficiently.
- Multi-tool systems: For those with varying project scales, consider a multi-tool system that includes a drill and attachable mixing paddles, as well as a dedicated mixer for larger jobs.
Safety precautions and PPE for mixing jobs
Prioritizing safety reduces the risk of injury and ensures a comfortable working environment. Follow safe mixing practices and wear appropriate personal protective equipment (PPE).
When working with dry or wet materials, use gloves to protect your hands from irritation and cuts. Wear eye protection to shield against debris and chemical splashes. A dust mask is essential for protecting against inhalation of harmful particles.
Always mix materials in a well-ventilated area, and avoid mixing near open flames or heat sources. Keep children and pets away from the work area during mixing operations.
If you’re unsure about any safety precautions, consult the material’s safety data sheet (SDS) or contact the manufacturer for guidance.
Conclusion
Choosing the right mixing drill and using it with care protects the motor, ensures uniform mixes, and keeps finished work looking right for years. When you pair the correct torque and speed with proper paddles and a measured load, you reduce heat buildup, prevent uneven textures, and cut the risk of surprises on site or in the basement.
Start with a simple, practical routine: verify the mixer and paddle are appropriate for concrete, mortar, or plaster, choose a drill type that provides enough torque for the batch size you plan, run a small test mix to check texture and consistency, watch the motor for unusual heat or stalling, stop to rest if the load seems heavy or the drill strains, and clean the equipment after use to prevent corrosion or residue buildup. If you are unsure about mix ratios or recommended RPM for a specific material, check the manufacturer instructions or label, and adjust in small increments rather than by guessing.
Common mistakes to avoid include overloading the drill or running at high speed with a heavy load, using the wrong paddle or a mismatched tool for the material, and neglecting to test a small batch before committing to a full mix. Practice safe handling by keeping hands away from the paddle while it’s turning, wearing eye and dust protection, and unplugging the drill before changing paddles or cleaning. A slow, deliberate approach and regular checks on temperature, texture, and consistency help prevent motor stress and damaged finishes.
If the project scale or material complexity exceeds your experience, or you notice persistent overheating, unusual noises, or inconsistent mixes despite following guidance, consider consulting a professional. Small projects can often be completed safely with careful planning and testing, but professionals can help with larger jobs or unusual mixes. With careful selection, deliberate testing, and steady execution, you can achieve reliable results and protect your tools for the long term.
FAQ
What are the tangible benefits of proper mixing for concrete, mortar, and plaster?
Proper mixing ensures uniform material consistency, reduces air pockets, and improves strength and finish quality. It also helps achieve predictable work times and reduces the risk of brittle patches or separation. Always follow material manufacturer guidance for best results.
What are the main limitations of using regular drills for mixing these materials?
Regular drills are not built for continuous, high-torque mixing and can overheat or wear quickly. They may lack the appropriate paddle geometry and shaft design for thick mixes, leading to poor blending. For heavy or dense batches, dedicated mixing tools are generally more reliable.
How should I think about torque and speed when choosing a mixing tool?
Look for a drill or mixer that provides steady, moderate torque at low to medium speeds suitable for thick mixes. High speeds can whip air into the mix or cause splatter, while low speeds with adequate torque promote thorough, uniform blending. Always verify the tool’s duty rating and follow material-specific recommendations from the manufacturer.
Which paddle types and attachments are recommended for different materials?
Use paddles designed for heavy, viscous mixes and for the specific material you’re working with. Material-specific paddles can improve blending and reduce strain on the tool. Check the label or manufacturer instructions to ensure compatibility with concrete, mortar, or plaster products.