
Introduction
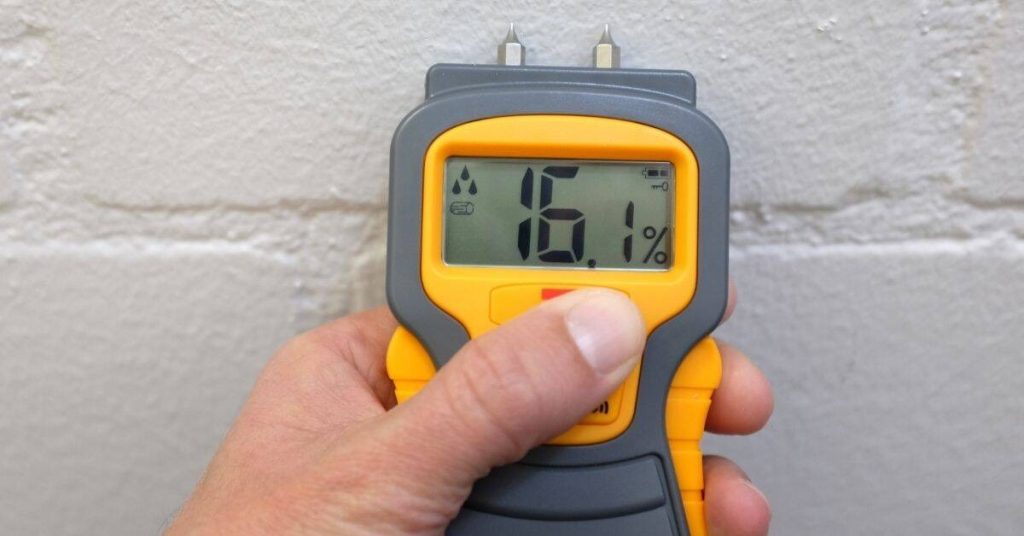
Cheap moisture meters for masonry offer quick, basic moisture readings at low cost. They are generally simpler and focus on giving a general sense of dampness rather than precise levels. For DIY projects, they’re a starting point, but their accuracy can vary with material and surface conditions.
Professional meters usually combine pin and pinless modes and give more reliable, deeper readings for masonry. They may also include features like improved calibration, data logging, and built-in guidance, and their price reflects the extra accuracy and capabilities. When choosing, check the method, calibration options, and what the manufacturer suggests for masonry materials.
Key takeaways
- Pinless meters offer quick, surface-wide scans without penetrating masonry surfaces.
- Pin-type meters provide point-specific readings and may require drilling test access.
- Consumer meters typically under-report moisture in dense masonry; exercise caution and safety checks.
- Pro meters add calibration checks, deeper sensing, and data logging for audits.
- Accurate interpretation requires verifying with lab methods when critical readings occur.
- Plan inspections with documented workflow, safe access, and clear reporting to stakeholders.
Table of Contents
- Introduction
- Key takeaways
- How Moisture Meters Work: Pinless Vs Pin-Type and Sensing Principles
- Accuracy and Limitations When Measuring Masonry
- What Cheap/Consumer Meters Typically Offer (and Where They Fall Short)
- What Pro/Industrial Meters Add for Masonry Inspections
- Calibration, Verification, and When to Use Lab Methods
- Data Documentation, Mapping, and Reporting
- Cost-Effectiveness, Lifecycle, and Buying Decision Guide
- Safety, Common Mistakes, and Practical Masonry Inspection Workflow
- Conclusion
- FAQ
How Moisture Meters Work: Pinless Vs Pin-Type and Sensing Principles
Moisture meters use two core approaches: pin-type resistance and pinless capacitive sensing. Pin-type measurements involve inserting probes to interact with the material matrix, while pinless devices scan the surface or just beneath it without penetration. Readings reflect electrical impedance and signal coupling, not a single universal method.
In masonry, sensor performance depends on frequency, electrode spacing, and how the signal couples with brick, block, mortar, and coatings. Surface conditions, porosity, and interior barriers influence accuracy and interpretation. Plan for quick surface checks with pinless meters and deeper readings with pin-type tools when needed.
Pinless (non-destructive) sensing
Pinless moisture meters use capacitive or frequency-based sensing to scan through surface layers without causing any damage. This non-invasive method is ideal for quick, initial checks and when preserving the surface’s integrity is crucial.
Advantages: No surface damage, quick and easy to use.
Limitations: Depth range varies by model; readings can be influenced by substrate properties. Always check manufacturer depth specs for accurate expectations.
For subsurface moisture detection, consider using pin-type or probe meters as they can reach deeper into the material.
Pin-type (contact) sensing
Pin meters measure resistance between electrodes by making direct contact with the masonry surface. This method requires either pressing pins onto the surface or drilling small holes for better contact.
Advantages: Can reach deeper into dense or salt-contaminated masonry, providing more accurate readings in such conditions.
Considerations: May cause minor surface damage; readings can be affected by substrate properties and potential salt contamination. Always consider these factors when interpreting results.
If preserving the surface is a priority, opt for pinless meters or use pin-type meters with care, filling any holes afterwards if necessary.
Combined and specialty sensors (dual-mode, probes)
Some moisture meters offer combined or specialty sensors that allow for both surface and deeper moisture detection. These can include pinless, pin, or probe attachments to provide more situational information.
Advantages: Versatile; useful when both surface and subsurface checks are required, offering a comprehensive view of moisture conditions.
Considerations: Be aware of specific sensor limitations and calibration needs for each mode. Always follow manufacturer guidelines to ensure accurate readings.
For complex tasks with varied depth requirements, consider using combined or specialty sensors to gain more detailed insights into the moisture situation.
Accuracy and Limitations When Measuring Masonry
Masonry presents porosity, salts, and contaminants that affect readings differently from wood. Surface coatings and efflorescence can skew calibration and contact quality. These factors make readings less straightforward and require careful interpretation.
Readings are best treated as relative indicators unless calibrated or lab-validated. Temperature, wet/dry cycles, and wall heterogeneity further complicate results. Use multiple measurements and clean surfaces to improve reliability.
Material calibration and correction
Masonry moisture meters must be calibrated for the specific materials you’re testing to ensure accurate readings. Different materials require different settings or offsets.
- Brick: Most meters have pre-set brick modes, but verify this in your user manual. Avoid using wood settings as they can lead to inaccurate readings and incorrect moisture management.
- Cement: Check if your meter supports cement-specific calibration. Using the wrong setting may result in weak bond strength or cracking.
- Mortar: Mortar requires its own specific settings due to its porous nature. Incorrect calibration can cause staining and other moisture-related issues.
- Concrete: Some meters have concrete-specific modes. Consult your user manual to ensure accurate readings and prevent structural damage.
- Stone: If testing natural stone masonry, check if your meter supports stone calibration. Using the wrong setting can lead to inaccurate readings and improper moisture control.
Environmental and surface effects
Temperature, salts (efflorescence), moisture gradients, and surface coatings can all skew moisture readings in masonry. Controlling or noting these factors is crucial for accurate interpretation.
Temperature: High temperatures can cause false positives. Monitor temperature during testing and note it with your results.
Salts/Efflorescence: The presence of salts on the surface can affect readings. Clean surfaces before testing, or note their presence to account for it in your interpretation.
Moisture Gradients: Masonry often has moisture gradients due to its porous nature. Be aware of this when interpreting your results and consider taking multiple readings across a single area.
Depth and spatial resolution limits
Different moisture meters penetrate to different effective depths in masonry. Understanding this is crucial for locating moisture paths effectively.
Effective Depth: Check your meter’s specifications or user manual to understand how deep it can detect moisture. Shallower penetration requires more test points for comprehensive mapping.
Masonry structures often have complex moisture paths due to their heterogeneous nature. To locate these effectively, map multiple locations across the surface and through the thickness of the masonry where possible.
What Cheap/Consumer Meters Typically Offer (and Where They Fall Short)
Inexpensive meters usually measure pin or pinless moisture on a relative scale with basic alerts. They often have limited calibration options and minimal data handling capabilities. These characteristics suit quick DIY checks but limit complex diagnostics.
Pros need for a professional remains when deeper, multi-mode assessment and robust data logging are required. For simple tasks, these meters provide a useful initial screen, as long as results are not over-interpreted. Always check manufacturer instructions for proper usage on masonry surfaces.
Typical DIY Use Cases
Cheap moisture meters are invaluable for quick, simple checks around the home. Before tiling, painting, or installing new fixtures, test for obvious moisture to prevent costly mistakes.
Post-leak spot checks can confirm drying progress and help you know when it’s safe to resume repairs or improvements.
However, if suspecting hidden moisture or complex issues, always escalate to professional testing. Regularly test and document readings, but avoid over-interpreting single readings in damp walls.
Limitations and Risks of Relying on Low-Cost Meters
While cheap moisture meters offer quick checks, they have limitations. False positives/negatives can occur due to surface effects or limited sensing depth, making it hard to diagnose issues accurately.
These meters may not quantify moisture content precisely, and they might miss deep or localized moisture. Always consider environmental and surface effects, and test on known controls for accurate results.
If requiring precise moisture quantification, professional testing with calibrated equipment is recommended. Understand the limitations of your meter to avoid misdiagnoses and costly repairs.
What Pro/Industrial Meters Add for Masonry Inspections
Professional meters offer multi-mode sensing, including both pinless and pin-based options with deeper scan capabilities. Material-specific modes help tailor measurements to concrete, brick, or mortar. These features improve detection and documentation on masonry surfaces.
Calibrations can be adjusted for the target material, and data logging with timestamps supports traceability. Mapping, geotagging, and accessory probes enable deeper or invasive checks when required. These tools enhance confidence and the quality of reports.
Key professional features to prioritize
When selecting a moisture meter for masonry inspections, consider these key features to ensure accurate readings and reliable results.
- Masonry calibration: Verify the meter is calibrated for concrete, brick, and mortar. This ensures accurate readings specific to masonry materials.
- Data export: Check compatible data export formats (CSV, PDF) to integrate with reporting software seamlessly.
- Multiple sensing depths: Ensure the meter offers various sensing depths (pinless, pin-type, probes) for comprehensive moisture diagnosis.
- Rugged construction: Inspect the meter’s durability and robustness to withstand harsh job site conditions.
- Traceable calibration support: Confirm the meter comes with certificates or records documenting traceable calibrations.
Quick rule: Prioritize these features for confident, well-documented masonry inspections.
Pro use cases on masonry projects
Professional moisture meters excel in various masonry applications. Here are some key use cases to consider:
- Post-remediation verification: Confirm moisture levels have been reduced to acceptable standards after remediation work.
- Forensic moisture mapping: Identify and document moisture distribution across walls or structures to inform repair strategies.
- Condition surveys for heritage masonry: Assess moisture-related damage and deterioration in historic masonry buildings.
- Pre-repair moisture acceptance testing: Ensure moisture levels are within acceptable ranges before proceeding with repairs to prevent further issues.
Quick rule: Apply moisture meters effectively in these professional use cases for confident, informed decision-making.
Calibration, Verification, and When to Use Lab Methods
Calibration and verification ensure readings are meaningful for masonry, considering mortar, brick, CMU, and plaster variability. Different meter types require different reference procedures. Follow manufacturer guidance to maintain accuracy over time.
Field verification uses known-dry references and baseline conditions, with lab methods reserved for high-precision needs. Gravimetric or oven-dried analyses confirm critical readings when remediation decisions depend on exact moisture content. Documenting conditions is essential.
Field Calibration Checks and Reference Samples
Before using your moisture meter on masonry surfaces, ensure its accuracy with simple on-site checks. This helps maintain confidence in your readings throughout the inspection.
Known Dry/Wet References: Use areas known to be dry or wet as references. Compare your meter’s readings against these known conditions to verify its functionality and calibration.
Repeatability Tests: Take multiple readings at the same spot on a consistent surface. If the readings vary significantly, recalibrate your meter or verify its functionality according to the manufacturer’s guidelines.
Document all reference checks and repeatability tests for your inspection records. This helps maintain a record of your meter’s performance and any adjustments made during the inspection process.
When to Escalate to Laboratory or Destructive Testing
While field moisture meters provide valuable data, there are situations where more precise assessment methods are required. Knowing when to escalate to laboratory or destructive testing can save time and prevent misdiagnosis.
Conflicting Meter Results: If you’re getting inconsistent readings from different meters or areas, consider lab testing or core sampling to confirm the moisture content accurately.
Suspected Salts or Structural Concerns: The presence of salts or structural issues may require destructive testing. This involves taking samples from the masonry for laboratory analysis, which can provide more detailed information about the moisture and salt content.
Consult with a professional engineer or lab specialist to confirm if further testing is necessary. They can provide guidance based on your specific situation and local regulations. Always prioritize safety and follow proper sampling procedures when performing destructive testing.
Data Documentation, Mapping, and Reporting
A complete data package includes the measurement method, material type, and depth of concern. Recordings should note date, time, location, and device settings to enable traceability. Distinguish surface readings from subsurface indications clearly.
Best practices cover visual evidence, standardized photo protocols, and clear links between images and measurement points. Mapping and heat maps help demonstrate moisture distribution for remediation and warranties. Both cheap and pro meters can contribute useful records with consistent templates.
Creating Moisture Maps and Inspection Reports
When conducting a masonry moisture inspection, it’s crucial to document your findings in a way that allows for easy understanding, tracking of changes over time, and effective remediation. Here’s a checklist to help you create comprehensive moisture maps and reports.
- Site Map/Floor Plan: Have a detailed site map or floor plan ready to mark spot readings or plot continuous scans.
- Spot Readings: Mark each spot reading’s location on the map with clear labels (e.g., Wall 1, Section A).
- Continuous Scans: If using a pro meter with this capability, plot the scan path and data points on the map.
- Geo-Tagging: If your meter supports it, use GPS or geo-tagging to automatically link readings to their locations.
- Exportable Reports: Use meters that can export reports in formats like CSV or PDF for easy integration with mapping software.
- Trend Lines/Heat Maps: Create these using your data points to visualize moisture distribution and changes over time.
- Metadata Storage: Keep metadata (e.g., date, time, unit of measure) organized for traceability.
- Reference Checks: Include any reference checks or control readings in your map and report.
Quick rule: Ensure all data points are accurately tagged to their respective locations on the map to avoid confusion during remediation or follow-up inspections.
What to Record for Reliable Inspection Records
To ensure your masonry moisture inspection records are reliable, repeatable, and informative, make sure to record the following details at each test point.
- Measurement Date/Time: Note when the reading was taken to track changes over time.
- Unit of Measure: Record whether you’re using relative humidity or moisture content percentage.
- Reading Type: Indicate if readings are spot checks or continuous logs.
- Meter Type: Specify if you’re using a pin or pinless meter.
- Meter Settings: Record the frequency and range used for pinless meters, or the depth of penetration for pin meters.
- Surface Condition: Note any relevant surface conditions that might affect readings (e.g., efflorescence, paint).
- Ambient Conditions: Record ambient temperature and humidity to account for environmental effects.
- Exact Location: Clearly mark the wall or section where each reading was taken.
- Reference Checks: Include any reference checks or control readings in your records.
- Calibration Status: Note when and how the meter was last calibrated.
Quick rule: Maintain a standardized format for recording and storing data to ensure consistency across inspections and easy retrieval when needed.
Cost-Effectiveness, Lifecycle, and Buying Decision Guide
Upfront cost versus long-term value should consider expected lifespan, calibration needs, and potential repair costs saved by accuracy. Higher-quality meters may reduce repeat visits and misdiagnoses over time. Balance initial spend with anticipated use and project scope.
Usage patterns and masonry types influence choice, as do regulatory requirements and reporting needs. Use a framework of accuracy, depth, data logging, and ease of reporting to guide decisions, not price alone. Map needs to practical project scenarios before buying.
When a Pro Meter is Worth the Investment
A professional-grade moisture meter can be a worthwhile investment in several scenarios:
Frequent Inspections: If you perform regular assessments, such as annual checks or ongoing remediation work, a pro meter’s accuracy and reliability can help reduce risks and potential costs.
Contract Reporting: When required to comply with relevant standards (e.g., ASTM E2177) and regulatory requirements, a pro meter ensures accurate, repeatable results for critical assessments.
Forensic Investigations: In high-stakes situations, a pro meter’s long-term stability and advanced features can provide crucial insights into moisture-related issues.
When a Cheap Meter is Appropriate and How to Get the Most From It
A low-cost moisture meter can be sufficient for occasional DIY projects or low-risk assessments, but getting reliable results requires careful procedure:
Combine with Visual Checks: Cross-verify meter readings with visual checks to confirm potential moisture issues.
Follow Manufacturer Guidelines: Ensure the meter’s accuracy is suitable for your intended use and follow the manufacturer’s instructions for optimal performance.
Use Confirmatory Testing: When necessary, employ other simple tests (e.g., moisture-sensitive paint) to corroborate your findings and enhance confidence in your results.
Safety, Common Mistakes, and Practical Masonry Inspection Workflow
Safety considerations include electrical hazards, mold exposure, and signs of structural issues that require a pro. Use appropriate PPE and follow site-specific safety protocols while testing. Be mindful of live wiring or compromised structures in test zones.
Common mistakes include selecting the wrong meter for the substrate, skipping surface prep, and misinterpreting relative versus absolute readings. A concise workflow from setup to moisture mapping helps reduce errors and improve result quality.
Common mistakes to avoid
To ensure accurate moisture readings on masonry, be aware of these common pitfalls:
- Misreading relative scales as absolute: Understand that moisture meters show relative moisture content; they don’t provide exact figures.
- Testing over contaminated finishes: Remove or account for surface coatings, rebar, or moisture barriers before testing.
- Ignoring temperature/salt effects: Consider environmental factors that can affect readings.
- Not documenting context: Record location, depth, material type, and environmental conditions to correlate readings with potential sources of intrusion or mold.
By avoiding these mistakes, you’ll improve the reliability of your moisture readings on masonry.
Practical step-by-step inspection workflow
Follow this systematic approach to efficiently inspect and document moisture levels in masonry:
- Perform a visual inspection to identify potential moisture paths and areas of concern.
- Choose the appropriate meter mode: pin or pinless, depending on your masonry type.
- Collect systematic readings, taking multiple measurements per area to ensure accuracy.
- Record data including location, depth, and material type for each reading.
- Compile a moisture map to visualize and interpret results, noting potential sources of intrusion or mold.
- If readings indicate structural concerns, mold, or persistent high moisture levels, escalate to a professional for further assessment.
Visual checkpoints and verification methods
Use these quick visual checks alongside meter readings to corroborate moisture issues in masonry:
- Staining: Look for discoloration or staining, which can indicate water intrusion.
- Efflorescence: Check for white, powdery deposits on the surface, a sign of excess moisture.
- Probe holes: Drill small holes to check for dampness inside the masonry; seal afterwards.
- Cracking or spalling: Inspect for signs of damage due to excessive moisture.
Quick rule: Always use visual checks in conjunction with meter readings for comprehensive moisture assessment.
Conclusion
Choose a moisture-meter approach that matches the masonry you’re inspecting and the level of accuracy you need, and prioritize readings that protect the structure, appearance, and long-term durability.
When you proceed, verify the tool’s suitability for masonry, perform a small-area test first, record readings with date and location, compare results from different modes if available, and follow manufacturer instructions for calibration verification and proper sensor placement. Use a clear workflow: set baseline readings, document any changes over time, map problem areas as you go, and keep notes for reporting. If in doubt, prefer safer, low-risk checks and escalate to more precise methods or professionals as needed.
Common mistakes to avoid include pushing for fast results without confirming calibration or using the wrong mode for masonry, skipping verification steps, and failing to document location, surface conditions, or drill/repair history. Always wear appropriate safety gear, work from a stable surface, and test a small, inconspicuous area before broader use. When moisture readings could affect structural integrity, when you encounter ambiguous results, or when repairs sit behind difficult-to-access masonry, call a professional to guide the assessment and treatment plan. With careful testing and proper documentation, you can make informed decisions that protect safety, durability, and value.
FAQ
How do pinless and pin-type meters differ for masonry, and when should you use each?
Pinless meters scan the surface with electromagnetic signals and are quick for large area checks without penetrating the wall. Pin-type meters insert pins to measure at a precise depth, which can reveal moisture at specific layers. Use pinless for a fast survey; use pin-type when you need depth-specific information or suspect localized wet spots.
How reliable are masonry moisture readings, and what factors affect accuracy?
Accuracy depends on material heterogeneity, surface condition, and proper tool use. Factors like texture, porosity, and temperature can influence results. For best reliability, follow manufacturer guidance, verify with multiple readings, and consider calibration checks as part of the workflow.
What are the general price differences between cheap and professional models, and what features justify higher cost?
Lower-cost models typically offer basic readings and fewer data options, while professional meters provide advanced features such as data logging, multiple measurement modes, and more robust calibration options. Higher-cost meters can improve repeatability and support longer-term documentation. Evaluate whether you need field-ready durability, deeper data capture, and higher accuracy for your projects.
What features are unique to professional-grade meters and how do they affect workflow?
Professional meters often include multiple scales, deeper penetration, built-in data storage, and easy export of results. They may offer self-calibration, full-spectrum sensing, and compatibility with software for reporting. These features support consistent inspections, traceable records, and more efficient reporting.