
Introduction
This guide focuses on enhancing your caulk gun setup for masonry sealants, addressing thrust control, drip prevention, and nozzle trimming. It provides practical checks you can perform during typical on-site jobs without relying on external resources.
To achieve a drip-free application, look for guns with built-in features to prevent drips. Practice nozzle trimming techniques to manage flow and neatness. Thrust ratios vary among models; follow manufacturer instructions and test on scrap material to assess control. Regular maintenance, including cleaning and inspecting seals, ensures consistent performance over time.
Key takeaways
- Successfully Added to Cart! Verify model compatibility before checkout.
- Drip-free features dramatically cut cleanup time and protect masonry surfaces.
- Different thrust ratios affect tool feel; choose models within your project needs.
- Nozzle trimming: wear safety gear and avoid trimming near open flame or dust.
- CHECK US OUT ON SOCIAL MEDIA: stay updated on tips, demos, and upgrades.
Table of Contents
- Introduction
- Key takeaways
- Successfully Added to Cart!
- Understanding Thrust Ratio and Why It Matters for Masonry Sealants
- Drip-Free Technology: Mechanisms, Benefits, and Selection
- Nozzle Trimming and Bead Control for Masonry Sealants
- Model Comparison and Upgrade Paths for DIY Vs Professional Use
- Durability, Maintenance, and Ergonomics
- Material Compatibility, Safety, and Environmental Considerations
- Cost, Planning Guide, Common Mistakes, and Troubleshooting
- Conclusion
- FAQ
Successfully Added to Cart!
Before you checkout, confirm you selected the correct masonry caulk gun model, verify the thrust ratio suits your sealant type, and double-check cartridge compatibility (thread size and nozzle type). Also ensure you have the right essential accessories and spare parts, such as a dripless plunger, interchangeable nozzles, a cutter, and a cartridge waste cap, and consider nozzle trimming and dripless features for clean, steady beads.
This check helps you avoid second-order orders and speeds future projects. Signing in to save favorites and quick-pick presets lets you reuse gun + cartridge combos for similar jobs, while reviewing quantities and shipping details at checkout reduces surprises. If the cartridge nozzle doesn’t match the joint profile, trimming or an adapter can help, and a quick pro check now keeps your masonry work on track.
Cart checklist
Before finalizing your purchase, use this checklist to ensure you’ve added the right items for a successful masonry caulking project.
- Masonry Caulk Gun Model: Verify it matches your project requirements. If incorrect, Remove and select the correct model.
- Thrust Ratio: Confirm it suits your sealant type. If not, Adjust or replace with a suitable thrust ratio.
- Cartridge Compatibility: Double-check thread size and nozzle type match. Incompatible cartridges may cause application issues.
- Dripless Plunger: Ensure it’s included to prevent mess during use.
- Interchangeable Nozzles: Include various sizes and angles to suit different joint profiles.
- Cutter/Snips: Essential for trimming cartridges. Without it, you may struggle to open cartridges.
- Cartridge Waste Cap: Helpful for containing waste material during cartridge changes.
- Masonry-Specific Adapters: If required, include them to ensure a proper fit with your masonry surfaces.
Quick rule: Review this checklist before proceeding to checkout to avoid second-order orders and ensure project success.
Shipping, returns, and warranty reminders
Familiarize yourself with post-purchase processes to ensure a smooth experience. Understanding shipping times, return windows, and warranty coverage helps make informed decisions.
Shipping Times: Confirm they align with your project timeline. If too long, consider alternative suppliers or expedited shipping.
Return Window: Ensure the return period is sufficient for your needs. If not, contact customer service to discuss extension or exchange options.
Warranty Terms: Note coverage duration and any registration requirements. Subscribe for accessory updates or maintenance reminders to stay informed about your purchase’s lifecycle.
Understanding Thrust Ratio and Why It Matters for Masonry Sealants
Thrust ratio describes how much force is transmitted from your hand to the cartridge plunger in simple terms. It relates to how heavy or thick sealants feel when you push the trigger and how that translates into bead control. The right ratio helps you maintain a steady, uniform bead without excessive effort or uneven dispensing.
Masonry sealants and heavy mastics behave differently from lightweight caulks, demanding different dispensing force and feedback. Look for features that support smooth rod action and comfortable operation to keep the bead consistency steady. Testing the gun with your chosen sealants can reveal whether the ratio supports reliable control and repeatable results.
What thrust ratio means for performance
The thrust ratio of a caulk gun determines how much force you need to apply to dispense the sealant. For heavy masonry sealants and mastics, a higher mechanical advantage is crucial.
A higher thrust ratio makes it easier to extrude thick materials with better control. This reduces hand fatigue during long jobs.
Test the gun with a heavy mastic to feel its smoothness and resistance. If the gun feels jerky or requires excessive force, consider a higher thrust ratio option for improved performance and reduced strain.
How to choose based on sealant viscosity and job size
Matching the caulk gun’s thrust capability to your material’s viscosity is essential for a clean, uniform bead. Thicker materials require more force, while thinner ones need less.
For large jobs with thick materials, choose a caulk gun with an adjustable or high fixed thrust ratio. This ensures consistent bead size and smooth extrusion throughout the project.
Before committing to your chosen gun, test it on scrap material to ensure it can handle the required volume of sealant without over- or under-dispensing. If the gun struggles with thick materials, consider one with more mechanical advantage. Conversely, if it dispenses too quickly, try a lower thrust ratio.
Drip-Free Technology: Mechanisms, Benefits, and Selection
Drip-free mechanisms fall into several core approaches, including valve-controlled cutoffs, piston or rod designs, and self-sealing tips. Each aims to stop oozing once you release the trigger, reducing waste and cleanup. Understanding how these mechanisms work helps you choose a model that fits masonry work patterns and joint profiles.
In masonry applications, drip-free operation can improve bead cleanliness and project flow by minimizing mess and rework. Evaluate bead size control, compatibility with the working time of cementitious sealants, and ergonomics related to tip and trigger design. Consider maintenance needs to keep the drip-free behavior reliable over time.
How Drip-Free Mechanisms Work
The heart of a caulk gun’s drip-free technology lies in its ability to stop the flow of sealant once the trigger is released. This is achieved through several mechanisms:
- Pressure Relief: Some guns use a valve that opens when pressure is relieved, preventing any residual material from oozing out.
- Rod Retraction: Others employ a piston or rod design that retracts upon trigger release, pulling the sealant back into the gun’s body.
- One-Way Mechanisms: Some designs use self-sealing tips or check valves that allow material to flow out only when pressure is applied, preventing backflow.
Understanding these mechanisms ensures optimal performance. Regularly inspect and maintain mechanism components to prevent drips.
Comparing Dripless Types
The feel and precision of a caulk gun’s drip-free mechanism can vary based on its design. Here are some common designs:
- Hex Rod: These provide precise control, ideal for small joints and intricate work. They may require more effort to operate.
- Cradle: Cradle designs offer a balance between precision and ease of use, making them versatile for various joint sizes.
- Super Ratchet: These provide smooth, continuous operation with minimal effort. They excel in large-scale projects but may lack the precision of other designs.
Matching design to application ensures efficient work. Evaluate each design’s feel and precision with your intended masonry sealant before purchasing.
Model Examples to Evaluate
When considering specific caulk gun models, check the following:
- Frame Style: Some guns have a fixed frame, while others offer adjustable or swivel frames for better maneuverability.
- Rod Type: Evaluate the rod design (hex rod, cradle, etc.) to ensure it matches your needs.
- Finishing Tools: Some models come with additional tools like cut-off knives or sealant core removal tools for easier application and cleanup.
Test these models with your intended masonry sealant to verify their performance. Review model specifications before purchasing to ensure compatibility with your work conditions.
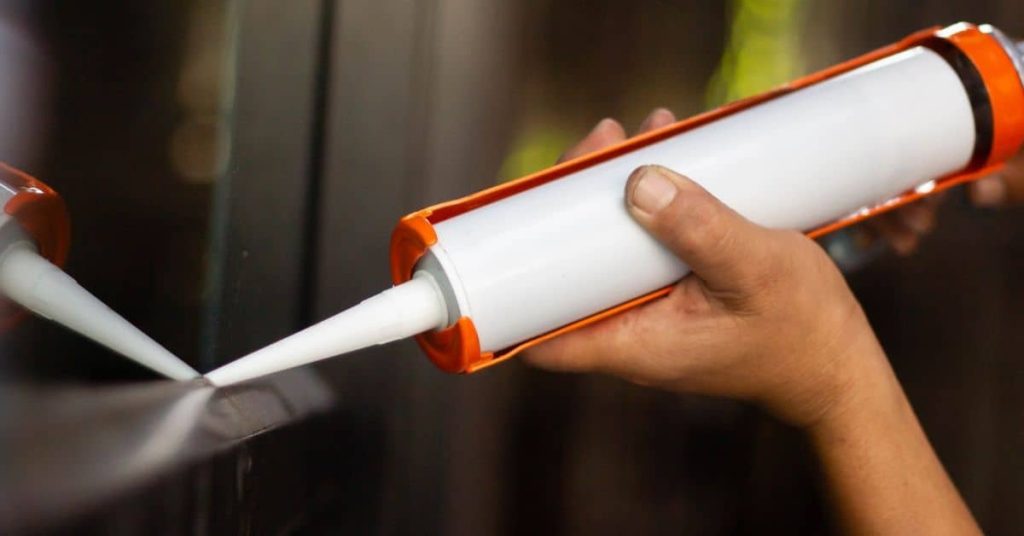
Nozzle Trimming and Bead Control for Masonry Sealants
Nozzle trimming options influence bead width and flow, with different diameters and shapes offering distinct control. Choose trimming options that align with the joint profile you’re targeting, and be prepared to adjust as projects vary. Consider how trimming choices affect drip potential and the ease of achieving clean starts and stops.
Detail the trimming technique and practical testing steps to calibrate flow, including starting with a conservative bead and validating on scrap material. Bead control fundamentals for thick, abrasive masonry sealants require consistent pressure and a steady hand to maintain uniform profiles along joints. Drip-free considerations connect to trimming size and angle, helping prevent backflow or stringing in vertical joints.
Trimming techniques for different joint profiles
The shape and size of the nozzle tip significantly impact bead control. Here are some trimming techniques to suit various joint profiles:
Beveled or V-shaped joints: Use a 45-degree angled cut with a corresponding bevel or V-tip nozzle. This ensures optimal contact with the joint and prevents over- or under-fill.
Square or rectangular joints: Start with a round tip, incrementally widening as needed. Bevel tips can also be used for a more finished look. If the bead is too wide or narrow, adjust nozzle size and re-test on scrap material to achieve the desired result.
Tools and materials checklist for trimming and finishing
Having the right tools ensures efficient and accurate nozzle trimming and finishing. Here’s a list of essential tools to have on hand:
- Spout cutter or sharp utility knife: Used for trimming nozzles to the desired size and shape. Ensure the blade is clean and sharp for precise cuts.
- Nozzle caps: Protects the nozzle during storage or transport, preventing damage and maintaining its shape.
- Buddy tool (optional): Aids in applying even pressure on the caulk gun’s trigger, ensuring consistent bead width. Can be rented or borrowed for occasional use.
- Spatula: Used to smooth and shape the sealant after application, removing excess material and creating a uniform bead profile.
- Caulk gun (with appropriate thrust ratio): Ensures consistent pressure and flow rate when applying masonry sealants. Check the label or manufacturer’s instructions to verify compatibility with your chosen sealant.
Model Comparison and Upgrade Paths for DIY Vs Professional Use
When comparing DIY-friendly guns with professional-grade models, focus on grip ergonomics, balance, and thrust mechanics as they relate to masonry sealants. Assess how these factors influence long sessions and accuracy in bead placement. Look for features that support easy operation without sacrificing control or durability.
Upgrade paths should balance initial cost with expected durability and maintenance needs. Consider how dripless mechanisms, improved plunger rods, and thrust ratio enhancements translate into practical gains on masonry tasks. Map recommended model categories and accessory bundles against project scale and budget, keeping in mind common pitfalls and the way upgrades mitigate them in real-world use.
Tradeoffs: frame type, thrust, and durability
The choice between cradle and parallel frames, along with the rod material, significantly impacts your caulk gun’s performance and lifespan. Cradle frames offer superior stability for heavy-duty tasks due to their design, which distributes weight evenly. However, they are heavier and less portable than parallel frames.
Parallel frames, on the other hand, are lighter and more maneuverable but may require additional support when dealing with high-viscosity sealants. They are ideal for lighter tasks or frequent repositioning.
Stainless steel, aluminum, and plastic rods are common, each with its own durability and compatibility considerations. Stainless steel is the most durable but also the heaviest, while aluminum offers a balance between weight and durability. Plastic rods are lightweight but less durable.
When selecting a caulk gun for masonry work, consider your job demands. For heavy-duty tasks with high-viscosity sealants, prioritize cradle frames for stability. If portability and maneuverability are crucial, consider parallel frames. Always verify the frame type and rod material in product specs to ensure they align with your needs.
Selecting upgrade priorities by project type
Prioritizing features based on your usage frequency and job complexity optimizes your investment in a caulk gun. Occasional homeowners may prioritize affordability and basic features, while serious DIYers and full-time contractors might require more advanced functionalities.
For occasional homeowners with small repairs, focus on affordability and essential features such as a suitable thrust ratio for your sealant type. Entry-level models with basic upgrades like drip-free mechanisms can cater to these needs.
Serious DIYers with varied tasks should invest in mid-range caulk guns that offer versatile features. An adjustable thrust ratio allows you to tackle different sealant types, while compatible nozzle trimming ensures precision work for various joint profiles.
Full-time contractors may require heavy-duty, professional-grade models with advanced features like super ratchet dripless mechanisms and robust frame designs. Always assess your personal needs before making a purchase to ensure the chosen model caters to your primary project types effectively.
Durability, Maintenance, and Ergonomics
Durability considerations center on material choice, corrosion resistance, and seal longevity when exposed to abrasive masonry sealants. Evaluate body construction and the quality of seals that withstand frequent use on concrete and brick substrates. Long-term reliability rests on robust design and durable components.
Maintenance routines cover cleaning after use, inspecting tips and traps, lubricating the plunger rod, and checking O-rings and seals for wear. Ergonomic design matters for hand fatigue, with attention to grip texture, trigger effort, and weight distribution. A simple preventive plan helps sustain performance and extend tool life in demanding masonry work.
Routine Maintenance Checklist
Perform these checks after each use and monthly for deeper cleaning to keep your caulk gun in optimal condition.
- Clean the barrel: Wipe out any remaining sealant with a damp cloth to prevent buildup and clogging. Neglect can lead to leaks or jams.
- Inspect rod and seals: Check the plunger rod and O-rings for signs of wear, damage, or cracks. Replace if necessary. Worn parts can cause sealant leakage.
- Lubricate moving parts: Apply a light coat of silicone-based lubricant to the plunger rod and other moving components to reduce friction and wear. Dry operation can cause excessive wear or jamming.
- Clean the tip/trap: Remove any dried sealant from the tip and trap area using a wire brush or needle-nose pliers. Buildup can interfere with smooth operation and cause drips.
- Check the trigger mechanism: Ensure the trigger moves smoothly and returns to its original position. Tighten any loose screws if necessary. Faulty triggers may cause drip-free mechanisms to fail.
- Inspect the nozzle: Check for cracks, wear, or blockages that could affect sealant flow. Replace if needed. Damaged nozzles can lead to inconsistent bead application.
- Check for leaks: Inspect all seals and connections for signs of leakage. Tighten any loose parts if necessary. Leaks can cause waste, mess, and tool damage.
- Store properly: Keep the caulk gun clean and dry in a cool, well-ventilated area to prevent corrosion. Improper storage can shorten tool life.
Quick rule: Regular cleaning, lubrication, and inspection are key to preventing failures and extending tool life.
Ergonomic Features to Look For
Comfortable tools reduce fatigue and improve precision. When choosing or upgrading your caulk gun, consider the following ergonomic features.
Handle shape: A pistol-grip style handle is typically more comfortable for extended use than a straight-handle design. It allows for a natural wrist position and better control.
Trigger effort: Light trigger pull makes it easier to apply consistent pressure, reducing hand strain during long projects. Test tools in-hand to assess comfort.
Weight balance: A well-balanced tool feels lighter and more comfortable in your hand. The weight should be evenly distributed for better control and reduced fatigue.
Grip texture: Textured grips provide better traction, reducing slippage and improving control. This is especially important when working with heavy-duty sealants or on uneven surfaces.
Material Compatibility, Safety, and Environmental Considerations
Identify compatible masonry sealants and note how viscosity and thrust ratio interact with your chosen gun. Consider metal versus plastic components that could react with certain solvent-based formulations. Verify guidance from the label or manufacturer instructions to confirm suitability for your material mix.
Match the gun to masonry-grade cartridges and ensure nozzle sizes and trimming practices align with your preferred bead profiles. Safety practices include handling solvents and adhesives with appropriate PPE and ventilation, while environmental considerations emphasize greener options and responsible disposal where applicable. Use a quick compliance checklist to confirm substrate compatibility, surface prep, cure guidance, and cleanup steps.
Sealant types and what to check on labels
Before starting any masonry sealing project, it’s crucial to ensure you’re using the right sealant for your surface. Here’s a quick checklist to help you:
- Masonry compatibility: Look for ‘masonry’, ‘cement-based’, or similar claims on the label.
- Viscosity range: Check if it matches your caulk gun’s thrust ratio (usually 10:1, 20:1, or 30:1).
- Flow test: Apply a small bead on a scrap surface to ensure desired consistency before starting.
- Avoid metal/plastic reactions: Check if the sealant is compatible with your gun’s components.
- Cure time: Verify how long it takes for the sealant to cure and plan accordingly.
- Cleanup requirements: Note what solvents or tools are needed for post-application cleanup.
- Temperature range: Ensure the sealant can handle your project’s temperature conditions.
- UV resistance: If applicable, check if the sealant can withstand sunlight exposure.
Quick rule: Always test a small amount of sealant on a hidden area to ensure it meets your needs before starting the project.
Safety, disposal, and eco-friendly options
Proper handling, disposal, and choosing eco-friendly sealants are essential for a safe and sustainable application. Here’s what you need to know:
Personal Protective Equipment (PPE): Wear appropriate PPE, including gloves, goggles, and a respirator when working with sealants.
Ventilation: Ensure adequate ventilation in the work area to minimize exposure to fumes. If possible, use fans or open windows.
Disposal and recycling: Follow manufacturer’s guidelines for disposing of empty cartridges. Check local recycling options for empty containers. Some sealants may be recyclable, while others require special hazardous waste disposal.
Eco-friendly choices: Look for ‘low-VOC’ or ‘water-based’ claims on labels to minimize environmental impact. These options are generally more eco-friendly than solvent-based alternatives.
Cost, Planning Guide, Common Mistakes, and Troubleshooting
Approach budgeting by outlining project scope and anticipated use to justify upgrades or rentals, while considering warranty terms. Plan purchases to align with project phases and evaluate whether bundles or essential accessories offer better value. Keep a record of expected maintenance needs to avoid surprise costs later.
Develop a practical decision pathway for selecting thrust ratio, drip-free features, and nozzle trimming needs that suit masonry sealants. Identify common missteps such as frame or rod installation errors, bead control neglect, over-tightening, or choosing an incompatible nozzle size. When troubleshooting drip-free and flow issues, follow a stepwise approach that encompasses priming, clog clearing, plunger adjustment, and type-specific guidance for your sealant and ambient conditions.
Budget Tiers and Cost-to-Value Considerations
When upgrading your caulk gun for masonry sealants, consider the following budget tiers to ensure you get the best value for your money:
Entry-level: These tools offer basic features at an affordable price. They are suitable for occasional use and smaller projects. While they may not last as long as higher-end models, they provide good value for their intended purpose.
Mid-range: Mid-range caulk guns strike a balance between affordability and durability. They often come with additional features like adjustable thrust ratios and dripless systems. These tools are ideal for most DIY projects and offer better long-term value than entry-level options.
Professional-grade: High-end caulk guns are designed for frequent, heavy-duty use. They feature robust construction, precise control, and advanced features like automatic rod retraction and adjustable pressure. While they come at a higher cost, their durability and performance make them a worthwhile investment for frequent users or large-scale projects.
Common Mistakes to Avoid and Quick Fixes
To ensure high-quality bead application, be aware of these common mistakes and their simple corrections:
- Wrong nozzle cut: Ensure the nozzle is cut at the correct angle for your project. A sharp 45-degree cut works well for most masonry applications.
- Poor rod adjustment: Adjust the rod tension to match the sealant’s consistency. Too loose or too tight can lead to poor flow control.
- Inadequate prep: Clean and prime the gun before use, and ensure the cartridge is properly seated in the gun.
- Over-tightening: Avoid over-tightening the caulk tube as it can cause excessive pressure buildup and lead to leaks or poor flow control.
Regularly check your nozzle cut, rod adjustment, and prep adequacy to maintain optimal bead quality.
Troubleshooting Drip-Free and Flow Problems
If you’re experiencing stopped or uncontrolled flow from your caulk gun, follow these diagnostic steps to identify and address the issue:
Blockage: Check for clogs in the nozzle or cartridge. Remove any obstructions by cleaning the nozzle or replacing the cartridge.
Mechanism wear: Inspect the rod, plunger, and other moving parts for signs of wear or damage. Replace worn-out components as needed to restore proper function.
Rod adjustment: Ensure the rod is properly adjusted for the sealant’s consistency. Tighten or loosen the rod tension as necessary to achieve smooth flow control.
Cartridge seating: Verify that the cartridge is securely seated in the gun and that the seal between the cartridge and nozzle is intact. Proper cartridge seating ensures consistent pressure and flow.
Conclusion
The key to a durable, clean seal is choosing the right gun setup and using it with care: limit mistakes by confirming your thrust ratio, drip-free features, and nozzle trimming work together to protect the masonry and look professional. Safety and control in the next steps prevent costly repairs and poor finishes.
Make your next moves by verifying compatibility on a small test area: confirm the chosen cartridge or tube works with your gun, check the drip-free mechanism in a short bead, trim the nozzle to the correct size for the bead you want, and then apply sealant in a steady, even pass while monitoring bead shape and excess squeeze-out. If any step feels uncertain, recheck the manufacturer instructions or labeling, and adjust before proceeding across the full project.
Common mistakes to avoid include applying sealant too quickly or with too much force, neglecting to test the drip-free feature before starting, and trimming the nozzle too aggressively or too conservatively. Maintain a calm pace, wipe excess promptly, and always wear eye protection and gloves. Plan for ventilation and clean the work area as you go to minimize mess and exposure to materials.
If the project involves larger areas, structural joints, or unfamiliar sealant products, consider professional help for a final pass or complex detailing. Otherwise, proceed with measured steps, keep test patches handy, and build your work across days if needed to preserve quality and safety. With careful preparation and steady technique, your masonry joints will seal reliably and endure.
FAQ
How does drip-free technology work in caulk guns and what should a DIY user look for?
Drip-free mechanisms typically control the flow of sealant after the trigger is released. Look for features described by the manufacturer, and check the product label or instructions for notes on valve design or spring action.
Check that the gun includes a method to reduce backflow and tip leakage. Confirm compatibility with masonry sealants and follow local guidance in the instructions for cleaning and storage.
What are best practices for nozzle trimming when working with masonry sealants?
Trim the nozzle straight and use a clean, sharp cutter. Start with a small opening and adjust to control bead size as you apply the sealant.
Keep tips clean and cap the cartridge when not in use. Refer to the manufacturer’s trimming guidelines and use a compatible nozzle for masonry products.
How should I compare thrust ratio across caulk gun models for DIY use?
Thrust ratio describes the effort needed to push the sealant; higher ratios reduce hand force. Check the model label or datasheet for the stated ratio or gearing description.
Consider your typical projects and test a model if possible. If unsure, look for recommendations in product instructions and compare how different handles feel during operation.
What maintenance helps keep a caulk gun reliable for masonry work?
Clean the plunger and nozzle after use to prevent sealant buildup. Lubricate moving parts as recommended by the manufacturer, and store the gun in a dry place.
Inspect for wear on the trigger, plunger, and seals. If you notice sticking or leaking, check the manufacturer instructions or local rules for safe maintenance steps. Ensure compatibility with the sealants you plan to use.