
Introduction
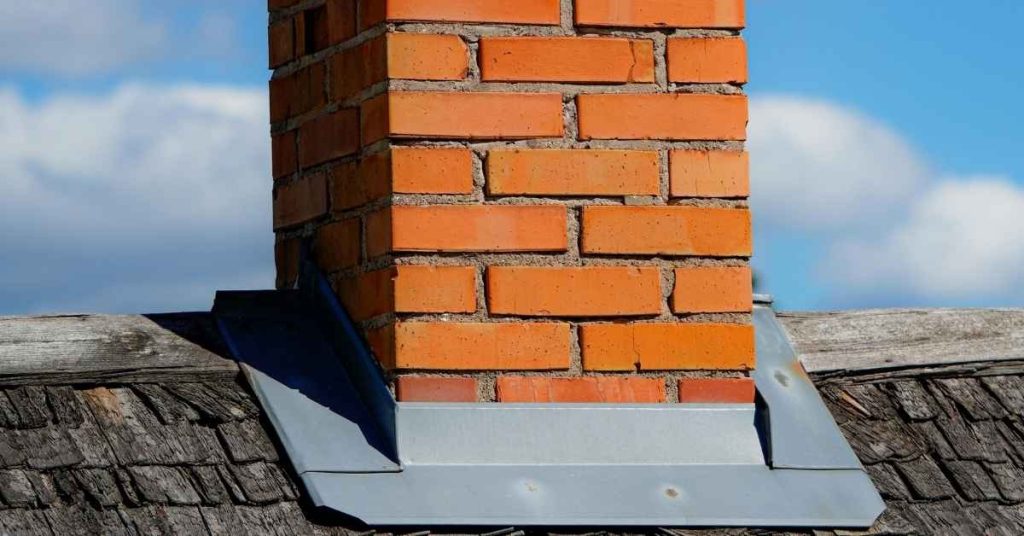
Brick flashing and weep holes at ledges are features that let water escape from behind brickwork. They direct runoff away from the wall and help prevent moisture damage. As a DIYer, you’ll inspect for proper placement and unobstructed openings before finishing the ledge.
Start by checking that flashing is in place under the brick and that weep holes are present and clear. If you see debris or blockage, clear it safely and avoid compressing the mortar near the openings. Always confirm with manufacturer guidelines and local requirements to ensure you’re meeting the standard for your wall.
Key takeaways
- Ensure through-wall flashing extends behind ledge and ties into counterflashing above properly.
- Check weep holes align with cavity and remain clear for drainage.
- Inspect ledge flashing for continuity; misalignment invites ponding and staining.
- Retrofitting: add continuous flashing replacement behind brick and re-drill weeps.
- Use compatible materials; mix cement and flashing per manufacturer instructions.
- Safety: protect by shutting down power tools, wear eye and hand protection.
Table of Contents
- Introduction
- Key takeaways
- How Water Moves in a Brick Veneer Wall and Why Ledges Matter
- Key Components — Through-Wall Flashing, Cavity, Weep Holes, and Counterflashing
- Ledge-Specific Flashing Details and Typical Configurations
- Step-by-Step Installation Checklist for New Construction at Ledges
- Retrofitting and Repairing Flashing and Weep Holes at Existing Ledges
- Inspection, Testing, and Visual Checkpoints at Ledges
- Common Failure Modes, Causes, and Troubleshooting
- Tools and Materials Checklist, and Material Compatibility to Check
- Conclusion
- FAQ
How Water Moves in a Brick Veneer Wall and Why Ledges Matter
Water starts at the brick face and can migrate inward if the masonry is not properly drained. It travels through mortar joints and along the surface until it reaches the cavity and flashing at each ledge. Ledges interrupt the natural flow and can concentrate moisture, creating focused paths for movement toward the interior.
When water reaches the horizontal ledge, gravity and detailing guide it toward flashings and weep holes. Elevated moisture at the ledge increases the risk of infiltration if drainage details are weak. Always check how the ledge design directs water away from the interior and toward the exterior drainage paths, and verify this with product labels or manufacturer instructions and local rules.
Capillary action, rain penetration, and cavity drainage
Water gets into brick joints through capillary action. It’s like how a sponge soaks up water.
Rain can also penetrate deep into the wall, especially during heavy storms or if the wall isn’t properly flashed.
Once inside, gravity and capillary forces work together to move that water downwards towards the flashing and weep holes at the bottom of your ledges.
Ledge geometry and its influence on flow paths
Ledges can be flat, sloped, or offset. Each shape affects where water goes.
Flat ledges let water sit and evaporate slowly. But if it rains too much, the water might not have anywhere to go but down into your wall.
Sloped ledges help water run off faster. But if they’re not sloped enough or if there’s an offset, water can still pool and cause problems.
Offset ledges create a step-like effect that can trap water. You’ll need to flash these areas carefully to direct the water out.
Key Components — Through-Wall Flashing, Cavity, Weep Holes, and Counterflashing
Through-wall flashing acts as the primary water channel behind the veneer. The cavity provides an air/moisture path that helps relieve pressure and move water outward. Weep holes are the relief points that allow any collected water to escape, especially near ledges.
Counterflashing works with the through-wall flashing to seal against water intrusion at projection joints. The moisture barrier and the proper cavity layout must work in concert to evacuate water efficiently at ledges. Confirm the roles and installation details in the product data sheets or manufacturer instructions and align them with local codes.
Through-wall flashing types and terminations
Flashing is your wall’s first line of defense against water intrusion. It’s a thin, impermeable barrier that diverts water away from the wall.
Common materials include galvanized steel, aluminum, and plastic. Each has its pros and cons, but they all need to be properly terminated into the air/moisture barrier or drainage plane.
Proper termination is crucial. It ensures water doesn’t just get trapped behind the flashing, causing damage. Seal it tight at both ends.
Weep hole methods and considerations
Weep holes let water escape from your wall cavity. They’re small openings at the bottom of the ledge, usually filled with a weep tube or screen.
Open weeps are simple but can let insects in. Tubes prevent that but can clog over time. Engineered weeps combine benefits, using tiny holes to keep pests out while still allowing water through.
Consider your climate. In areas with heavy rain or snow melt, larger weeps may be needed. But bigger isn’t always better – too large and you risk letting in more than just water.
Ledge-Specific Flashing Details and Typical Configurations
At shelf angles and projections, flashing should extend to shed water away from the wall face. The common configurations aim for positive drainage toward the exterior, not into the wall cavity. Be aware that many guides omit nuances at ledges, which can leave gaps in practical performance.
Detailing should address potential gaps and joints so water cannot pond or bypass the flashing. Focus on how the ledge geometry affects the path of moisture and where flashing ends need to align with counterflashing. Check manufacturer guidelines and local requirements to ensure the configuration matches site conditions.
Flashing continuity at shelf angles and support ledges
When you’ve got steel angles or insulation at your ledge, water can’t just flow right through. You need to bridge these interruptions with your flashing.
Start by running your flashing under the angle or insulation. Then, bring it up the other side, bridging any gap. This keeps water moving outward.
Remember: The goal is a continuous path for water, not a dead end.
Counterflashing onto the exterior finish and drip control
Counterflashing sits on top of your through-wall flashing. It’s there to keep water from getting behind the ledge.
Make sure it laps over the through-wall flashing, directing water outward. And don’t forget a good drip edge – that helps water fall away from the wall.
Back-terminate your counterflashing properly. It should end with a drip, not a flat surface where water can pool.
Step-by-Step Installation Checklist for New Construction at Ledges
Start with a clear plan that shows where each flashing and weep hole will lay out in relation to the ledge. Coordinate with structural trades to ensure there are no interferences and that openings stay protected during construction. Use this sequence as a guide and verify spacings and thickness with manufacturer instructions and local codes.
Install flashing first, then position the cavity and air/moisture barrier, followed by counterflashing at overlaps. Finish with proper weep hole placement and any sealant or backer materials as directed by the product labels and local requirements. Keep checks at each stage to catch misalignments early.
Step-by-Step Installation Process
Use this checklist once you’ve prepared the site and are ready to start installing brick flashing and weep holes at ledges.
- Check safety: Ensure the area is clear, wear appropriate PPE, and follow jobsite safety rules.
- Inspect ledges: Check ledge geometry and ensure they’re clean, dry, and free of debris.
- Measure and mark: Mark flashing locations based on manufacturer’s guidelines and local code.
- Install through-wall flashing: Start at the bottom, lap each piece properly, and secure with appropriate fasteners.
- Place weep provisions: Install weep holes or strips according to manufacturer’s instructions.
- Lay brick courses: Begin laying bricks, ensuring they’re level and plumb.
- Install counterflashing: Once above the ledge, install counterflashing to protect the top of the flashing.
- Tool mortar joints: After the mortar has set, tool the joints for a finished look.
- Final inspection: Check for any gaps, leaks, or improper laps before moving on.
Quick rule: Always double-check your work. Water intrusion issues often start small and grow over time.
Prep, sequencing, and temporary protections
Use this checklist before installing brick flashing and weep holes at ledges to ensure a solid start and protect your work.
- Prepare substrate: Ensure the surface is clean, dry, and free of contaminants. Check for and repair any damage.
- Integrate air barrier: Install an appropriate air barrier system according to manufacturer’s instructions.
- Temporary weatherproofing: Protect exposed ledges from rain with temporary covers or plastic sheeting.
- Coordinate with steel: Work with structural trades to ensure flashing integrates properly with steel elements.
- Check ledge dimensions: Ensure ledges are the correct size and shape for your chosen flashing system.
- Order materials: Have all necessary materials on-site before starting work.
- Plan sequencing: Schedule work with other trades to ensure a smooth installation process.
Quick rule: Good prep work saves time and prevents costly mistakes down the line.
Installing flashing, integrating weeps, and finishing mason work
Use this checklist during the main installation phase of brick flashing and weep holes at ledges.
- Start at the bottom: Begin installing through-wall flashing at the lowest ledge.
- Lap flashing properly: Ensure each piece overlaps the one below it by the recommended amount to maintain a continuous barrier.
- Secure flashing: Use appropriate fasteners, following manufacturer’s guidelines and local code.
- Place weep provisions: Install weep holes or strips at the recommended spacing, ensuring they’re not blocked by mortar.
- Lay brick courses: Begin laying bricks, maintaining a consistent bond pattern and checking for level and plumb.
- Protect openings: Before tooling mortar joints, protect any openings with temporary covers to prevent debris from entering.
- Tool mortar joints: Once the mortar has set, use joint tools to create a consistent, finished look.
- Check for gaps: Inspect your work for any gaps or voids that could allow water intrusion.
Quick rule: Patience and attention to detail are key when tooling mortar joints. Take your time to ensure a quality finish.

Retrofitting and Repairing Flashing and Weep Holes at Existing Ledges
Assess the current flashing and weep holes with a careful, non-destructive approach. Look for signs of leakage, corrosion, or buildup that blocks drainage. Plan repairs that minimize brick damage while restoring a clear drainage path.
Use compatible materials and sealants that suit the existing wall assembly, and avoid introducing incompatible products. When in doubt, consult the manufacturer’s instructions or local codes to select safe repair options and to verify environmental compatibility. Document the findings for future maintenance checks.
Detecting hidden failures and deciding repair strategies
First, inspect the ledge for visible signs of failure like missing mortar, cracked bricks, or water stains. But remember, damage can be hidden.
Use a moisture meter to find dampness behind bricks. Drill small holes (<1/4″ diameter) at suspected areas, seal them afterwards.
If flashing is damaged, decide repair strategy based on severity:
– Patching: Minor damage. Remove loose material, apply new mortar or caulk.
– Partial replacement: Moderate damage. Replace affected section of flashing.
– Full replacement: Severe damage. Remove and reinstall entire flashing system.
Common retrofit details and temporary fixes
For quick fixes, consider these options:
– Surface-mounted flashings: Install new flashing over existing one. Use masonry screws or nails to secure.
– Weep re-drilling: If weeps are clogged, drill new ones nearby. Ensure they’re below the ledge and not in direct rain path.
– Pocket flashing: Remove a small section of brick, install new flashing, replace bricks. This is more invasive but effective.
Note: These are temporary or band-aid solutions. Consult a specialist for long-term fixes if water issues persist.
Inspection, Testing, and Visual Checkpoints at Ledges
Perform a visual tour of ledges to spot cracks, misalignment, or missing weep openings. Look for staining, efflorescence, or damp patches that indicate moisture retention. Simple in-field tests like watching for water drainage after a rain can reveal obvious flaws.
If moisture behavior is unclear, consider moisture meters or expert assessment as advised by local codes or manufacturer guidance. Record observations and plan follow-up checks after any remediation to confirm performance over time.
Visual checkpoints during and after installation
Use this checklist during and after installing flashing and weep holes at ledges to ensure proper drainage.
- Flashing continuity: Check that the flashing runs continuously from one end of the ledge to the other, with no gaps or breaks. Inadequate continuity can lead to water intrusion.
- Lap direction: Ensure laps are directed away from the wall to allow water to drain off properly. Incorrect lap direction can cause water to back up and enter the wall.
- Weep presence: Verify that weep holes are present at regular intervals along the ledge, typically every 30-48 inches. Missing or blocked weeps prevent proper water evacuation.
- Mortar cleanliness in cavities and weeps: Inspect cavities and weep holes to ensure they’re free of mortar droppings. Blockages can hinder water flow and cause moisture buildup.
- Counterflashing integration: Confirm that counterflashing is properly integrated with the main flashing, providing a secure seal against water entry at the ledge’s outer edge.
- Drip edge presence: Check for a drip edge on the flashing to prevent water from running back onto the wall. A missing drip edge can cause water to wick up the wall.
- Flashing termination: Ensure that flashing is properly terminated at both ends of the ledge, with no exposed edges where water could enter.
- Shelf angle and support ledge continuity: Verify that flashing runs continuously across shelf angles and support ledges, providing a seamless barrier against water intrusion.
Quick rule: Regular visual checks during installation and after completion can help catch issues early, preventing costly repairs down the line.
When and how to use moisture testing and invasive probes
Moisture testing and invasive probes help identify hidden moisture issues at ledges. Use this guide to determine when and how to employ these tools.
- Non-destructive moisture tests: Use a non-invasive moisture meter (pinless or pin-type) to scan the wall for signs of excess moisture. These tests are useful for initial screening but may not detect all issues.
- Invasive probes: Drill small holes and insert probes to measure moisture content deep within the wall. Invasive testing is necessary when non-destructive methods fail to provide clear results or indicate a serious problem.
- Equipment guidance: Follow the manufacturer’s instructions for using moisture meters and invasive probes, ensuring accurate readings.
- Code guidance: Consult local building codes for acceptable moisture content thresholds. These values may vary depending on your location and the specific material being tested.
- Interpretation of results: Compare test results to established thresholds to determine if moisture levels are within acceptable limits or indicate a problem that requires further investigation or repair.
- Expert assessment: If tests reveal high moisture content, consult a professional for expert advice on diagnosis and remediation strategies. They can provide specialized tools and techniques to pinpoint the source of the moisture intrusion.
Quick rule: Moisture testing is most effective when used strategically, combining non-destructive and invasive methods as needed to accurately diagnose water intrusion issues at ledges.
Common Failure Modes, Causes, and Troubleshooting
Typical failures include poor termination at edges, clogged or blocked weep holes, and mortar droppings that block drainage. Incompatibility between materials can also undermine flashing performance. Start troubleshooting by tracing the water path and identifying the first blockage point.
Follow a logical check sequence: inspect termination points, verify weep hole condition, and assess the interaction with the counterflashing. Use manufacturer instructions and local rules to guide material compatibility and repair methods.
Mortar blockage, debris, and insect/vegetation ingress
Over time, mortar droppings from masonry work can clog weep holes. Insects and vegetation can also find their way in, blocking drainage.
Regular cleaning: Inspect and clean weeps every 6 months to a year. Use a wire brush or compressed air to remove debris.
Avoid blockages: During construction, protect weeps with tape or plugs until mortar has cured. Keep ledges clear of plants and debris.
Material incompatibility, corrosion, and movement issues
Choosing the right materials is crucial for flashing longevity. Incompatible metals can corrode, and thermal movement or settling can cause leaks.
- Galvanized steel: Use for its durability. Look for G90 or G125 rating. Avoid in coastal areas due to salt corrosion.
- Aluminum: Lightweight, won’t corrode. Look for 3003 or 6061 alloy. Not suitable for high-heat applications.
- Copper: Expensive but durable. Avoid in areas with acidic soil to prevent green rot.
- Stainless steel: Highly resistant to corrosion. Look for 304 or 316 grade. More expensive than other options.
- Thermal movement: Allow for expansion and contraction in long runs of flashing. Use expansion joints every 25-50 feet.
Tools and Materials Checklist, and Material Compatibility to Check
Prepare a DIY-friendly set of basic tools for inspection and minor repairs, focusing on access and cleanup. Gather non-proprietary material categories like flashing, sealants, and compatible backer materials. Always verify compatibility with the existing wall assembly per manufacturer recommendations and local codes.
Document any limitations or site-specific requirements, and avoid mixing materials without guidance. When in doubt, check product labels or instructions and consult local regulations to ensure proper pairing and performance.
Basic tools and safety equipment for inspection and minor repairs
Before you start inspecting or repairing your ledge flashings, make sure you have the right tools and safety gear.
- Tape measure: To ensure accurate measurements for any replacements or repairs.
- Level: To check if your ledges are level and to ensure proper installation of new flashings.
- Chisel and hammer: For removing old mortar, debris, or damaged flashings.
- Safety glasses: To protect your eyes from debris during chiseling or drilling.
- Work gloves: To protect your hands from cuts and scrapes.
- Drill with masonry bit: For creating weep holes or enlarging existing ones.
- Flashlight: To inspect dark areas where water may be hiding.
- Ladder: To safely access high ledges for inspection and repair.
Quick rule: Always prioritize safety first. Wear appropriate PPE before starting any work on your ledges.
Material compatibility, substrate concerns, and sealants
Matching materials correctly is crucial to prevent failures down the line. Here’s what to check before installing or repairing your ledge flashings.
- Metal types: Ensure that different metals in contact with each other are compatible to avoid galvanic corrosion. Check manufacturer guidelines.
- Sealant adhesion: Test sealants on a small, hidden area first to ensure they adhere well to your substrate.
- Manufacturer limits: Follow the manufacturer’s recommended temperature and weathering limits for their products.
- Substrate condition: Inspect your ledge surface for cracks, crumbling, or other damage that could compromise adhesion.
- Sealant type: Choose a sealant suitable for your specific application (e.g., silicone for masonry).
- Expansion and contraction: Consider how different materials may expand and contract at different rates with temperature changes.
- Paint or coating: If painting or coating, ensure the surface is clean, dry, and free of contaminants.
Quick rule: Always follow manufacturer guidelines for best results. Don’t guess; verify their recommendations.
Conclusion
Water will find a way out if the flashing, cavity, weep holes, and counterflashing are treated as a system you install and test. A solid setup protects the bricks, keeps the wall dry, and reduces costly damage over time. Stay practical, test as you go, and keep the failed paths from becoming costly repairs.
Inspect the ledge area as you work: verify through-wall flashing continuity, confirm the cavity is clear, ensure weep holes are open and unobstructed, seal counterflashing where it belongs, and perform a simple drainage test after any change. Do the checks in a logical order from upstream flashing to the exterior openings, use compatible materials, and document what you changed so future work won’t repeat mistakes.
Common mistakes to avoid are skipping the flashing at ledges, blocking or filling weep holes, and mixing incompatible materials that trap water. Always keep Safety first and test small areas before full installation, never force components into places they don’t fit, and double-check overlaps and seals before leaving the site. If the retrofit path requires structural work, or if water has already caused interior damage, call a professional rather than pushing on alone, and remember that careful planning now saves expensive repairs later. Stay steady, follow the checks, and you’ll keep the wall dry and the project moving forward.
FAQ
How can I tell if weep holes at ledges are clear and working?
Look for a straight path of small holes along the brick below the ledge. If you can see obstructions or debris inside, use a flexible, non-damaging probe to clear them. Do not force anything; if you’re unsure, stop and consult the manufacturer instructions or local rules.
What should I look for when choosing flashing at ledges for retrofit?
Choose flashing that you can bend to fit the ledge profile and extend into the wall cavity as designed. Check the label or datasheet for compatibility with brick and mortar. If in doubt, follow manufacturer instructions and local guidance for your wall type.
How should I inspect and maintain brick ledge flashing and weep holes during seasonal checks?
Inspect for loose or rusted flashing, staining, or mortar gaps near the ledge. Ensure weep holes remain unobstructed and look for cracks that could channel water behind the brick. Clean and reseal only after confirming compatible products and proper installation methods.
What are common signs of water intrusion around ledges, and what immediate steps should I take?
Watch for efflorescence, dark staining, or softening mortar near the ledge. If you see pooling water or damp spots inside, pause interior work and verify flashing, counterflashing, and weep hole condition. Check product labels, instructions, and local rules before attempting repair.