
Introduction
Brick expansion joints are gaps that allow movement between sections of brickwork as structures expand and contract. They help prevent cracking and mortar damage by accommodating seasonal and load changes. Identifying where these joints exist and how they should be resealed is a hands-on maintenance task rather than a cosmetic repair.
Look for irregular gaps, misaligned bricks, visible sagging mortar, or separations at corners as signs expansion joints may need attention. Causes include movement from settling, temperature shifts, moisture problems, or poor initial sealing. Ignoring the problem can lead to larger cracks, water intrusion, and more extensive repairs down the line.
Key takeaways
- Brick expansion joints allow movement and must be properly sized to prevent cracking.
- Signs of irregular gaps include uneven widths, cracking, and visible migration of mortar.
- Common causes include settlement, thermal movement, wind-driven rain, and poor initial detailing.
- Ignoring gaps can lead to water intrusion, brick spalling, and structural damage risk.
- Resealing requires compatible sealant, clean joints, and following manufacturer guidance.
- For repairs, consult local codes and consider qualified contractor for safety and compliance.
Table of Contents
- Introduction
- Key takeaways
- What Brick Expansion Joints Are and Why They Matter
- How Brick Expansion Joints Are Constructed and Sized
- How to Identify Problematic Expansion Joint Gaps (Visual Checkpoints)
- Common Causes of Irregular Expansion Joint Gaps
- Options for Addressing Gapping Expansion Joints (Pros and Cons)
- How to Reseal Expansion Joints — DIY Steps and Professional Steps
- Best Materials and Techniques for Long-Lasting Results
- Maintenance Schedule, Safety Considerations, and Cost Guidance
- Conclusion
- FAQ
What Brick Expansion Joints Are and Why They Matter
Expansion joints in brick veneer and masonry are deliberate gaps that allow for movement in the wall system. They differ from control joints by focusing on accommodating thermal, settling, and moisture-driven movement, while vertical and horizontal joints work together to manage shifts.
Joints matter because they help prevent cracking, spalling, and moisture intrusion as the wall experiences temperature changes, wind loading, and moisture cycling. Proper placement keeps joints near changes in wall plane, at openings, and at material transitions, with regular spacing in long runs. Misplacement or absence can lead to mortar deterioration, bowing, and veneer failure, along with water problems. Assessing joints involves checking gap size, uniformity, sealant presence, and the condition of surrounding mortar. Resealing is appropriate as routine maintenance in many cases, while joint or concrete masonry repair may be needed for long-term integrity in other situations.
Definition and Purpose
Expansion joints in brick veneer and masonry are narrow gaps intentionally left between bricks or blocks to accommodate movement due to various factors. They play a crucial role in preventing cracking, spalling, and other damage caused by natural shifts and changes.
Without expansion joints, the rigid nature of masonry would cause it to crack under stress from temperature fluctuations, settling, wind pressure, or moisture absorption.
Think of them as built-in safety valves that allow your walls to ‘breathe’ and expand or contract without compromising their integrity. If you’re unsure about their purpose, review the definition and consider how they protect your masonry structures.
Typical Locations and Placement
Strategically position expansion joints to accommodate natural movement and prevent damage. They are typically located at:
- Changes in wall plane, such as corners or offsets
- Openings like doors and windows
- Transitions to different materials or structures
- At regular intervals along long runs of masonry
Vertical joints are typically spaced 30-48 inches apart, while horizontal joints may be placed every 6-12 feet. However, these guidelines can vary based on wall length and specific details. If unsure about placement, review the manufacturer’s guidelines and consult local building codes.
Codes and Standards Overview
Local building codes and referenced standards outline specific requirements for expansion joint spacing, materials, and installation. It’s essential to comply with these regulations to ensure the long-term integrity of your masonry structures.
Commonly referenced standards include:
– ASTM C126: Standard Specification for Mortar for Unit Masonry
– ACI 530.1-13: Building Code Requirements and Specifications for Masonry Structures
– Local building codes, which may reference additional or specific standards
If you’re unsure about applicable codes and standards, check local regulations and consult common references to ensure compliance.
How Brick Expansion Joints Are Constructed and Sized
The core components are a recessed joint, a backer material such as foam or fiber, and a sealant chosen for masonry. Each part helps absorb movement and control moisture, while also preventing direct sealant contact with wet mortar.
Sizing principles cover joint width, depth, and the profile, with considerations for brick veneer versus solid brick walls. Deeper joints tolerate larger movements, whereas overly narrow gaps can pinch sealants and overly wide joints may require different backer materials. Material compatibility matters, so check sealant families for masonry and verify substrate prep recommendations. Construction steps include surface cleaning, accurate measuring, backer rod installation, and careful sealant application, avoiding wet mortar contact and ensuring proper drainage and edge detailing to prevent negative effects.
Common materials and profiles
The choice of materials for brick expansion joints significantly impacts their performance. Understanding common materials and profiles ensures appropriate selection for optimal joint performance.
- Backer Rod/Foam: Used to maintain joint width, they should be compressible and dimensionally stable to accommodate movement. Incorrect materials may result in cracking or inadequate movement accommodation.
- Compressible Fillers: These help maintain joint depth and prevent sealant over-application. Incompatible fillers can lead to weak bonds or ineffective sealing.
- Elastomeric Sealants: Suitable for masonry, they should have high elongation, strong adhesion, and good weathering resistance. Poor quality sealants may crack or stain under stress.
- Mortar: Compatible with chosen brick type, it ensures a strong bond between bricks and the joint system. Incompatible mortar can cause weak joints and structural issues.
- Joint Profiles (Square vs. Rounded): Square profiles are common but may retain more water; rounded profiles shed water better. Choose based on climate conditions and exposure to prevent water damage.
Joint width and depth guidance
The proportion of joint width and depth is crucial for accommodating movement without compromising structural integrity. Verify joint size aligns with wall thickness and expected movement.
For solid brick walls, wider joints (1/4″ to 3/8″) are recommended due to increased movement. For brick veneer, narrower joints (1/8″ to 1/4″) are typically sufficient.
In cases of large expected movement, increasing joint depth proportionally helps accommodate expansion and contraction. Consult manufacturer specifications, local codes, and industry standards for exact dimensions.
Material specs and standards explained
Following technical standards and manufacturer guidelines ensures material compatibility and optimal performance. Confirm chosen materials comply with local codes and meet required performance criteria.
- Elastomeric Sealants: Check ASTM C920 or AASHTO M178 for sealant specifications, ensuring suitable elongation, adhesion, and weathering resistance.
- Mortar: Ensure compatibility with chosen brick type and jointing method to create a strong bond between bricks and the joint system.
- Manufacturer Guidelines: Follow coverage and cure time recommendations for optimal performance. Ignoring these may result in subpar sealing or premature failure.
- Local Codes and Standards: Verify chosen materials comply with local codes to ensure structural integrity and safety.
How to Identify Problematic Expansion Joint Gaps (Visual Checkpoints)
Visual checkpoints focus on gap width, edge integrity, and any cracks or displacement of brick courses. Note any irregularity that suggests movement beyond normal aging.
Pattern interpretation helps distinguish steady aging from troublesome gaps by looking for uniformity, widening at corners, or recurrence in hotspots. Documenting with a consistent photography workflow, scale references, and lighting supports comparison over time. Measurements should capture center-to-center dimensions and visible depth, with notes on seasonal or weather-related factors. A structured photo and measurement dossier helps track changes and guide decisions.
Step-by-Step Process
Follow these steps to thoroughly identify problematic expansion joint gaps using visual checkpoints.
- Preparation: Gather necessary tools (ladder, flashlight, camera, ruler), wear appropriate PPE including gloves, safety glasses, and sturdy footwear. Ensure ladders are secure and level.
- Inspect the Entire Wall Surface: Begin by examining the entire wall to gain an overall perspective of its condition. Look for any visible gaps, cracks, or other defects.
- Focus on Individual Joints: Using a ladder if necessary, closely inspect each expansion joint. Check for gap width, edge integrity, and any signs of cracking or displacement.
- Measure Gap Width: Use a ruler or caliper to measure the width of each gap at multiple points along its length. Record measurements in millimeters or inches.
- Document Findings: Photograph key areas, take notes on observations, and sketch a simple diagram mapping locations of problematic gaps for future reference.
- Check for Seasonal Changes: Note any visible changes that may be due to seasonal temperature or moisture variations. Re-inspect during different seasons if necessary.
- Safety Check: Before descending from ladders, ensure all tools are secured and the area is clear of debris. If in doubt about any findings, consult a professional mason or structural engineer.
- Cleanup: After completing your inspection, tidy up the work area, ensuring no tools or debris are left behind.
Visual checkpoints to photograph and record
Use this checklist to ensure you capture all necessary visual data during your inspection.
- Overall Wall Views: Photograph the entire wall from multiple angles to provide context for close-up shots.
- Close-ups of Joints: Capture clear, well-lit images of each problematic joint. Use a ruler or tape measure as a scale reference.
- Top vs Bottom of Joint: Take photos at both ends of each gap to check for variations in width or shape.
- Nearby Cracks: Photograph any cracks or other defects near the problematic joints. These may be related and should be documented together.
- Edge Integrity: Inspect mortar joints at both ends of each brick course for signs of crumbling, spalling, or other damage.
- Brick Spalling: Check bricks themselves for signs of spalling (flaking or chipping) which could indicate structural issues.
- Cracking or Displacement: Document any visible cracks in the mortar joints or displacement of brick courses.
- Recurring Hotspots: Note and photograph any areas where gaps or other defects recur, as these may indicate underlying structural issues.
Quick rule: Always use consistent framing, scale references, and lighting in your photos to ensure accurate comparison between shots.
Gap patterns and what they commonly indicate
Use this checklist to interpret gap patterns and identify potential causes of issues.
- Wider at Top: Gaps wider at the top may suggest corner settlement, where the wall is settling more at the corners than in the middle.
- Wider at Bottom: Gaps wider at the bottom could indicate mid-wall sagging, where the wall is settling more in the middle than at the corners or top.
- Irregular Gaps: Irregular gaps may suggest differential movement, where different parts of the wall are moving independently due to varying soil conditions or other factors.
- Isolated Spots with Gaps: Isolated spots with gaps may indicate localized movement or damage, such as from a settling foundation or previous repairs.
- Uniform Gaps: Uniform gaps along the entire length of a joint are typically normal and do not necessarily indicate an issue.
Quick rule: Remember that visual inspection is just one part of the assessment process. Always confirm findings with measurements and further investigation as needed.
When gaps are likely cosmetic vs structural
Use this checklist to help distinguish normal movement or cosmetic deterioration from signs that warrant further structural evaluation.
- Uniform and Narrow Gaps: Uniform, narrow gaps (less than 1/8 inch) are typically cosmetic in nature and do not indicate a structural issue.
- Wide, Irregular Gaps: Wide, irregular gaps may suggest underlying structural issues and should be evaluated by a professional.
- Accompanied Symptoms: Gaps accompanied by symptoms such as cracking, displacement of brick courses, or recurring hotspots may indicate structural problems.
- Numerous or Worsening Gaps: Even cosmetic gaps can indicate underlying issues if they’re numerous or worsening over time. Regular monitoring is recommended.
Quick rule: If you’re unsure about the cause of any gaps, it’s always best to err on the side of caution and consult a professional for further evaluation.
Common Causes of Irregular Expansion Joint Gaps
Irregular gaps involve size variation and misalignment that affect both brickwork and moisture control. These gaps can compromise movement accommodation and water drainage if not addressed.
Root causes span foundation settlement indicators, climate-driven thermal movement, and installation factors such as initial width and edge detailing. Mortar loss or soft joints can widen gaps, while debris and vegetation impede drainage and proper joint function. Regular inspection, measuring variability, and noting seasonal patterns aid in deciding between resealing, repointing, or professional evaluation when movement is evident.
Foundation and Settlement-Related Movement
Irregular expansion joint gaps can indicate underlying foundation issues. When bricks appear sloped or cracked, substrates shift, or joints misalign, it’s time to suspect foundation problems.
Regularly measure joint width variability. Constant gaps suggest no structural issue, but widening gaps over time may indicate settlement or heave, requiring professional assessment.
Pro Tip: Inspect for sloped or cracked bricks, shifting substrates, and misaligned joints to diagnose foundation-related movement.
If gaps are widening over time, consult a structural engineer immediately. Repointing may be necessary if gaps are due to mortar loss or soft joints.
Installation and Material Failures
Proper installation and material selection are crucial for long-lasting expansion joint performance. Incorrect backer rod placement, wrong sealant type, or inadequate joint preparation can lead to premature failure.
- Improper Backer Rod Placement: Causes uneven pressure distribution, leading to sealant cracking and joint failure. Ensure proper backer rod size and placement according to manufacturer instructions.
- Wrong Sealant Type: Using incompatible sealants can result in staining, weak bond, or premature failure. Choose sealants suitable for your specific application and local climate.
- Inadequate Joint Preparation: Poor cleaning, priming, or surface preparation leads to weak adhesion and eventual joint failure. Thoroughly clean and prepare joints before sealing.
Weather, Thermal Cycles, and Moisture Effects
Exposure to freeze-thaw cycles, thermal expansion/contraction, and water ingress can accelerate joint degradation. Regular inspection is crucial in areas with extreme weather conditions.
Check for water stains, efflorescence, or other moisture-related issues around joints after heavy rain or snow melt. Inspect joints for signs of deterioration after extreme temperature changes.
Pro Tip: Use appropriate sealant types for your local climate and ensure proper joint preparation to mitigate weather-related damage.
If moisture-related deterioration is present, address water ingress immediately and reseal joints as needed. Neglecting these issues can lead to further damage and costly repairs.
Options for Addressing Gapping Expansion Joints (Pros and Cons)
Options for addressing expansion joints range from doing nothing to full structural repair, with homeowner-friendly paths like monitoring, cosmetic fills, or basic mechanical filling, up to mortar work and structural tie-ins. Key decision factors include gap width and progression, brick type and mortar condition, moisture and drainage, wall location, climate, and whether movement is seasonal or ongoing. A clear workflow helps: measure gaps, photograph changes over time, check mortar integrity, inspect drainage, and note nearby structural signs.
For DIY readers, the practical takeaway is to match the method to the situation while prioritizing underlying moisture or structural causes first. Use a simple decision framework: when to monitor, when to attempt cosmetic or mechanical work, and when to call a pro for more involved repairs or reinforcement. Tools, materials, and safety notes specific to brick joints—sealants, backer rods, and appropriate mortar mixes—should be validated against the gap size and climate, with attention to red flags that indicate professional evaluation is needed.
Ignore or Monitor (When Appropriate)
For minor gaps that show no signs of progression, monitoring is an acceptable DIY approach. However, it’s crucial to keep a close eye on them and take action if necessary.
Quick check: Photograph and record gap sizes over time to track any changes. Pro check: Regularly inspect for widening or new cracks. If gap width increases or new cracks appear, consider more involved options.
Common mistake: Ignoring gaps that show signs of progression. Always address any underlying moisture or structural issues first.
Temporary and Cosmetic Fixes (Stuffing, Mortar, Caulk)
Quick fixes like stuffing, mortar, or caulk can temporarily fill gaps but may not prevent further movement. They are useful for minor cosmetic improvements.
Stake: Quickly fills gaps but may not prevent further movement. Pro check: Use appropriate sealants or mortars for brick joints that are compatible with existing materials and climate.
If gap width exceeds 1/4 inch, consider more permanent solutions. Common mistake: Relying on cosmetic fixes alone; always address underlying causes.
Permanent Solutions (Resealing, Reconstruction, Foundation Repair)
Long-term remedies like resealing, reconstruction, or foundation repair address structural issues and prevent further movement. These options require more effort but provide lasting results.
Quick check: Consult a professional for ongoing or severe movement. Pro check: Evaluate the cause of movement before proceeding with repairs.
If movement is seasonal or minor, DIY resealing may be sufficient. If movement is ongoing or severe, consider hiring a professional for structural repair. Common mistake: Always address underlying moisture or structural issues first.
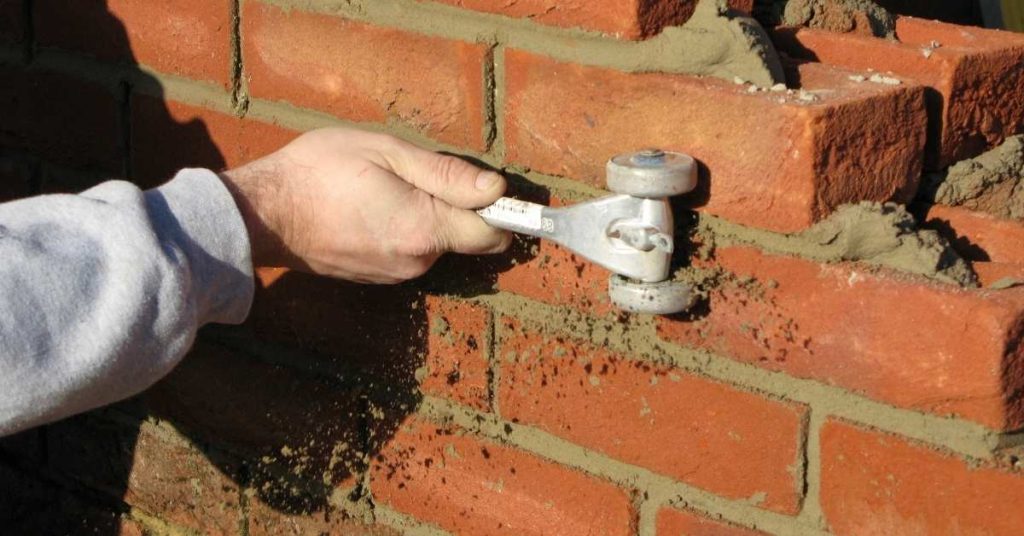
How to Reseal Expansion Joints — DIY Steps and Professional Steps
Start by determining whether the joint is purely cosmetic or shows signs of deeper problems like brick spalling or mortar deterioration. Consider weather and cure conditions that can affect sealant performance during work.
Assess movement and material compatibility by noting joint dimensions and selecting backer and sealant that accommodate expected expansion without binding. Remove old material and prep the area, install backer rod, and apply the sealant in full-depth, with a slight overfill for smoothing. Use proper tooling to create a consistent finish and protect the seal while it cures, with professional help advised for large gaps or visible structural concerns.
Tools and materials checklist
Having the right tools and consumables ensures a successful resealing job. Here’s what you’ll need:
- Scraper or chisel: To safely remove old sealant and deteriorated backing.
- Wire brush: For cleaning dust, loose mortar, and debris from the joint.
- Backer rod: Choose a compatible diameter to match your joint’s width and depth. Pro tip: Verify compatibility with your chosen sealant.
- Sealant: Select a non-staining, masonry-compatible option that accommodates anticipated expansion without binding. Quick check: Ensure you have enough to fill the joint in full-depth.
- Caulking gun: To apply sealant evenly and smoothly. Rent or borrow: If you don’t use it often, consider renting instead of buying.
- Safety gear: Include gloves, safety glasses, and a dust mask to protect yourself during work. Double-check: Ensure all safety gear is in good condition before starting.
Step-by-step resealing procedure
The following sequence ensures a long-lasting, effective seal. Follow these steps carefully:
- Assess and prepare: Inspect the joint for damage, check weather conditions, and ensure surfaces are clean and dry.
- Install backer rod: Place evenly along the joint’s length to reproduce a proper profile. Quick check: Ensure it’s installed correctly before applying sealant.
- Apply sealant: Use a caulking gun to apply a full-depth, continuous bead with slight overfill for smoothing. Pro tip: Work in sections to prevent the sealant from drying out.
- Tool and smooth: Use appropriate tooling to create a consistent finished surface, preventing air pockets and promoting adhesion.
- Cure and protect: Protect curing sealant from rain and rapid drying. Quick check: Follow manufacturer’s instructions for cure times and temperature ranges.
When to hire a professional and how to vet contractors
Knowing when to hire a pro protects your property’s integrity. Here are signs that indicate you may need help:
Structural damage or large gaps: If you notice significant cracks, crumbling mortar, or large gaps, it’s time to call in the professionals. These could be signs of structural issues that require immediate attention.
When hiring, always get multiple quotes from licensed and insured professionals. This helps ensure you’re getting a fair price and working with reputable contractors. Additionally, request references and check their warranties. A reliable contractor will stand behind their work.
Common mistake: Rushing the hiring process can lead to subpar workmanship. Take your time, do your research, and re-evaluate if necessary.
Best Materials and Techniques for Long-Lasting Results
Sealant selection for brick joints typically centers on polyurethane, silicone, and MS-polymer hybrids, weighing waterproofing, paintability, and breathability. Choose based on exterior exposure and movement demands, with attention to compatibility with brick and mortar.
Compatibility and movement considerations cover ideal joint widths, backing depth, and the use of backer rods to prevent three-point adhesion. Follow preparation steps such as cleaning, priming if required, and proper tooling. Plan for maintenance and inspect sealants regularly, looking for cracking or separation as signs to reseal.
Sealant Selection Guide
Choosing the right masonry sealant is crucial for durability and longevity. Ensure you select a movement-capable sealant suitable for brick surfaces.
Avoid using materials not intended for masonry or with insufficient movement accommodation. Consult product data and industry standards to find suitable options.
When sealing exterior brick, consider waterproofing, paintability, life expectancy, and breathability when selecting between polyurethane, silicone, and MS-polymer hybrids.
Role of Backer Rod and Bond Breakers
Proper use of backer rods and bond breakers is essential for correct joint function. They prevent three-sided adhesion and allow proper joint deformation.
Ensure bond breakers are used to prevent three-point adhesion and allow joint movement. Size backer rods appropriately to maintain ideal joint width and depth, typically around 1/4″ to 3/8″.
If installing backer rod, choose a size that maintains the recommended joint width and allows for movement.
Common Mistakes That Shorten Seal Life
To extend the lifespan of your masonry sealants, avoid these frequent errors:
- Poor joint preparation: Thoroughly clean and prepare joints before sealing to promote adhesion.
- Wrong sealant type: Use a sealant compatible with brick surfaces and suitable for the joint’s movement.
- Overfilling: Avoid overfilling joints, as it can lead to excess material bulging out or being forced into the joint during expansion.
- Painting over uncured sealant: Allow sealant to cure completely before painting to prevent peeling and other issues.
Avoid these common mistakes by following best practices, including thorough surface preparation, appropriate sealant selection, and adherence to manufacturer guidelines for application and curing times.
Maintenance Schedule, Safety Considerations, and Cost Guidance
Set an inspection cadence that fits the climate and wall exposure, with checks after storms and notable movement events to catch failures early. Maintain a simple log of condition, photos, and actions taken.
Safety protocols cover working at height, PPE for sealants, ventilation for solvents, and safe storage of products. When budgeting, separate costs by materials, tools, and potential labor, and consider regional and access factors. Document disposal and environmental considerations, and plan resealing intervals based on climate and joint type.
Routine Inspection and Maintenance Checklist
Regularly inspecting your expansion joints helps prevent minor issues from becoming major problems. Use this checklist to ensure you’re covering all essential aspects.
- Seal condition: Check for cracks, gaps, or missing sealant. If damaged, reseal as soon as possible to prevent further damage.
- Gaps: Measure and record joint widths. Gaps wider than 1/4 inch may need attention.
- Mortar loss: Inspect for missing or crumbling mortar. Repair before resealing to maintain joint integrity.
- Vegetation growth: Remove any plants, moss, or weeds growing in joints. They can cause damage and clog joints.
- Water entry: Look for signs of water penetration, such as stains or efflorescence. Water entry may indicate a need for resealing or further investigation.
- Ground movement: Check for any noticeable changes in the ground around joints. Ground movement can cause cracks and gaps.
- Cracking: Inspect bricks for hairline cracks, which may indicate structural issues requiring professional assessment.
- Joint alignment: Ensure joints remain straight and level. Misaligned joints may need realignment or repair.
Quick rule: Perform a visual check quarterly for early detection of failing joints, and conduct a thorough inspection annually or seasonally to maintain your expansion joints in optimal condition.
Safety and When to Involve Engineers
Prioritize safety during maintenance work, and know when to seek professional help. Always inspect ladders or scaffolding before use for stability and safety.
When working at height with sealants, always use proper fall protection, personal protective equipment (PPE), and adequate ventilation. This helps prevent injuries and ensures a safe working environment.
If you notice progressive movement or large cracks in bricks, consult a structural engineer immediately. These signs may indicate serious structural issues that require professional assessment and repair.
Important: Never attempt to repair extensive damage without proper assessment and guidance from a qualified professional.
Cost Considerations and How to Budget
Understand the cost implications of different maintenance options. Small reseals are relatively low-cost, while structural or foundation repairs can be substantially more expensive.
For major repairs or reseals, obtain multiple written estimates from reputable contractors. This helps you make informed decisions and avoid unexpected expenses.
Budget for materials, tools, and labor based on the expected scope of work. If a small reseal is required, consider doing it yourself to save costs. However, if structural or foundation repair is needed, hire a professional and expect higher costs.
Pro tip: Ask for itemized scopes of work to understand cost breakdowns and avoid surprises.
Conclusion
The key outcome is durable, safe brick joints that resist weather and movement while keeping the appearance clean. By following proper resealing practice and using the right materials, you reduce the risk of leaks, cracking, and costly damage over time.
To proceed, check the joint area in a logical order: confirm the existing gaps and their widths, clean the joints thoroughly, select the sealant and backer material recommended for the joint type, apply and tool the sealant evenly, and allow the cure time and test for water resistance before finishing the project. Start with a small, low-traffic area if you are unsure, and scale up only after you confirm the result.
A few mistakes to avoid are overfilling or underfilling the joint, using the wrong sealant for brick and mortar, and skipping surface cleaning or primer where required. Keep safety in mind: wear eye protection and gloves, use ladders and scaffolding correctly, and work in good lighting with dry surfaces. If moisture problems, structural movement beyond typical expansion, or complex detailing are present, pause and reassess before proceeding.
If uncertainty remains about joint size, substrate condition, or local code requirements, consult a professional rather than forcing a DIY fix. When you follow the recommended steps and allow for appropriate cure time, you’ll achieve reliable results with minimal risk of damage. With careful planning and deliberate execution, your brick expansion joints will perform well and look right for years to come.
FAQ
What is a brick expansion joint and why is it important?
An expansion joint in brickwork is a gap filled with flexible material that absorbs movement. It allows the wall to expand and contract with temperature changes and settling without cracking. Proper joints prevent damage to bricks, masonry, and the overall structure.
What are the signs of irregular gaps in brick expansion joints?
Signs include gaps that appear wider in some areas and narrower in others, cracking near the joints, and visible misalignment of bricks at the edge of joints. Uneven joint widths can indicate movement beyond the joint’s capacity. Look for staining, bulges, or hairline cracks near the joints.
What are common causes for expansion joint issues in brickwork?
Typical causes are foundation settlement, thermal movement, moisture infiltration, and improper or aging sealant. Poor substrate preparation or deterioration of backing materials can also lead to joint failure. Seasonal movement and load changes may contribute over time.
What happens if I ignore irregular expansion joint gaps?
Ignoring gaps can allow water to seep behind the brick, leading to mortar deterioration and potential cracking. Continuous movement without proper sealing can worsen brick and veneer damage. In severe cases, structural components may be affected if water intrusion reaches the interior.
What are temporary and permanent options for resealing expansion joints?
Temporary options include flexible sealants or backer rods that accommodate movement but may need periodic reapplication. Permanent solutions involve selecting a compatible sealant system and proper joint backing designed for brick and climate, installed according to manufacturer instructions. Always verify material compatibility and follow local guidelines for restoration work.