
Introduction
Breathable coatings let moisture escape from the wall while waterproof coatings block water from entering. In practice, choosing between them for stucco means balancing moisture movement with the need for surface protection. Always follow the product label and consider how your climate and surface condition will interact with the coating.
Temperature changes can affect film flexibility and durability, so look for coatings suited to your climate and sun exposure. Check labels for breathability indicators, cure times, and coverage, and plan for proper surface prep to avoid trapping moisture. This hands-on approach helps prevent damp spots and paint failure in humid environments.
Key takeaways
- Choose breathable coatings for ongoing moisture exchange; avoid trapping moisture behind stucco.
- For damp climates, prefer products labeled breathable and vapor-permeable with proper detailing.
- Test weather conditions; apply when surfaces are dry, temperatures moderate, and forecast is stable.
- Weatherproof or low-perm coatings can work on weathered walls with limited moisture; follow guidelines.
- Inspect coating systems for cracks, gaps, or peeling that compromise breathability or waterproofing.
- Safety: wear eye/skin protection; ensure scaffolding and ladders used per site rules.
Table of Contents
- Introduction
- Key takeaways
- Why Moisture Management Matters for Stucco
- What “Breathable” Stucco Coatings Are and When to Use Them
- What “Waterproof” or Low-Perm Stucco Coatings Are and When They’re Appropriate
- How Weather and Site Conditions Change Coating Performance
- Choosing the Right Coating for Your Building and Climate
- Preparation, Application Best Practices, and Common Mistakes
- Tools, Materials Checklist and How to Read Product Specs
- Maintenance, Inspection, and When to Hire a Professional
- Conclusion
- FAQ
Why Moisture Management Matters for Stucco
Moisture management is essential for stucco assemblies because diffusion of water vapor and resistance to liquid water influence the wall’s longevity. Proper balance helps prevent hidden moisture buildup that can weaken the substrate over time. Poor control often leads to visible and hidden failures that are costly to repair.
Common failure modes include blistering, spalling, efflorescence, and mold growth when moisture remains trapped. The coating choice can either support breathability or seal too tightly, sealing in moisture behind the stucco. Start with an assessment of surface moisture, interior humidity, and substrate condition before selecting finishes.
Consequences of trapped moisture
Improper coating selection can lead to serious issues in stucco assemblies. Moisture entrapment promotes mold growth, which can cause health problems and compromise the structure’s integrity.
Efflorescence, the appearance of white salt deposits on the surface, indicates trapped moisture. It not only affects aesthetics but also weakens the coating over time.
Trapped moisture can cause stucco delamination, where the coating separates from the substrate, leading to a shortened lifespan and increased maintenance costs. Moreover, it can hide rot and other structural damages, making early detection challenging.
How permeability affects wall performance
Vapor transmission is the movement of water vapor through a material. Some wall assemblies require vapor-open finishes to allow moisture to escape, preventing buildup within the assembly.
In high humidity environments, prioritize coatings with higher perm ratings to facilitate vapor transmission. However, in areas exposed to heavy rain, consider low-perm layers for added protection against liquid water intrusion.
Understanding your wall assembly’s design and climate zone is crucial before selecting a coating. Always verify the coating’s perm rating matches your assembly’s needs by checking the product label or datasheet.
Long-term cost implications
Choosing the wrong coating for short-term savings can lead to higher repair, remediation, and replacement costs over time. Upfront investments in a durable, UV-stable coating can save you from frequent repainting or premature stucco replacement.
Consider the coating’s expected lifespan and maintenance needs when making your selection. Evaluate its durability, UV stability, and warranty by reviewing the product instructions.
If budget-focused on short-term savings, balance initial cost with expected lifespan and repair needs. Re-evaluating your coating choice based on long-term performance and cost-effectiveness can prevent unexpected expenses down the line.
What “Breathable” Stucco Coatings Are and When to Use Them
Breathable coatings are vapor-permeable finishes that permit moisture to move through the coating while preventing bulk water intrusion. They differ from non-breathable or water-repellent finishes by allowing moisture to escape from the wall assembly. This helps reduce the risk of rot and damage from advancing moisture.
These coatings are often preferable in high-humidity climates or on older or porous substrates with minor moisture concerns. Evaluate substrate condition, climate, and existing finishes to decide if a breathable option is best. Ensure prep and compatibility are considered for reliable performance.
Typical breathable coating types
Breathable stucco coatings are typically categorized into a few common families. Understanding these can help you select the right product for your needs.
Acrylic-based vapor-permeable paints are popular choices due to their durability and flexibility. They allow moisture vapor to pass through while providing protection against bulk water intrusion.
Siloxane-modified breathable repellents are another option, offering good water repellency and permeability. These often come in the form of clear or tinted sealers.
Always check manufacturer data, labels, or instructions to verify the permeability claims of any product you’re considering.
Benefits and limitations
Breathable stucco coatings offer several advantages but also have some limitations. Recognizing these can help manage your expectations for performance and maintenance.
The primary benefit of breathable coatings is their ability to allow moisture vapor to escape while keeping bulk water out. This helps reduce the risk of stucco rot, blistering, and freeze-thaw damage by preventing moisture buildup within the wall system.
However, it’s important to note that breathable coatings may have lower direct water ponding or heavy abrasion resistance. They are designed to shed water quickly but may not be impervious to prolonged exposure to standing water or heavy wear and tear.
In severe weather exposure conditions, consider additional protective measures such as proper drainage or additional layers of protection.
What “Waterproof” or Low-Perm Stucco Coatings Are and When They’re Appropriate
Waterproof or low-perm coatings include film-forming finishes that block moisture and penetrating treatments that reduce vapor transmission. Understanding the difference helps decide how moisture should move through the wall. Low perm ratings indicate reduced vapor movement through the coating.
Use cases include high-moisture environments, frequent rain exposure, and conditions where the substrate requires a moisture barrier. In other situations, breathable coatings may be a better fit to avoid trapping moisture behind the surface.
Types and Performance Trade-offs
Low-perm stucco coatings come in two main types: film-forming and impregnating treatments. Film-forming coatings create a barrier on the surface, blocking moisture but also reducing the wall’s ability to breathe. Impregnating treatments penetrate into the stucco, making it water-repellent while allowing some vapor transmission.
Elastomeric membranes are heavy-duty film-forming coatings that provide excellent durability and resistance to cracking. However, they can trap moisture if not used correctly in high-moisture environments. Heavy film coatings are quicker to apply but may also trap vapor if not monitored closely.
Perm ratings indicate a product’s vapor transmission ability. Lower perm ratings mean less moisture can escape, increasing the risk of trapped vapor and potential substrate stress. Always review product labels or datasheets to understand how a low-perm product works and its suitability for your project’s needs.
Situations to Avoid Waterproof Coatings
Applying waterproof coatings in inappropriate situations can lead to premature failure and costly repairs. Before specifying, check the wall build-up (cavity insulation, vapor barriers) and local climate to ensure waterproof coatings are suitable.
- Walls with no cavity insulation or vapor barrier: Avoid waterproof coatings to prevent trapped moisture and potential damage.
- Climates with high humidity and infrequent rain exposure: Consider breathable coatings instead of waterproof ones to manage moisture effectively.
- Walls subject to frequent temperature changes or freeze-thaw cycles: Waterproof coatings may not be suitable without proper ventilation or drainage.
- Existing stucco with unknown moisture levels or history of leaks: Thoroughly inspect and address any underlying issues before applying waterproof coatings.
Monitor walls for signs of failure (peeling, cracking) and consider re-evaluating the moisture management strategy if waterproof coatings are used in inappropriate situations.
How Weather and Site Conditions Change Coating Performance
External forces such as UV exposure, humidity, rain, and freeze–thaw cycles drive coating performance and failure patterns. Look for cracking, blistering, or efflorescence that signal how moisture is moving through the system.
Moisture management hinges on matching coating porosity to climate and site conditions. Consider climate zone, sun exposure, wind-driven rain, and microclimates when choosing between breathable and waterproof options. Prep and compatibility remain essential to prevent trapped moisture.
UV Exposure Effects
Ultraviolet (UV) radiation from the sun breaks down binders in stucco coatings over time. This degradation accelerates fading and chalking, reducing the coating’s lifespan.
Chalking is evident by a fine powdery residue on the surface after initial exposure to sunlight. Fading occurs when the color fades or changes hue due to UV damage.
To mitigate these effects, choose coatings with UV-resistant formulations. Inspect product labels or datasheets for this information. In areas with high UV exposure, prioritize products with robust UV protection.
Humidity and Moisture Exposure
High ambient humidity and driving rain can lead to moisture trapping in stucco coatings. This requires a balance between vapor management (allowing moisture egress) and water repellency.
In humid conditions, condensation or water stains may appear on the surface. These signs indicate that the coating is not managing moisture effectively.
To address this, evaluate coatings’ permeability (vapor transmission rate) on their datasheets. In areas prone to high humidity and driving rain, consider products offering balanced vapor management and water repellency. Promptly address any moisture issues; recoating with an appropriate product may be necessary.
Freeze–Thaw Cycles and Thermal Movement
Repeated temperature swings, such as those experienced in freeze-thaw cycles, can cause cracking and loss of adhesion in stucco coatings. This is due to the expansion and contraction of the substrate during these cycles.
Cracks or delamination may appear during or after freeze-thaw periods, indicating that the coating cannot accommodate the thermal movement.
To mitigate this, choose flexible coatings with suitable elongation (stretchability) to withstand thermal movement. Check product datasheets for flexibility and elongation information. In areas with frequent freeze-thaw cycles, prioritize coatings designed to handle these conditions.
Choosing the Right Coating for Your Building and Climate
Start with substrate condition and preparation needs, including any repairs and priming requirements before coating selection. A clean, stable base supports the chosen moisture strategy and long-term performance. Aligning repairs with a breathable or waterproof approach helps avoid future failures.
Evaluate how the wall assembly behaves in your climate and exposure, then set performance goals for moisture tolerance and durability. Use a decision framework to compare coating types, patch testing, and warranty terms before installation. Budget and aesthetics also influence the final choice and lifecycle planning.
Assessing Substrate and Existing Finishes
Before selecting a stucco coating, thoroughly inspect your building’s exterior walls to assess the condition of the substrate and any existing finishes. This step is crucial for ensuring that your chosen coating can effectively protect and enhance your structure.
Inspect for:
- Cracks or fissures in the masonry or drywall
- Salt deposits, which may indicate previous moisture issues
- Previous coatings that might affect adhesion or performance
- Structural moisture pathways that could compromise your coating’s effectiveness
Repair any cracks and remove loose or incompatible finishes before applying a new coating. Consider using a primer or moisture barrier to prepare the surface, following manufacturer guidelines.
Matching Permeability to Wall Assemblies
When choosing a stucco coating, it’s essential to match its permeability rating with your building’s wall assembly to ensure effective moisture management. The goal is to allow the wall to dry both inward and outward as needed.
Evaluate:
- The vapor-permeance of your substrate (drywall or masonry)
- The insulation type and its perm rating
- The weather barriers’ ability to shed water while allowing vapor diffusion
For complex wall assemblies, consult product data sheets or consult with a building scientist to determine the most suitable coating. Breathable coatings allow moisture to escape but may require compatible materials throughout the assembly. Waterproof coatings block moisture but can trap it if not properly managed within the assembly.
Considering Lifecycle Costs and Warranties
When comparing stucco coating options, consider both initial material and labor costs as well as long-term maintenance and repair risks. Understanding these factors will help you make an informed decision that balances upfront expenses with future investments.
Weigh:
- The initial cost of the coating and its application
- The expected frequency of recoating or touch-ups
- The potential for repairs due to moisture damage or other issues
- The warranty terms, including coverage duration and what’s included
While breathable coatings may have a higher upfront cost, they often require less frequent maintenance and offer better long-term durability. Waterproof coatings might be cheaper initially but could lead to more frequent repairs if not properly managed within the wall assembly.
Preparation, Application Best Practices, and Common Mistakes
Begin with thorough surface cleaning, moisture assessment, and crack or efflorescence repair to create a sound base. Proper surface preparation minimizes moisture entrapment and coating failure. Do not skip steps that affect adhesion and long-term performance.
Follow best practices for weather window, mixing, and application thickness. Use the correct primers and topcoats for the chosen system, and monitor cure conditions to prevent moisture-related defects. Document any deviations from recommended procedures and inspect after curing.
Surface Preparation and Visual Inspection
Before applying any coating, ensure your surface is ready. Follow this checklist for thorough preparation.
- Clean the surface: Remove dirt, dust, and debris using a brush or broom. Inspect for signs of contamination like oil stains or mold.
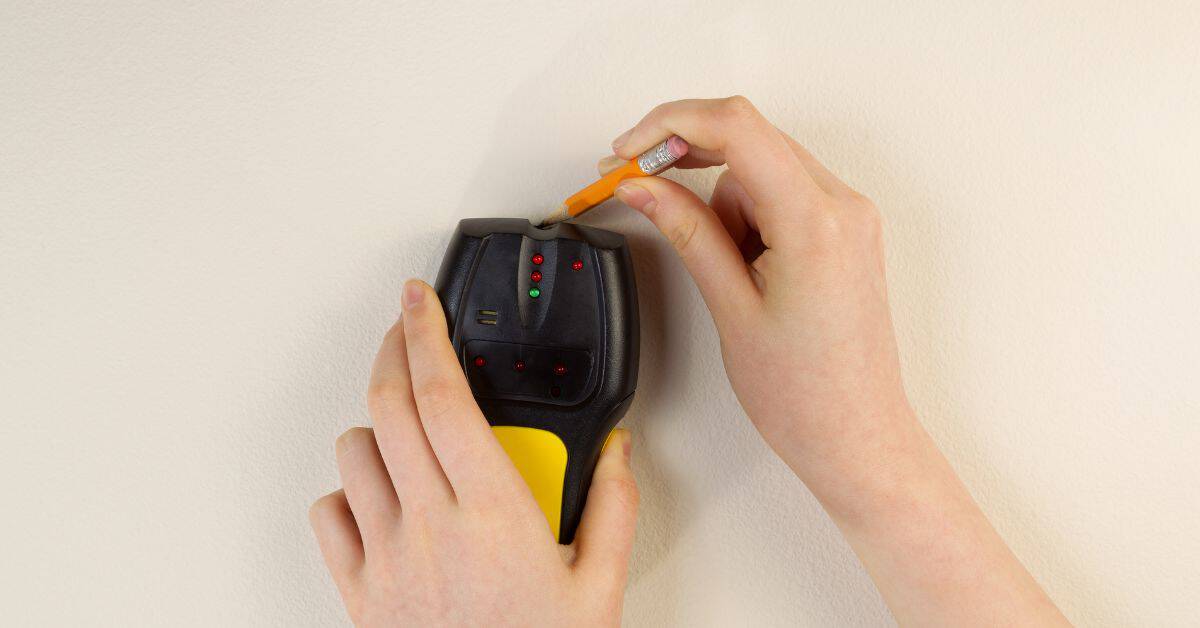
- Check for moisture: Use a moisture meter to test for excess dampness. Moisture levels should be below 15%.
- Repair cracks and chips: Fill gaps with an appropriate filler, ensuring they’re level with the surface.
- Remove efflorescence: Scrub off white powdery deposits using a wire brush or acid solution. Neglecting this can lead to coating failure.
- Inspect substrate: Ensure your surface is compatible (concrete, stucco, masonry). Check for signs of deterioration like crumbling or delamination.
- Test for soundness: Knock on the surface. A hollow sound may indicate instability beneath.
- Check weather conditions: Ensure temperature and humidity are within suitable ranges (50-90°F, 40-70% RH).
- Perform a moisture flush-out test: Wet the surface, let it dry, then re-test for moisture. If it’s still damp after 24 hours, wait longer or consider pre-sealing.
- Applying over damp substrates: This can trap moisture, leading to peeling or blistering. Always ensure your surface is dry before applying.
- Wrong primer choice: Match the primer to your coating type and substrate. Using the wrong one can affect adhesion and performance.
- Inadequate coverage: Apply coatings evenly, following manufacturer guidelines for coverage rates. Skipping this can result in patchy protection.
- Ignoring manufacturer conditions: Always follow application temperature, humidity, and other conditions specified on the product label.
General guideline: If unsure about any of these steps, consult manufacturer guidelines or seek professional advice.
Application Tips and Common Mistakes
To avoid coating failures, steer clear of these application pitfalls.
By avoiding these mistakes, you’ll ensure a longer-lasting, more effective coating.
Safety Precautions During Prep and Application
Prioritize safety throughout your project with these guidelines.
Wear appropriate PPE: This includes gloves, goggles, and a respirator for sanding or pressure washing to protect against dust and chemicals.
Contain work areas: Use plastic sheets or tape to contain dust and debris when sanding or pressure washing. This minimizes environmental exposure and keeps your workspace clean.
Follow SDS guidance: Always read the Safety Data Sheet (SDS) for each product you use. It provides crucial information on safe handling, storage, and disposal.
Tools, Materials Checklist and How to Read Product Specs
Assemble a practical set of tools and consumables for breathable and waterproof coatings, plus moisture meters and PPE. Organize the work area to maintain quality and safety throughout the project. Keep a simple log of materials used and batch numbers for reference.
Learn how to read product specs such as permeability, adhesion tests, and VOC statements. Compare labels and warranties to determine suitability for stucco, climate, and substrate condition. Use practical checks to verify breathability versus waterproofing needs before committing to a finish.
Tools and materials checklist
Before starting any painting or coating project, it’s crucial to gather the right tools and materials. This ensures a smooth process and a durable finish. Here’s a list of essentials for your task:
- Surface repair products: These are necessary to fix any imperfections on your surface before applying paint or coating. They include fillers, sanding spackle, and primers.
- Primers: Primers prepare the surface for painting by promoting adhesion and sealing the surface. Choose a primer that matches your project’s needs, such as oil-based for oily surfaces or latex for most walls.
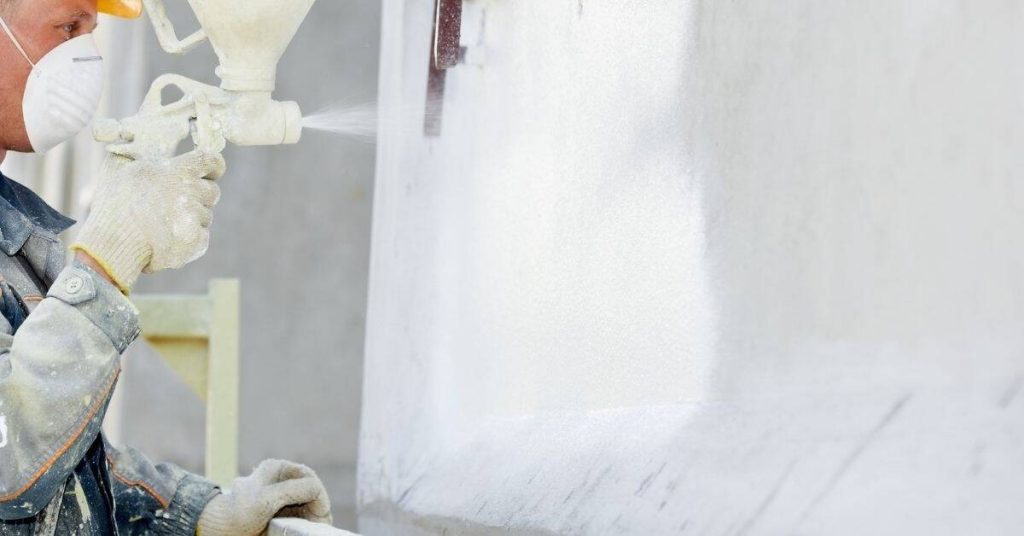
- Applicators: You’ll need brushes, rollers, and possibly spray equipment depending on your project. For best results, use high-quality applicators suited to the paint or coating you’re using.
- Test or monitoring tools: These help ensure your surface is dry and ready for painting. A simple moisture meter can detect dampness in walls, while a tackiness test can check if your primer is ready for paint.
- Safety equipment: Always prioritize safety. This includes gloves, goggles, and respiratory protection when using certain products.
- Tape measure: Essential for measuring surfaces accurately to ensure you buy the right amount of materials.
- Drop cloths or canvas: Protect your floor and furniture from paint spills. These can be bought or rented, depending on your preference.
Pro tip: When combining tools, consider their compatibility. For instance, use a primer that’s compatible with your chosen paint to ensure optimal adhesion and durability.
Reading datasheets and permeability terms
Before starting any painting or coating project, it’s crucial to understand the product specifications. This checklist helps you navigate through datasheets and ensures you’re using the right products for your substrate and environment.
- Check Permeability/MVTR: Look for permeability (perms) or Moisture Vapor Transmission Rate (MVTR) values. These indicate how much moisture a coating allows to pass through. Confirm it matches your substrate’s requirements.
- Verify Recommended Substrates: Ensure the product is designed for your specific surface, such as concrete, wood, or metal. Check if primer or special preparation is needed.
- Temperature and Humidity Limits: Confirm that the application temperature and humidity conditions fall within the product’s specified range to ensure proper adhesion and curing.
- Third-Party Test Claims: Verify any third-party test claims, such as ASTM or EN standards, to confirm the product meets required performance criteria.
- VOC Content: Check the Volatile Organic Compounds (VOC) content to ensure compliance with local regulations and indoor air quality standards.
- Pot Life and Open Time: Note these values to plan your work efficiently. Pot life is how long a mixed product remains usable, while open time is when you can still recoat without creating visible lines of demarcation.
- Safety Precautions: Review the safety section for proper handling, storage, and disposal instructions. Always wear appropriate personal protective equipment (PPE).
- Cleanup Instructions: Check how to clean tools and surfaces after application to maintain their longevity.
Quick rule: Always prioritize substrate compatibility, permeability ratings, and local climate conditions when selecting coatings. Regularly check product datasheets for updates or changes in specifications.
Environmental and Regulatory Considerations
Before starting your project, use this checklist to ensure you’re compliant with environmental regulations and local building codes. This will help you avoid costly mistakes and maintain a safe work environment.
- Check VOC Regulations: Verify that your paint and other materials comply with local volatile organic compound (VOC) limits. Check product labels or manufacturer websites for VOC content information.
- Look for Green-Building Flags: Ensure products are certified by recognized green-building programs like LEED, BREEAM, or EcoLogo. These certifications indicate the product meets certain environmental standards.
- Review Red List and Product Transparency: Check if your materials contain any substances on the Living Building Challenge’s Red List. Also, ensure products provide clear information about their ingredients and manufacturing processes.
- Check Local Code Requirements: Consult with your local building department to confirm you’re following all relevant codes and standards for your specific project.
- Ensure Fire Resistance: Check that your materials meet the required fire resistance ratings, especially for interior finishes in multi-family dwellings or public spaces.
- Consider Moisture Management: In humid climates or damp-prone areas, prioritize breathable materials to prevent moisture buildup and potential mold growth. Feel the surface before painting; it should be dry, clean, and free of debris.
- Protect Against Weather Damage: If installing in frequent heavy rain or high wind areas, consider waterproof coatings for better protection. Consult product datasheets to ensure they’re suitable for your specific climate conditions.
- Safety Data Sheets (SDS): Review SDS for each product to understand potential hazards, proper handling and storage, and emergency procedures in case of accidents.
Quick rule: Always prioritize safety and environmental responsibility by following local regulations and choosing products with clear certifications and transparency.
Maintenance, Inspection, and When to Hire a Professional
Establish a routine inspection plan that focuses on coating integrity, moisture indicators, and substrate condition with seasonal timing. Document findings to track changes over time. Regular checks help catch problems early before they escalate.
When signs of coating failure appear or moisture issues persist, consult a qualified contractor with stucco experience. Request product data sheets and warranty details, and compare multiple estimates. Consider safety, permits, and appropriate weather windows for any professional work.
Routine Inspection and Upkeep
Maintain your stucco coating’s longevity and prevent moisture issues with regular inspections. Check for the following every 6 to 12 months.
- Surface Cleanliness: Remove dirt and debris using a mild detergent and soft brush to prevent moisture trapping and premature deterioration.
- Minor Cracks: Seal minor cracks with a compatible sealant to prevent water intrusion and further damage.
- Stains or Discoloration: Inspect for stains, discolorations, or efflorescence (white salt deposits), which may indicate moisture problems beneath the surface.
- Cracking or Soft Spots: Check for cracks or soft spots on the surface that may signal underlying issues requiring attention.
- Delamination or Peeling: Inspect for signs of delamination (peeling) from the substrate, which could indicate trapped moisture.
- Moss or Mildew: Remove any moss or mildew growth promptly to prevent moisture ingress and potential damage.
- Coating Condition: Inspect the overall condition of the coating. Peeling, blistering, or severe cracking may indicate a need for re-coating or professional intervention.
- Timely Re-coating/Re-sealing: Re-coat or re-seal your stucco every 5 to 10 years, depending on climate and exposure, to maintain its protective barrier.
Quick rule: Address any surface issues promptly to prevent moisture ingress and costly repairs.
Red Flags That Suggest Trapped Moisture
Certain signs can indicate trapped moisture behind your stucco, which may lead to serious damage if left unaddressed. Inspect for these red flags regularly.
- Persistent Staining: Stains that persist after cleaning could indicate a moisture problem beneath the surface.
- Efflorescence: White salt deposits on the surface may signal excessive moisture behind the stucco.
- Blistering or Bubbling: These can indicate trapped moisture beneath the coating, causing it to lift and bubble.
- Recurring Rot: If you notice recurring rot or decay in wood framing or other materials behind the stucco, this could be a sign of chronic moisture intrusion.
- Unusual Musty Odors: Musty odors indoors can indicate hidden moisture issues and potential mold growth.
- Visible Coating Failure: Peeling, severe cracking, or other visible signs of coating failure may indicate trapped moisture behind the stucco.
- Damp Patches: Persistent damp patches on the surface could signal a moisture problem beneath the coating.
Quick rule: If you notice any of these signs, hire a professional for further investigation and remediation to prevent costly damage and health hazards.
Selecting a Contractor and Warranty Tips
When hiring a professional for stucco coating services, follow this checklist to ensure you choose a qualified contractor with a solid warranty.
- Verify Licenses/Insurance: Ensure the contractor is licensed and insured to protect both parties from potential liabilities.
- Obtain Written Estimates: Get multiple written estimates to compare costs and services.
- Stucco Coating Experience: Vet firms with proven experience in stucco coating systems. Request references or case studies to verify their expertise.
- Product Data Sheets: Ask for data sheets on the products they intend to use, including permeability ratings and other relevant specifications.
- Warranty Details: Review both product and labor warranties carefully. Ensure they cover a sufficient duration and understand what is and isn’t covered.
- Review Past Projects: Inspect the contractor’s past work to assess their quality of service and craftsmanship.
Quick rule: Never hire a contractor without proper verification of their credentials, understanding of the warranty, and confidence in their expertise with stucco systems.
Conclusion
Choosing the right coating is a practical form of moisture management that protects the structure, preserves appearance, and reduces costly repairs. By prioritizing breathable options where appropriate and using waterproof or low-perm products only where they suit the climate and surface, you build resilience against trapped moisture and weather-related damage.
Take this practical, action-focused guide as your checklist: inspect the wall surface and surrounding conditions, confirm the coating’s permeability and suitability for stucco, perform a small-area test in a discreet location, follow the manufacturer’s prep and cure instructions, apply within the recommended weather window, maintain proper substrate dry times, and inspect after completion for uniform coverage and any signs of seepage or peeling. Keep safety at the forefront: work in good light, use protective gear, and verify ventilation when working with coatings or solvents. If in doubt, verify product specs, local rules, and label warnings before proceeding.
Common mistakes to avoid are coating over a compromised substrate or overloading one coat, ignoring substrate preparation or temperature and humidity limits, and skipping a small-area test to catch issues early. Avoid applying coatings in rain, extreme heat, or when dew is likely to form, and never seal around openings without ensuring proper flashing and drainage are in place. A simple safety rule is to treat each step as reversible only if the product and surface permit it; otherwise plan for minimal, controlled variation and document results.
If the project involves complex conditions, persistent moisture, or uncertain staging, consider bringing in a professional before you push ahead. A measured approach saves time and reduces risk of damage. With careful planning, testing, and adherence to product instructions, you can achieve durable protection that lasts and still looks right for years to come.
FAQ
How does moisture management influence breathable vs waterproof coatings for stucco?
Breathable coatings allow some moisture vapor to escape from the wall, reducing the risk of trapped moisture. Waterproof or low-perm coatings slow or block moisture movement, which can help with leaks but may trap moisture if the wall isn’t dry enough. Check the product label and manufacturer guidance for the tested perm rating and suitability for stucco applications.
What paints or coatings tend to perform best in humid climates for stucco?
Look for coatings labeled for stucco that emphasize moisture management and flexibility. In humid climates, products with breathability and adequate UV resistance tend to hold up better. Always verify compatibility with your stucco type and follow the manufacturer’s application instructions.
How do temperature swings affect painted stucco, and what should I look for in coatings?
Extreme temperature changes can cause expansion and contraction, which stresses coatings. Choose paints or coatings specified for exterior use on stucco with good film flexibility. Check the product datasheet for temperature guidance and any required curing conditions.
How should I maintain and clean exterior stucco paint to extend its life?
Regular inspections and gentle cleaning help prevent moisture problems and staining. Use a soft brush or low-pressure wash recommended by the coating manufacturer, avoiding high-pressure methods that can damage the surface. Follow label directions for cleaning frequency and compatible cleaners.