
Introduction
Block surface prep for paint is the process of cleaning and treating concrete block surfaces to remove efflorescence, manage alkalinity, and ensure the primer will adhere properly.
This work helps prevent staining and peeling by addressing the minerals that can migrate to the surface. Start by removing visible efflorescence with a brush and water, and follow with a gentle cleaning. Then assess and address surface alkalinity as directed by product instructions, and choose a masonry primer that is compatible with both the blocks and the intended paint.
Key takeaways
- Inspect block for efflorescence, salt deposits, and moisture patterns before painting.
- Clean surfaces with appropriate masonry cleaner and rinse thoroughly; dry before primer.
- Remove loose mortar and repair cracks to ensure stable substrate.
- Test surface alkalinity, then neutralize high pH with recommended prep steps.
- Choose masonry-compatible primer that bonds to cement blocks and blocks porosity.
- For paint, select breathable, masonry-grade coatings to handle alkalinity and moisture.
- Plan safety steps, ventilation, PPE, and budget for materials and labor.
Table of Contents
- Introduction
- Key takeaways
- Surface Assessment and Diagnosis
- Tools and Materials Checklist
- Removing Efflorescence and Salt Deposits
- Cleaning, Repair, and Preparing the Surface for Paint
- Testing and Neutralizing High Alkalinity
- Primer Selection and Compatibility with Cement Block
- Ensuring Proper Adhesion and Paint Application
- Safety, Workflow Planning, Budgeting, and Common Mistakes
- Conclusion
- FAQ
Surface Assessment and Diagnosis
Identify efflorescence versus salt migration by noting powdery white deposits that flake versus persistent mineral staining that reappears after cleaning. Quick on-site checks include gently scraping a small area with a coin or scraper; if it flakes, active moisture is likely present. Also assess moisture sources and ingress pathways to map capillary rise versus bulk water intrusion.
Evaluate masonry alkalinity and substrate readiness to anticipate adhesion risks and plan simple tests for pH or indicators, knowing that moisture will reappear if not controlled. Inspect surface condition and coatings compatibility, including laitance, dust, cracks, and joint deterioration, to decide if cleaning, etching, or profiling is needed before coating. Skipping active efflorescence identification can lead to recurring issues; if active, remediate moisture first, otherwise clean and apply appropriate primer after addressing moisture.
Identifying Efflorescence vs Other Stains
Before starting any remediation work, it’s crucial to accurately identify the nature of the stains on your masonry surface. Efflorescence appears as a white, powdery deposit, often found on the surface and in joints.
To differentiate efflorescence from other stains:
Inspect under different lighting conditions. Efflorescence’s white color may appear differently under natural or artificial light compared to other stains like mildew or mineral deposits. Perform a simple touch test. Efflorescence is powdery and will rub off easily, while mildew or mineral staining won’t.
If the deposit flakes easily and reappears after cleaning, it indicates active moisture. Address the source of moisture before treating efflorescence to prevent recurrence.
Moisture Source Tracing
Identifying and addressing moisture sources is vital for preventing efflorescence, alkali issues, and paint failure. Here’s how to trace moisture sources:
Use a moisture meter or salt test to confirm the presence of water in walls and map likely capillary rise versus bulk intrusion.
Inspect exterior drainage, downspouts, moss growth, puddling, and interior humidity trends. Poor or damaged exterior drainage can lead to hydrostatic pressure buildup, causing moisture issues.
If exterior drainage is poor or damaged, repair or improve it before addressing efflorescence. Failure to address all moisture entry points may result in recurrent efflorescence and paint failure.
Structural and Mortar Evaluation
Before painting, it’s essential to check for any loose mortar, cracks, spalling, or other damage that could compromise paint adhesion or pose safety hazards. Here’s how to evaluate your masonry structure:
Gently tap suspect areas with a hammer. A hollow sound indicates potential voids or instability in the mortar or substrate.
Inspect for loose mortar, cracks, spalling, joint deterioration, and other defects. If significant damage is found, repair structural and mortar issues before proceeding with paint preparation to ensure optimal results and longevity of your paint job.
Tools and Materials Checklist
Tools, cleaners, primers, measurement tools, and PPE form a practical checklist for block surface prep. Distinguish hand tools from power tools, such as a hammer drill with a mixer for cleaner application, and mark which items require DIY or pro-grade options. Include basic PPE (gloves, eye protection) and respirator if acids are involved, plus drop cloths, brushes, and a caulking gun for sealants as needed.
Having the right kit supports effective salt and alkalinity remediation, and it clarifies what tasks best stay in a professional’s domain. Quick checks—feel the surface for grit and signs of efflorescence—help decide if mechanical removal or specialized cleaning is required. If efflorescence is light, mechanical brushing may suffice; if heavy or persistent, plan for professional equipment and techniques and verify primer compatibility with the treated surface to avoid future failures.
Cleaning agents and neutralizers
Before applying any paint or primer, it’s crucial to clean the concrete block surface thoroughly. This checklist helps you select the right cleaning agents for your specific needs.
- Detergents: Mild detergents are suitable for light dirt and dust. They won’t harm the surface but may not be effective against efflorescence or high alkalinity.
- Mild acids (e.g., muriatic acid): For efflorescence removal, use mild acids diluted according to manufacturer instructions. Be cautious as they can damage unprotected surfaces if left on too long.
- Phosphoric/mosap cleaners: High alkalinity often requires stronger cleaners like phosphoric or mosap cleaners. Always neutralize after using these.
- Proprietary salt removers: Some products are specifically designed to remove efflorescence and other salts. Follow manufacturer guidelines for use.
- Neutralizers (e.g., sodium bicarbonate): After using acid-based cleaners, neutralize the surface to prevent chemical reactions with subsequent coatings.
Quick rule: Always match the cleaner type to the surface condition. Incorrect cleaners can lead to ineffective cleaning or damage.
Test kits and measurement tools
Accurate testing is vital for understanding your block’s condition and ensuring effective treatment. Here are essential test kits and measurement tools:
- Moisture meters: Detect hidden dampness by measuring moisture content in the substrate. Ideal for tracing moisture sources.
- pH/alkalinity tests (strips/meters): Measure surface alkalinity to ensure it’s within paint’s acceptable range (typically pH 4-9).
- Surface profile testers: Verify the surface profile is suitable for paint adhesion. Rentable, with varying accuracy levels.
- Visual aids (magnifying glasses, flashlights): Inspect surfaces closely to identify cracks, holes, or other defects.
Pro tip: Always follow manufacturer instructions and ensure tools are in good working condition for accurate results.
Repair and application tools
Selecting the right tools ensures proper surface preparation, patching, and paint application. Here’s a checklist of essential tools:
- Trowels (handheld, square-notched): Apply and smooth repair materials like mortar or joint compound.
- Grinders (angle, orbital): Remove loose material, prepare surfaces for patching, or apply primers/paints with specialized attachments.
- Brushes (stiff-bristled, angled): Apply cleaners, primers, and paints to hard-to-reach areas or small surface patches.
- Rollers (9-inch, 18-inch, extension poles): Cover large surface areas quickly and evenly with paint or primer. Choose roller covers based on nap thickness and material.
- Sprayers (airless, HVLP, high-volume): Apply paints or primers over large, complex surfaces efficiently. Requires proper setup, technique, and safety precautions.
Quick rule: Choose tools based on the task at hand, surface area, and complexity to ensure optimal results.
Removing Efflorescence and Salt Deposits
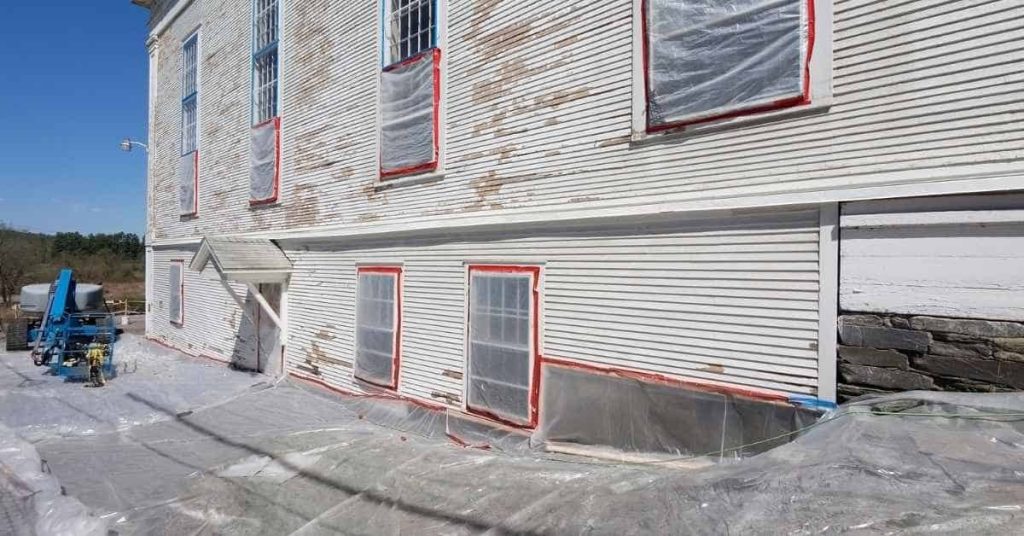
Efflorescence removal combines mechanical cleaning with chemical treatment to remove salt deposits and reduce future whitening. Use mechanical methods such as wire brushing or rotary scrubbing for lighter stains, and reserve chemical cleaners or weaker acids for heavier deposits, always following surface containment, masking, and PPE requirements; specify contact times and agitation per product instructions. Rinse thoroughly and repeat as needed, and use clear criteria such as removal of powdery salt and absence of ongoing whitening to judge when the surface is ready, while addressing the moisture source to prevent recurrence.
Why it matters: proper removal reduces paint adhesion issues and long-term moisture problems. A DIY reader gains safer choices: both methods have pros and cons for different severities, and careful rinsing and neutralization or disposal of rinse water are part of the process; consider moisture sources like leaks or high humidity and test moisture before coating. Use simple checks like a water break test or visual/moisture cues to confirm completion, and know when to call a professional if deposits persist.
Mechanical removal techniques
For light efflorescence, mechanical methods can be effective. Use a stiff-bristled brush or a rotary scrubber to remove the powdery deposits.
Caution: Avoid using high-pressure washers as they can damage the block face. Similarly, do not use harsh abrasives that may scratch the surface.
For more stubborn deposits, you can lightly abrade the surface with a suitable tool like a wire brush or a soft-bladed scraper. Always be gentle to prevent damaging the substrate.
Chemical treatments and rinsing
For heavier efflorescence, chemical treatments may be necessary. Mild acid washes or commercial salt removers can help dissolve the deposits.
Note: Always follow manufacturer instructions for safe handling and application. Wear appropriate PPE and ensure proper ventilation.
After application, allow the solution to sit as directed, then agitate with a brush if necessary. Thoroughly rinse the surface with clean water, ensuring all residue is removed. Neutralize any acid used with a suitable base (like baking soda) to prevent further chemical reactions.
Post-Efflorescence Removal Painting Timing
After treating efflorescence, confirm the substrate is stable and salt-free prior to priming. Conduct a simple test by securing a piece of plastic over the treated area for 24 hours.
If condensation appears on the underside of the plastic, moisture might still be present. Allow the surface to dry fully, monitoring with a moisture meter as needed.
Tip: Before applying primer, test a small, inconspicuous area first to verify compatibility and allow adequate drying time before painting.
Cleaning, Repair, and Preparing the Surface for Paint
Assess and document the surface condition, noting efflorescence, cracking, spalling, and moisture indicators. If efflorescence is present, apply calcium carbonate remover, brush gently, and rinse. Ensure the surface is dry before repairs.
Check pH on the masonry and verify moisture or humidity to determine primer compatibility, and address moisture sources with adequate drying time. Perform repairs to create a uniform substrate that holds primer and paint without differential absorption, and note that skipping efflorescence removal can lead to paint delamination. Use visual and tactile checks and basic adhesion tests to confirm readiness, and look for a surface that feels cool and dry to the touch.
Repairing cracks and repointing
Before applying primer and paint, it’s crucial to address any cracks or degraded joints in your masonry surface. This ensures long-term stability of the substrate before coating.
Cracks: If cracks are wide or deep, use appropriate crack filler or compatible mortar. Apply with a trowel, ensuring proper bonding and leveling. Allow it to cure according to manufacturer’s instructions before proceeding.
Joints: If joints are degraded, repoint using matching or compatible mortar. Remove old mortar with a chisel, then apply new mortar, packing it firmly into the joint. Strike it off smooth and allow it to cure. Reapply and level repair materials if not properly bonded or cured.
Surface profile and roughness
To achieve the recommended profile for primer adhesion, you may need to adjust the surface texture of your masonry. Follow manufacturer’s guidelines for surface preparation.
Smooth or glossy surfaces: Consider abrading or acid-etching to increase roughness. This can be done using sandpaper or a chemical etcher, respectively. Ensure all residue is removed after treatment.
Existing texture desired: Retain the existing texture, ensuring it’s clean and sound. Remove any loose material with a wire brush or stiff-bristle broom.
Visual checkpoints for readiness
Before priming your masonry surface, perform the following visual checks to ensure it’s ready:
- No loose residue: Inspect the entire surface for any remaining dirt, dust, or debris. Remove with a brush or vacuum.
- Consistent color: Check for any discoloration or stains that may indicate underlying issues. Address these before priming.
- Dry surface: Ensure the masonry is completely dry to the touch. Moisture can cause primer failure.
- Sound structure: Look for any signs of damage, such as crumbling or spalling. Repair as necessary.
- Even texture: Confirm that the surface has a consistent roughness across its entirety.
- No efflorescence: Check for white salt deposits, which indicate moisture issues. Address these before priming.
- No active leaks or moisture sources: Inspect for any signs of water intrusion or dampness.
- Properly repaired cracks and joints: Ensure all repairs are level, properly bonded, and cured.
Quick rule: If any issues are found during these checks, re-clean or re-prepare the affected areas before proceeding with priming.
Testing and Neutralizing High Alkalinity
High alkalinity on masonry can affect primer and paint performance, so test the surface pH and interpret what the readings mean for coating choices. Use practical pH testing Options such as indirect color-indicator tests, digital meters, or simple strips, sampling from representative locations after cleaning and re-testing to confirm stability. If readings indicate elevated alkalinity, choose safe, manufacturer-supported neutralization approaches and verify the surface has stabilized before applying primer.
Why this matters: even small residual alkalinity can cause poor adhesion or early coating failure, so a careful sequence of testing, neutralizing, and re-testing helps prevent future problems. A quick on-site cue is white powdery efflorescence or salt deposits, which should prompt testing and possible treatment, followed by a moisture check and final pH re-test to confirm readiness. Common mistakes include incomplete rinsing after neutralization or acid wash; ensure complete removal to avoid residual alkalinity and perform a small adhesion test or skim coat to confirm primer compatibility before full coating.
How to perform a pH test on masonry
To accurately assess the alkalinity of your masonry surface, follow these steps:
1. Ensure the surface is clean, dry, and free from contaminants. Refer to Cleaning, Repair, and Preparing the Surface for Paint if necessary.
2. Use pH strips or a digital pH meter. Test multiple spots across the surface to account for variability in alkalinity levels. Moisten the test area slightly with distilled water before applying the strip or probe.
3. Compare the color of the strip to the provided chart, or read the display on your pH meter. If the reading exceeds 8.5, consider additional cleaning or neutralization steps.
Neutralization options and verification
To effectively neutralize high alkalinity on your masonry surface:
1. Use mild acids or dedicated neutralizers, following manufacturer guidelines for dilution, application, and contact time. Common products include muriatic acid (hydrochloric acid) or professional-grade masonry cleaners.
2. Apply the neutralizer evenly across the surface using a sprayer or brush. Allow it to sit on the surface as directed by the manufacturer.
3. Rinse thoroughly with clean water, ensuring no residue remains. Re-test the surface using your preferred pH testing method to confirm stabilization before proceeding with priming. If pH remains above acceptable threshold after treatment, consider additional cleaning or consulting a professional.
When to consult a professional
Certain conditions may require the expertise of a professional masonry contractor or painter. Inspect your surface for:
1. Persistent high alkalinity, despite attempted neutralization and cleaning efforts.
2. Active salt migration, indicated by white, powdery deposits that reappear after removal.
3. Structural moisture issues, such as efflorescence or dampness, which may suggest underlying water penetration problems.
If any of these conditions are present, consult a professional immediately to address the underlying causes and prevent further damage. Prompt intervention can save you costly repairs and ensure optimal paint performance.
Primer Selection and Compatibility with Cement Block
Primers for cement block must seal a porous surface, manage alkalinity, resist salt efflorescence, and provide adhesion for the topcoat. Choose from masonry primers, breathable primers, bonding primers, or elastomeric primers based on block history and moisture behavior, not brand names. Match the primer to efflorescence history, surface porosity, and the intended paint to ensure compatibility and durability.
Before applying, clean the surface and remove salt deposits as needed; if the block feels damp, wait until it is dry. An experienced installer checks for signs of efflorescence or moisture and confirms readiness with simple tests. If efflorescence is present, remove salt deposits using a wire brush and water, then rinse and let dry. A common mistake is primer peeling due to inadequate preparation; remove existing paint and re-prep the block.
Choosing primers for high-salt or high-alkali surfaces
When dealing with cement block surfaces that have a history of salt efflorescence or high alkalinity, selecting the right primer is crucial to prevent paint failure. Primers designed for such conditions must resist salt migration and chemical attack.
Prioritize primers with high resistance to salt and alkali. These primers are formulated to seal porous surfaces, manage alkalinity, and resist salt efflorescence. They provide adequate surface adhesion for the chosen topcoat and help prevent moisture-related issues.
If efflorescence or high alkalinity is present, choose a primer with enhanced resistance to salt migration and chemical attack. This will help ensure that your paint job lasts and performs as expected.
Primer adhesion vs vapor permeability
Balancing strong adhesion with breathability is key when priming cement blocks. This ensures trapped moisture can escape without causing paint failure, which often manifests as peeling or blistering.
Opt for primers that offer good adhesion and moderate to high perm ratings (vapor permeability values). These primers seal the surface while allowing moisture vapor to pass through, preventing buildup that could compromise your paint job.
If your surface is highly porous or prone to moisture, choose a breathable primer with adequate adhesion. This will help prevent paint peeling and ensure long-term performance of your paint job.
Testing primer compatibility
Before applying primer to the entire surface, it’s crucial to test its compatibility with both the substrate and topcoat. This helps avoid costly mistakes and ensures a successful paint job.
Perform small-area adhesion trials by applying primer to an inconspicuous part of the surface. Observe the test area for any signs of incompatibility, such as blistering, discoloration, or adhesion loss, during the cure time specified by the manufacturer.
If the test area shows no signs of incompatibility, proceed with full primer application. However, if issues arise, consult the manufacturer’s guidelines or a professional painter before proceeding.
Ensuring Proper Adhesion and Paint Application
Ensure the masonry surface is ready for paint by addressing efflorescence, assessing alkalinity, and cleaning thoroughly. Use a compatible primer and follow proper mixing, thinning, and application methods, with adhesion tests before topcoating. Check surface conditions and plan for any needed etching or cleaning to maximize bond.
Understanding environmental limits, dew point, and substrate moisture helps prevent peeling and failures. If efflorescence is present, clean and allow the surface to dry completely before painting, and if alkalinity is high, choose a primer designed for high-alkalinity surfaces. Practical checks like wiping with a damp cloth to test for grit, and confirming curing times and recoat windows, help DIYers catch issues early and fix common adhesion problems such as peeling by scraping, cleaning, and repriming.
Application techniques (brush, roller, sprayer)
Each application method has its advantages and drawbacks for block surfaces.
Brush: Ideal for intricate details and edges. It provides precise control but can be time-consuming for large areas. To avoid runs or thin coverage:
- Use a high-quality, angled brush with synthetic bristles for better paint flow.
- Load the brush evenly to prevent drips and maintain consistent coverage.
- Apply paint in ‘W’ or ‘M’ patterns, working from one side of the area to the other.
Roller: Efficient for large, flat surfaces. It covers quickly but may leave visible roller marks. To avoid overspray and maintain even coverage:
- Use a high-quality, short-nap roller cover suitable for your paint type.
- Load the roller evenly by rolling it onto a paint tray with an even distribution of paint.
- Apply paint in ‘M’ or ‘N’ patterns, working from one side of the area to the other. Maintain consistent pressure and speed.
Sprayer: Provides a smooth, even finish but requires proper setup and technique. It can be messy and overspray is a common issue. To minimize overspray and maintain thin coats:
- Use a high-quality paint sprayer suitable for your paint type.
- Set the sprayer’s nozzle to an appropriate size (usually between 8-12) for block surfaces.
- Apply paint in even, side-to-side motions, maintaining consistent distance from the surface. Start and end each pass slightly off the edge of the area to avoid overspray.
Moisture Control and Timing
Before applying any paint, ensure both your substrate (the surface you’re painting) and its surroundings are dry. Moisture can significantly impact adhesion and the overall lifespan of your paint job.
Assess moisture: Feel the surface; if it’s cold or damp to touch, or shows signs of dew, delay painting. Professionals often use a moisture meter for accurate readings, but visual cues can also help.
Account for time of day and weather conditions. Painting in direct sunlight or high temperatures may cause paint to dry too quickly, leading to poor adhesion. Conversely, painting in shaded areas or during cooler periods might result in slower drying times, which can also affect adhesion.
Delay painting if: the surface feels cold or damp to touch, or if there’s a chance of rain within the next 24 hours. If paint starts peeling due to moisture, strip and reprime the surface before repainting for proper adhesion.
Post-application inspection and maintenance
After applying your paint or coating, use this checklist to ensure proper adhesion, uniformity, and to identify any potential issues before they become major problems.
- Check Adhesion: Gently press and pull on the paint film with your fingers. Look for any signs of lifting or peeling.
- Inspect Uniformity: Check for any missed spots, uneven coverage, or visible brush/roller marks.
- Efflorescence Check: Inspect the surface for any white, powdery deposits. These can compromise paint adhesion and durability.
- Moisture Check (if applicable): Ensure there’s no visible moisture or dampness on the surface, as this could lead to adhesion failure.
- Check for Bubbles: Inspect the painted surface for any bubbles or blisters. These indicate trapped air or moisture beneath the paint film.
- Inspect Edges and Corners: Ensure proper coverage and adhesion in these areas, as they are often prone to missed spots or peeling.
- Check for Cracking or Peeling: Inspect the surface for any signs of cracking or peeling paint. This could indicate a problem with the substrate or the paint itself.
- Verify Drying Time: Ensure the painted surface has dried completely before subjecting it to traffic, touch-ups, or additional coats.
Quick rule: Always perform a thorough post-application inspection. Address any issues promptly to prevent minor problems from turning into costly rework.
Safety, Workflow Planning, Budgeting, and Common Mistakes
Key safety and risk controls include proper PPE, ventilation, fall protection where needed, handling of chemicals, dust control, and having MSDS references on hand. Plan the workflow around high‑risk steps like dust generation, wet work, and chemical primers, with mitigation tactics and permit considerations identified early. The task sequence prioritizes surface assessment for efflorescence and alkalinity, cleaning and dusting, moisture or alkali testing, spot treatments, primer compatibility checks, then actual priming and painting, followed by cure and clean‑up.
This approach supports realistic budgeting and planning by outlining material needs, safety gear, coatings, cleaners, potential grinding tools, and rough labor time estimates, while highlighting weather or room conditions and a contingency fund. For DIY readers, understanding surface condition checks and testing protocols for efflorescence, alkalinity, and primer compatibility helps reduce rework. A simple on‑site moisture check and a rule to delay priming if moisture exceeds the product’s acceptable threshold prevent premature coating failures and poor adhesion.
Safety Precautions and PPE
Prioritize safety when preparing block surfaces for painting. Wear appropriate Personal Protective Equipment (PPE) to prevent injuries and chemical exposure.
Chemical handling: Use gloves, goggles, and protective clothing. Always refer to Material Safety Data Sheets (MSDS) for specific product guidelines.
Pressure washing and grinding: Wear non-slip shoes, safety glasses, and hearing protection. Ensure proper ventilation and use respiratory protection when handling chemicals or grinding surfaces.
Project Planning and Budgeting Tips
Effective planning ensures efficient use of resources and time. Break down your project into manageable tasks, estimate labor and material costs accurately, and allocate contingency funds.
Task sequencing: Start with surface assessment for efflorescence/alkalinity, followed by cleaning, moisture/alkali testing, spot treatments, primer compatibility checks, priming/painting, and finally cure and clean-up.
Budgeting: Factor in task complexity, duration, potential delays, safety gear, PPE, coatings/primers, cleaners, grinding tools if needed, labor time estimates, weather/room conditions, and a contingency fund for unexpected expenses.
Common Mistakes and Troubleshooting
Avoid these frequent errors to prevent failures and rework. Address any signs of trouble promptly.
- Painting over active salts: Neutralize, clean, and test the surface before priming to avoid poor adhesion and peeling.
- Inadequate drying: Allow sufficient cure time between surface preparation steps and painting to prevent premature failure of the finish.
- Wrong primer choice: Ensure primer compatibility with existing surfaces and alkalinity levels to achieve optimal adhesion and performance.
- Skipping surface prep steps: Thoroughly clean, test, and treat surfaces before priming to ensure a durable paint job.
Regularly inspect your work in progress and address any issues promptly to maintain the quality of your project.
Conclusion
With the surface properly assessed, treated, and primed, block walls will resist moisture and paint failures, delivering a durable, even finish and safer, longer-lasting results. The gains come from thoughtful prep, careful testing, and adherence to primer compatibility and application guidelines.
Follow this practical sequence: verify the wall for efflorescence and alkaline conditions, remove deposits, clean and repair as needed, test for high alkalinity and neutralize where required, select a compatible primer, and confirm adhesion before applying finish coats. Proceed in small, repeatable steps, document what you did, and always prioritize safety, ventilation, and drying times as recommended by product labels.
Common mistakes to avoid include skipping a patch test or small-area trial, using the wrong primer for cement block, missing proper surface drying, and rushing the cleaning or repair work. Work methodically, wear protective gear, avoid excessive water on the block, and never apply paint over an unresolved alkalinity or loose material. Maintain a simple safety rule: if in doubt, test first, and when in doubt about the surface or primer compatibility, pause and review the manufacturer instructions or local guidelines.
If the block shows persistent moisture signs, extensive cracks, or repeated efflorescence after a single set of steps, consider bringing in a professional. When you proceed, you’ll finish with clearer, more predictable results and fewer costly touch-ups. Plan your workflow, stay within safe limits, and you’ll complete the project with confidence.
FAQ
How do I remove efflorescence from concrete blocks safely before painting?
Use a stiff brush and clean water to scrub the surface. If residue remains, rinse and allow the block to dry thoroughly before continuing. Avoid high-pressure methods that can damage the surface and always follow the product label for any cleaners you choose.
What should I do to neutralize or manage high alkalinity on block surfaces?
Test the surface to confirm alkalinity levels and follow the manufacturer instructions for any recommended neutralizing products. Use products only as directed and rinse well after treatment. If unsure, consult product labels or local guidance for appropriate steps.
Which primer is best for masonry blocks and why does it matter?
Choose a primer labeled for masonry or concrete blocks and compatible with your chosen topcoat. Primer helps improve adhesion and seals the surface. Always verify compatibility on the label or with the manufacturer instructions before application.
What type of paint works best on concrete blocks, and how should I prepare the surface?
Look for paints designed for masonry or concrete surfaces and follow the surface preparation steps you’ve outlined. Ensure the surface is clean, dry, and free of efflorescence or dust before applying primer and paint. Check product labels for any specific prep or application requirements.